释放双眼,带上耳机,听听看~!
首先看要实现的功能,如下图:
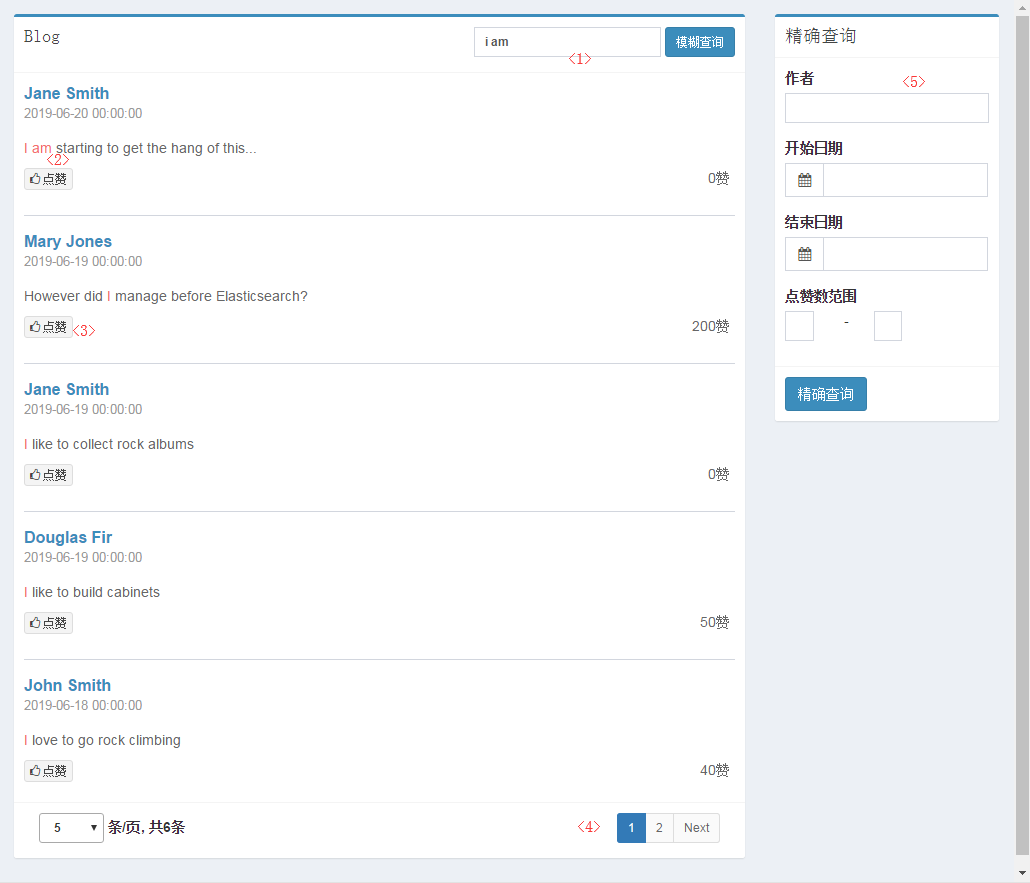
<1> 支持模糊查询
<2> 支持查询匹配的关键字高亮显示
<3> 支持点赞功能,即修改文档
<4> 支持查询结果分页
<5> 支持指定字段精确匹配;支持日期和数值类的范围查询
下面用ElasticSearch(以下简称ES)一一实现上述功能。
准备工作一、搭建ElasticSearch Windows测试环境
下载
因SpringBoot的starter还不支持最新版的ES,这里使用6.5.4版本
https://artifacts.elastic.co/downloads/elasticsearch/elasticsearch-6.5.4.zip
下载后解压缩,并执行bin/elasticsearch.bat即可启动ES
用浏览器打开 http://localhost:9200/ 如无意外,可看到类似以下信息
2
3
4
5
6
7
8
9
10
11
12
13
14
15
16
17
18
2 "name" : "sRdVRrd",
3 "cluster_name" : "elasticsearch",
4 "cluster_uuid" : "HRu5vExrQo6L_OkTtCb8eQ",
5 "version" : {
6 "number" : "6.5.4",
7 "build_flavor" : "default",
8 "build_type" : "zip",
9 "build_hash" : "d2ef93d",
10 "build_date" : "2018-12-17T21:17:40.758843Z",
11 "build_snapshot" : false,
12 "lucene_version" : "7.5.0",
13 "minimum_wire_compatibility_version" : "5.6.0",
14 "minimum_index_compatibility_version" : "5.0.0"
15 },
16 "tagline" : "You Know, for Search"
17}
18
** 准备工作二、创建一个SpringBoot Web应用**
依赖
2
3
4
5
6
7
8
9
10
11
12
13
14
15
16
17
18
19
20
21
22
23
24
25
26
27
28
29
30
31
32
33
34
35
36
37
38
39
40
41
42
43
44
45
46
47
48
49
50
2 <dependency>
3 <groupId>org.springframework.boot</groupId>
4 <artifactId>spring-boot-starter-web</artifactId>
5 <exclusions>
6 <exclusion>
7 <groupId>org.springframework.boot</groupId>
8 <artifactId>spring-boot-starter-logging</artifactId>
9 </exclusion>
10 </exclusions>
11 </dependency>
12 <dependency>
13 <groupId>org.springframework.boot</groupId>
14 <artifactId>spring-boot-starter-log4j2</artifactId>
15 </dependency>
16 <dependency>
17 <groupId>org.springframework.boot</groupId>
18 <artifactId>spring-boot-starter-thymeleaf</artifactId>
19 </dependency>
20
21 <dependency>
22 <groupId>org.springframework.boot</groupId>
23 <artifactId>spring-boot-starter-data-elasticsearch</artifactId>
24 </dependency>
25 <!-- https://mvnrepository.com/artifact/com.querydsl/querydsl-core -->
26 <dependency>
27 <groupId>com.querydsl</groupId>
28 <artifactId>querydsl-core</artifactId>
29 <version>4.2.1</version>
30 </dependency>
31
32 <dependency>
33 <groupId>com.alibaba</groupId>
34 <artifactId>fastjson</artifactId>
35 <version>1.2.58</version>
36 </dependency>
37 <dependency>
38 <groupId>org.apache.commons</groupId>
39 <artifactId>commons-lang3</artifactId>
40 <version>3.1</version>
41 <optional>true</optional>
42 </dependency>
43
44 <dependency>
45 <groupId>org.springframework.boot</groupId>
46 <artifactId>spring-boot-starter-test</artifactId>
47 <scope>test</scope>
48 </dependency>
49 </dependencies>
50
application.yml
2
3
4
5
6
7
8
9
10
11
12
13
14
2 data:
3 elasticsearch:
4 cluster-name: elasticsearch
5 cluster-nodes: 127.0.0.1:9300
6 repositories:
7 enabled: true
8 thymeleaf:
9 prefix: classpath:/templates/
10 suffix: .html
11 mode: HTML
12 encoding: UTF-8
13 cache: false
14
接下来创建一个用于保存和展示数据的JavaBean,本例中模拟Blog的形式,属性包括作者、内容、发布时间及点赞数,如下:
2
3
4
5
6
7
8
9
10
11
12
13
14
15
16
17
18
19
20
21
22
23
24
25
2import org.springframework.data.elasticsearch.annotations.Document;
3
4@Document(indexName = "website", type = "blog")
5public class Blog {
6
7 private int id;
8 private String author;
9 private String text;
10 private int likes;
11 private Date date;
12
13 public Blog() {
14 }
15
16 public Blog(int id, String author, String text, int likes, Date date) {
17 this.id = id;
18 this.author = author;
19 this.text = text;
20 this.likes = likes;
21 this.date = date;
22 }
23
24 //getter/setter略
25
注意注解@Document是必须的。
测试:写入一条"Blog"并读取出来
2
3
4
5
6
7
8
9
10
11
12
13
14
15
2 private ElasticsearchTemplate elasticsearchTemplate;
3
4 @Test
5 public void contextLoads() {
6 Blog blog1 = new Blog(1, "Mary Jones", "Jane is an expert in her field", 0, new Date());
7 IndexQuery indexQuery = new IndexQueryBuilder().withObject(blog1).build();
8 elasticsearchTemplate.index(indexQuery);
9
10 GetQuery getQuery = new GetQuery();
11 getQuery.setId("1");
12 Blog blog2 = elasticsearchTemplate.queryForObject(getQuery, Blog.class);
13 System.out.println(ToStringBuilder.reflectionToString(blog2));
14 }
15
