前言:
如今信息时代,对于web服务器的要求很高,既要性能,又要稳定性,又经济最好免费,还要满足公司的各大奇葩业务需求,越来越挑剔,互联网上主流的web服务器有 nginx, Apache, Squid, IIS, kangle, WebSphere,WebLogic, Tomcat, Jboss, TrafficServer等等, 我玩过的就nginx,Apache, TrafficServer三款,其它不熟, Apache由于不可扩展,不可定制,固满足不了公司一些需求,TrafficServer 开源产品 c++编写,功能强大,可搭建集群,国人用得不多,知道的人也不多,大公司在用(阿里),小公司用不起,bug太多,难维护, Nginx现在用的人越来越多
优点如下:
2
3
4
5
6
7
8
9
2
3 2.可扩展性强,官方文档资料全,安装配置简单,官方代码贡献者活跃,不断有更新,
4
5 3.Nginx从头开始都是纯C实现,采用多进程和异步机制(异步非阻塞),内存消耗极小,官方统计,单台能达到50000并发请求量。
6
7 4.支持负载均衡,跨平台,能满足公司很多需求。
8
9
使用两台虚拟机一台安装nginx,一台安装lamp架构
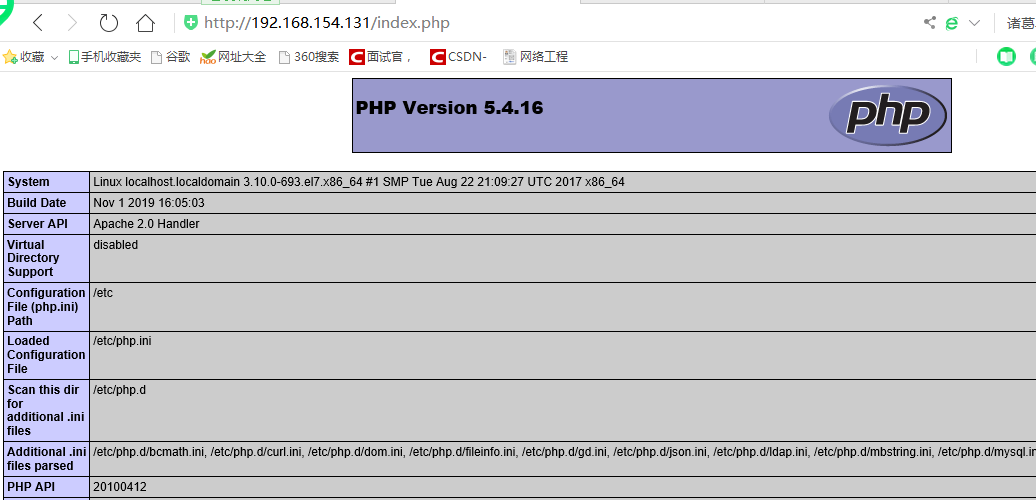
nginx: 192.168.154.131
没有做反向代理之前

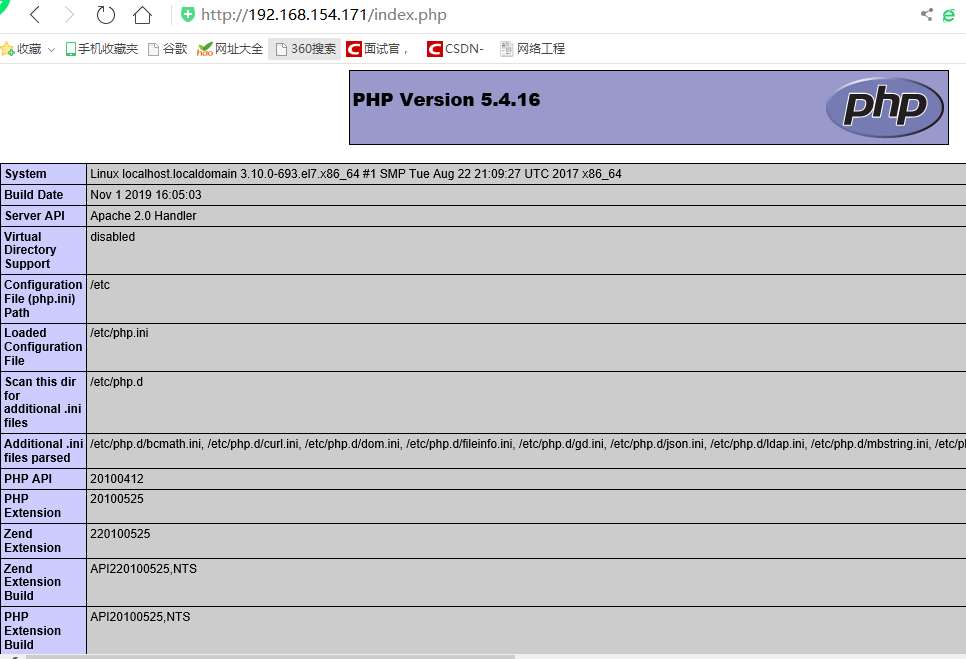
lamp: 192.168.154.171
一、安装nginx所需要的依赖库
2
3
2
3
二、如有安装老版本,则卸载
查看:find -name nginx
卸载:yum remove nginx
三、下载nginx源码并解压.(源码去官网下载, 以下是官方链接)
2
3
4
5
6
7
8
9
10
11
12
13
14
15
16
17
18
19
20
21
2
3tar -zxvf nginx-1.6.2.tar.gz
4
5cd nginx-1.6.2
6
7./configure --user=nginx --group=nginx --prefix=/usr/local/nginx \
8
9--with-http_addition_module \
10
11--with-http_flv_module --with-http_gzip_static_module \
12
13--with-http_realip_module --with-http_ssl_module \
14
15--with-http_stub_status_module --with-http_sub_module \
16
17--with-http_dav_module
18
19make && make install
20
21
四、建立nginx用户及用户组
2
3
2
3
cd 到nginx目录,看能否启动
sbin/nginx #如果没有报错,说明ok
ps ax | grep nginx
2537 ? Ss 0:00 nginx: master process sbin/nginx
2538 ? S 0:00 nginx: worker process
nginx在启动后,会有一个master进程和多个worker进程。master进程主要用来管理worker进程,包含:接收来自外界的信号,向各worker进程发送信号,监控worker进程的运行状态,当worker进程退出后(异常情况下),会自动重新启动新的worker进程。
查看安装的nginx版本:
sbin/nginx -v
查看安装的编译选项:
sbin/nginx -V
五、下面开始配置nginx,及反向代理,编辑配置文件nginx.conf
vim /usr/local/nginx/conf/nginx.conf
主要修改反向代理路径
2
3
4
5
6
7
8
9
10
11
12
13
14
15
16
17
18
19
20
21
22
23
24
25
26
27
28
29
30
31
32
33
34
35
36
37
38
39
40
41
42
43
44
45
46
47
48
49
50
51
52
53
54
55
56
57
58
59
60
61
62
63
64
65
66
67
68
69
70
71
72
73
74
75
76
77
78
79
80
81
82
83
84
85
86
87
88
89
90
91
92
93
94
95
96
97
98
99
100
101
102
103
104
105
106
107
108
109
2#user somebody;
3
4#启动进程,通常设置成和cpu的数量相等
5worker_processes 1;
6
7#全局错误日志
8error_log D:/Tools/nginx-1.10.1/logs/error.log;
9error_log D:/Tools/nginx-1.10.1/logs/notice.log notice;
10error_log D:/Tools/nginx-1.10.1/logs/info.log info;
11
12#PID文件,记录当前启动的nginx的进程ID
13pid D:/Tools/nginx-1.10.1/logs/nginx.pid;
14
15#工作模式及连接数上限
16events {
17 worker_connections 1024; #单个后台worker process进程的最大并发链接数
18}
19
20#设定http服务器,利用它的反向代理功能提供负载均衡支持
21http {
22 #设定mime类型(邮件支持类型),类型由mime.types文件定义
23 include D:/Tools/nginx-1.10.1/conf/mime.types;
24 default_type application/octet-stream;
25
26 #设定日志
27 log_format main '[$remote_addr] - [$remote_user] [$time_local] "$request" '
28 '$status $body_bytes_sent "$http_referer" '
29 '"$http_user_agent" "$http_x_forwarded_for"';
30
31 access_log D:/Tools/nginx-1.10.1/logs/access.log main;
32 rewrite_log on;
33
34 #sendfile 指令指定 nginx 是否调用 sendfile 函数(zero copy 方式)来输出文件,对于普通应用,
35 #必须设为 on,如果用来进行下载等应用磁盘IO重负载应用,可设置为 off,以平衡磁盘与网络I/O处理速度,降低系统的uptime.
36 sendfile on;
37 #tcp_nopush on;
38
39 #连接超时时间
40 keepalive_timeout 120;
41 tcp_nodelay on;
42
43 #gzip压缩开关
44 #gzip on;
45
46 #设定实际的服务器列表
47 upstream zp_server1{
48 server 127.0.0.1:8089;
49 }
50
51 #HTTP服务器
52 server {
53 #监听80端口,80端口是知名端口号,用于HTTP协议
54 listen 80;
55
56 #定义使用www.xx.com访问
57 server_name www.helloworld.com;
58
59 #首页
60 index index.html
61
62 #指向webapp的目录
63 root D:\01_Workspace\Project\github\zp\SpringNotes\spring-security\spring-shiro\src\main\webapp;
64
65 #编码格式
66 charset utf-8;
67
68 #代理配置参数
69 proxy_connect_timeout 180;
70 proxy_send_timeout 180;
71 proxy_read_timeout 180;
72 proxy_set_header Host $host;
73 proxy_set_header X-Forwarder-For $remote_addr;
74
75 #反向代理的路径(和upstream绑定),location 后面设置映射的路径
76 location / {
77 proxy_pass http://192.168.154.171;
78 }
79
80 #静态文件,nginx自己处理
81 location ~ ^/(images|javascript|js|css|flash|media|static)/ {
82 root D:\01_Workspace\Project\github\zp\SpringNotes\spring-security\spring-shiro\src\main\webapp\views;
83 #过期30天,静态文件不怎么更新,过期可以设大一点,如果频繁更新,则可以设置得小一点。
84 expires 30d;
85 }
86
87 #设定查看Nginx状态的地址
88 location /NginxStatus {
89 stub_status on;
90 access_log on;
91 auth_basic "NginxStatus";
92 auth_basic_user_file conf/htpasswd;
93 }
94
95 #禁止访问 .htxxx 文件
96 location ~ /\.ht {
97 deny all;
98 }
99
100 #错误处理页面(可选择性配置)
101 #error_page 404 /404.html;
102 #error_page 500 502 503 504 /50x.html;
103 #location = /50x.html {
104 # root html;
105 #}
106 }
107}
108
109
保存退出!
nginx平滑重启:nginx -s reload #重载
nginx #启动nginx服务
六、测试:
做过反向代理之后:
nginx:192.168.154.131