一、示例整体架构
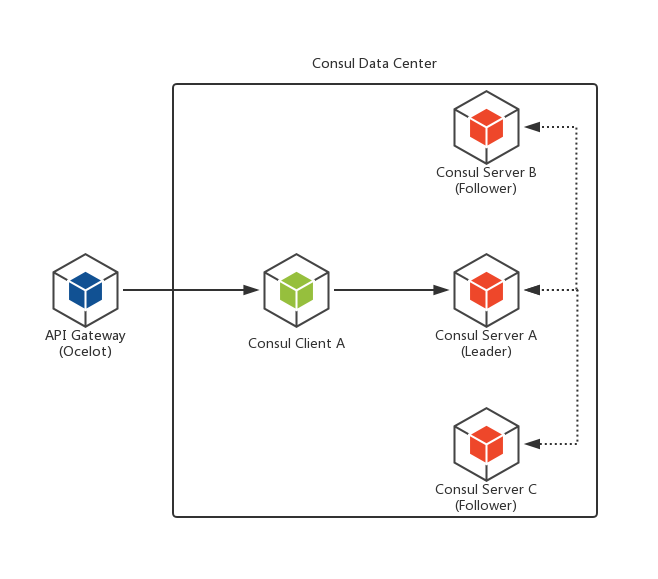
此示例会由一个API Gateway, 一个Consul Client以及三个Consul Server组成,有关Consul的Client和Server这两种模式的Agent的背景知识,请移步我之前的文章加以了解:《.NET Core微服务之基于Consul实现服务治理》。其中,Consul的Client和Server节点共同构成一个Data Center,而API Gateway则从Consul中获取到服务的IP和端口号,并返回给服务消费者。这里的API Gateway是基于Ocelot来实现的,它不是这里的重点,也就不过多说明了,不了解的朋友请移步我的另一篇:《.NET Core微服务之基于Ocelot实现API网关服务》。
二、Consul集群搭建
2.1 Consul镜像拉取
docker pull consul:1.4.4
验证:docker images

2.2 Consul Server实例创建
以下我的实践是在一台机器上(CentOS 7)操作的,因此将三个实例分别使用了不同的端口号(区别于默认端口号8500)。实际环境中,建议多台机器部署。
(1)Consul实例1
docker run -d -p 8510:8500 –restart=always -v /XiLife/consul/data/server1:/consul/data -v /XiLife/consul/conf/server1:/consul/config -e CONSUL_BIND_INTERFACE='eth0' –privileged=true –name=consul_server_1 consul:1.4.4 agent -server -bootstrap-expect=3 -ui -node=consul_server_1 -client='0.0.0.0' -data-dir /consul/data -config-dir /consul/config -datacenter=xdp_dc;
(2)Consul实例2
为了让Consul实例2加入集群,首先获取一下Consul实例1的IP地址:
JOIN_IP="$(docker inspect -f '{{.NetworkSettings.IPAddress}}' consul_server_1)";
docker run -d -p 8520:8500 –restart=always -v /XiLife/consul/data/server2:/consul/data -v /XiLife/consul/conf/server2:/consul/config -e CONSUL_BIND_INTERFACE='eth0' –privileged=true –name=consul_server_2 consul:1.4.4 agent -server -ui -node=consul_server_2 -client='0.0.0.0' -datacenter=xdp_dc -data-dir /consul/data -config-dir /consul/config -join=$JOIN_IP;
(3)Consul实例3
docker run -d -p 8530:8500 –restart=always -v /XiLife/consul/data/server3:/consul/data -v /XiLife/consul/conf/server3:/consul/config -e CONSUL_BIND_INTERFACE='eth0' –privileged=true –name=consul_server_3 consul:1.4.4 agent -server -ui -node=consul_server_3 -client='0.0.0.0' -datacenter=xdp_dc -data-dir /consul/data -config-dir /consul/config -join=$JOIN_IP;
验证1:docker exec consul_server_1 consul operator raft list-peers

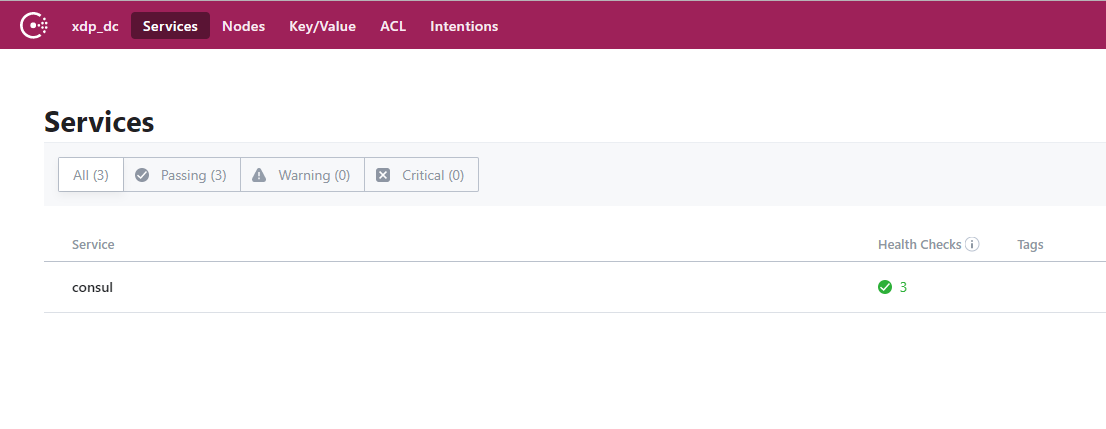
验证2:http://192.168.16.170:8500/
2.3 Consul Client实例创建
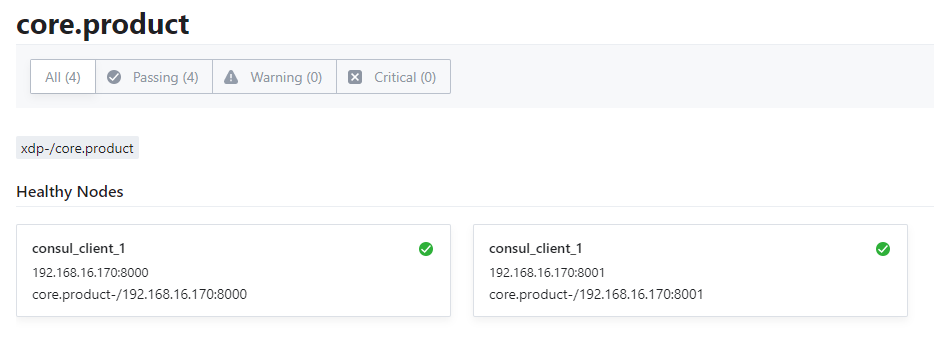
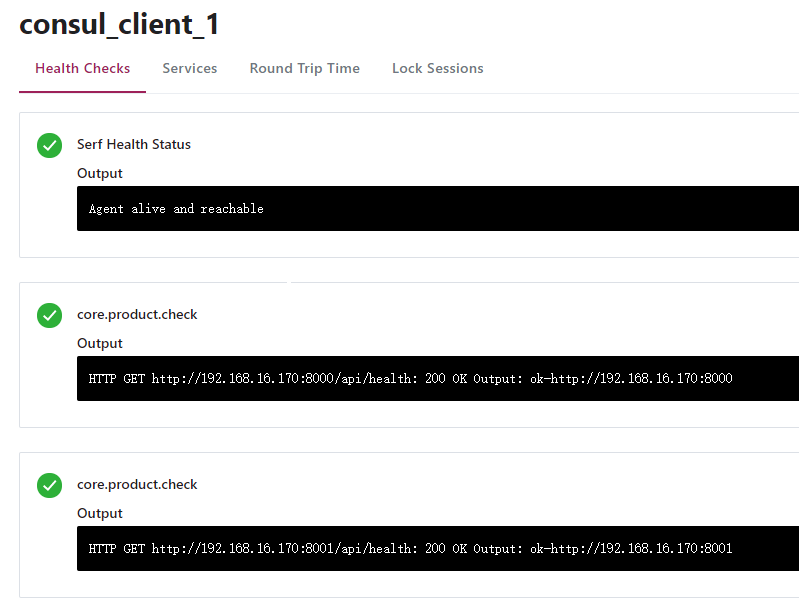
(1)准备services.json配置文件,向Consul注册两个同样的Product API服务
2
3
4
5
6
7
8
9
10
11
12
13
14
15
16
17
18
19
20
21
22
23
24
25
26
27
28
29
30
31
32
33
34
35
2 "services": [
3 {
4 "id": "core.product-/192.168.16.170:8000",
5 "name": "core.product",
6 "tags": [ "xdp-/core.product" ],
7 "address": "192.168.16.170",
8 "port": 8000,
9 "checks": [
10 {
11 "name": "core.product.check",
12 "http": "http://192.168.16.170:8000/api/health",
13 "interval": "10s",
14 "timeout": "5s"
15 }
16 ]
17 },
18 {
19 "id": "core.product-/192.168.16.170:8001",
20 "name": "core.product",
21 "tags": [ "xdp-/core.product" ],
22 "address": "192.168.16.170",
23 "port": 8001,
24 "checks": [
25 {
26 "name": "core.product.check",
27 "http": "http://192.168.16.170:8001/api/health",
28 "interval": "10s",
29 "timeout": "5s"
30 }
31 ]
32 }
33 ]
34 }
35
有关配置文件的细节,请移步另一篇文章:《.NET Core微服务之基于Consul实现服务治理(续)》
(2)Consul Client实例
docker run -d -p 8550:8500 –restart=always -v /XiLife/consul/conf/client1:/consul/config -e CONSUL_BIND_INTERFACE='eth0' –name=consul_client_1 consul:1.4.4 agent -node=consul_client_1 -join=$JOIN_IP -client='0.0.0.0' -datacenter=xdp_dc -config-dir /consul/config
(3)验证

2.4 服务检查监控邮件提箱
(1)为Client添加watches.json
2
3
4
5
6
7
8
9
10
11
12
13
14
15
16
2 "watches": [
3 {
4 "type": "checks",
5 "handler_type": "http",
6 "state": "critical",
7 "http_handler_config": {
8 "path": "http://192.168.16.170:6030/api/Notifications/consul",
9 "method": "POST",
10 "timeout": "10s",
11 "header": { "Authorization": [ "token" ] }
12 }
13 }
14 ]
15 }
16
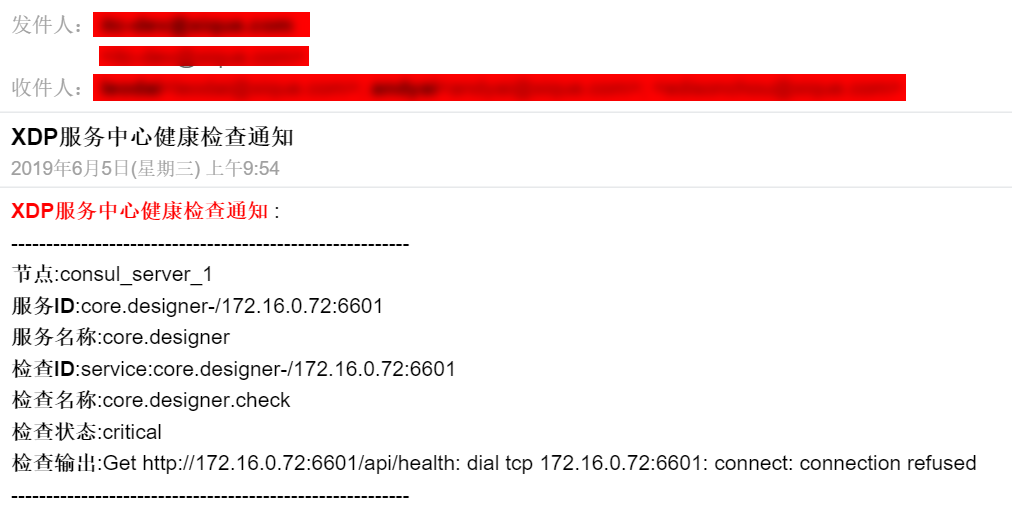
*.这里的api接口 http://192.168.16.170:6030/api/Notifications/consul是我的一个通知服务接口,下面是实现的代码
2
3
4
5
6
7
8
9
10
11
12
13
14
15
16
17
18
19
20
21
22
23
24
25
26
27
28
29
30
31
32
33
34
35
36
37
38
39
40
41
42
43
44
45
46
47
48
49
50
51
52
53
54
55
56
57
58
59
60
61
62
63
64
65
66
2 /// 发送Consul服务中心健康检查Email
3 /// </summary>
4 [HttpPost("consul")]
5 public async Task SendConsulHealthCheckEmail()
6 {
7 using (var stream = new MemoryStream())
8 {
9 HttpContext.Request.Body.CopyTo(stream);
10 var ary = stream.ToArray();
11 var str = Encoding.UTF8.GetString(ary);
12
13 dynamic notifications = JsonConvert.DeserializeObject(str);
14 if (notifications == null || notifications.Count == 0)
15 {
16 return;
17 }
18
19 var title = "XDP服务中心健康检查通知";
20 var emailBody = new StringBuilder($"<span style='font-weight:bold; color:red;'>{title}</span> : <br/>");
21 foreach (var notification in notifications)
22 {
23 emailBody.AppendLine($"---------------------------------------------------------<br/>");
24 emailBody.AppendLine($"<span style='font-weight:bold;'>节点</span>:{notification.Node}<br/>");
25 emailBody.AppendLine($"<span style='font-weight:bold;'>服务ID</span>:{notification.ServiceID}<br/>");
26 emailBody.AppendLine($"<span style='font-weight:bold;'>服务名称</span>:{notification.ServiceName}<br/>");
27 emailBody.AppendLine($"<span style='font-weight:bold;'>检查ID</span>:{notification.CheckID}<br/>");
28 emailBody.AppendLine($"<span style='font-weight:bold;'>检查名称</span>:{notification.Name}<br/>");
29 emailBody.AppendLine($"<span style='font-weight:bold;'>检查状态</span>:{notification.Status}<br/>");
30 emailBody.AppendLine($"<span style='font-weight:bold;'>检查输出</span>:{notification.Output}<br/>");
31 emailBody.AppendLine($"---------------------------------------------------------<br/>");
32 }
33
34 var email = new Email()
35 {
36 Username = _configuration["EmailSettings:Username"],
37 Password = _configuration["EmailSettings:Password"],
38 SmtpServerAddress = _configuration["EmailSettings:SmtpServerAddress"],
39 SmtpPort = Convert.ToInt32(_configuration["EmailSettings:SmtpPort"]),
40 Subject = title,
41 Body = emailBody.ToString(),
42 Recipients = _configuration["EmailSettings:Recipients"]
43 };
44
45 email.Send();
46 }
47 }
48
49 /// <summary>
50 /// 使用同步发送邮件
51 /// </summary>
52 public void Send()
53 {
54 using (SmtpClient smtpClient = GetSmtpClient)
55 {
56 using (MailMessage mailMessage = GetClient)
57 {
58 if (smtpClient == null || mailMessage == null) return;
59 Subject = Subject;
60 Body = Body;
61 //EnableSsl = false;
62 smtpClient.Send(mailMessage); //异步发送邮件,如果回调方法中参数不为"true"则表示发送失败
63 }
64 }
65 }
66
(2)验证
三、Ocelot网关配置
3.1 为Ocelot增加Consul支持
(1)增加Nuget包:Ocelot.Provider.Consul
Nuget>> Install-Package Ocelot.Provider.Consul
(2)修改StartUp.cs,增加Consul支持
s.AddOcelot() .AddConsul();
更多内容,请移步:Ocelot官方文档-服务发现
3.2 修改Ocelot配置文件增加Consul配置
2
3
4
5
6
7
8
9
2 "BaseUrl": "http://api.xique.com",
3 "ServiceDiscoveryProvider": {
4 "Host": "192.168.16.170",
5 "Port": 8550,
6 "Type": "Consul"
7 }
8 }
9
*.这里指向的是Consul Client实例的地址
此外,Ocelot默认策略是每次请求都去Consul中获取服务地址列表,如果想要提高性能,也可以使用PollConsul的策略,即Ocelot自己维护一份列表,然后定期从Consul中获取刷新,就不再是每次请求都去Consul中拿一趟了。例如下面的配置,它告诉Ocelot每2秒钟去Consul中拿一次。
2
3
2 "PollingInterval": 2000
3
3.3 Service配置
2
3
4
5
6
7
8
9
10
11
12
13
2 {
3 "UseServiceDiscovery": true,
4 "DownstreamPathTemplate": "/api/{url}",
5 "DownstreamScheme": "http",
6 "ServiceName": "core.product",
7 "LoadBalancerOptions": {
8 "Type": "RoundRobin"
9 },
10 "UpstreamPathTemplate": "/product/{url}",
11 "UpstreamHttpMethod": [ "Get", "Post", "Put", "Delete" ]
12 }
13
这里配置了在Consul中配置的服务名(ServiceName),以及告诉Ocelot我们使用轮询策略(RoundRobin)做负载均衡。
3.4 验证
第一次访问:

第二次访问:

四、HA示例整体架构
对于实际应用中,我们往往会考虑单点问题,因此会借助一些负载均衡技术来做高可用的架构,这里给出一个建议的HA示例的整体架构:
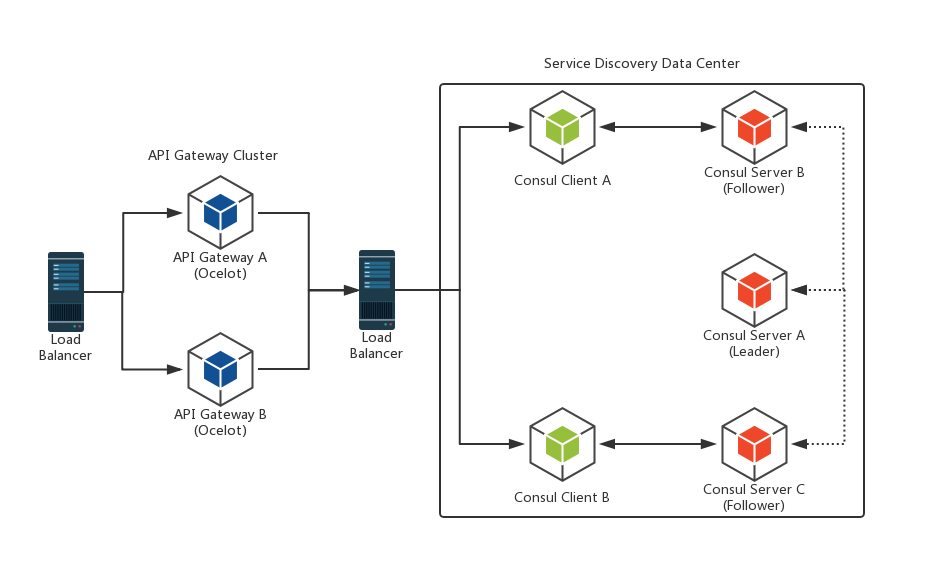
对于一个API请求,首先会经历一个Load Balancer才会到达API Gateway,这个Load Balancer可以是基于硬件的F5,也可以是基于软件的Nginx或LVS再搭配Keepalived,一般来说大部分团队都会选择Nginx。然后API Gateway通过部署多个,来解决单点问题,也达到负载均衡的效果。而对于API Gateway和Consul Client之间的连接,我们往往也会增加一个Load Balancer来实现服务发现的高可用,这个Load Balancer也一般会基于Nginx/LVS搭配Keepalived,API Gateway只需要访问一个Virtual IP即可。而在Consul Data Center中,Consul Server会选择3或5个,Consul Client也会部署多个,刚刚提到的Virtual IP则会指向多个Consul Client,从而防止了Consul Client的单点问题。
