Spring MVC自动配置
Spring Boot为Spring MVC提供适用于多数应用的自动配置功能。在Spring默认基础上,自动配置添加了以下特性:
- 引入ContentNegotiatingViewResolver和BeanNameViewResolver beans。
- 对静态资源的支持,包括对WebJars的支持。
- 自动注册Converter,GenericConverter,Formatter beans。
- 对HttpMessageConverters的支持。
- 自动注册MessageCodeResolver。
- 对静态index.html的支持。
- 对自定义Favicon的支持。
如果想全面控制Spring MVC,你可以添加自己的@Configuration,并使用@EnableWebMvc对其注解。如果想保留Spring Boot MVC的特性,并只是添加其他的MVC配置(拦截器,formatters,视图控制器等),你可以添加自己的WebMvcConfigurerAdapter类型的@Bean(不使用@EnableWebMvc注解),具体拦截器等配置可参考:https://blog.csdn.net/fmwind/article/details/81146107。
默认资源映射
Spring Boot 默认为我们提供了静态资源处理,使用 WebMvcAutoConfiguration 中的配置各种属性。
建议大家使用Spring Boot的默认配置方式,提供的静态资源映射如下:
- classpath:/META-INF/resources
- classpath:/resources
- classpath:/static
- classpath:/public
在工程里面路径是这样:
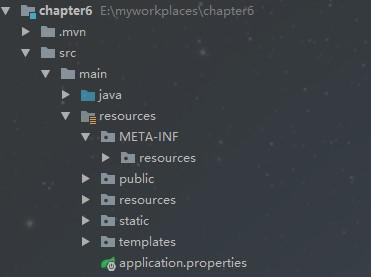
上面这几个都是静态资源的映射路径,优先级顺序为:META-INF/resources > resources > static > public
大家可以自己在上面4个路径下都放一张同名的图片,访问一下即可验证。
还有,你可以随机在上面一个路径下面放上index.html,当我们访问应用根目录http://lcoalhost:8080 时,会直接映射到index.html页面。
对应的配置文件配置如下:
2
3
4
5
2spring.mvc.static-path-pattern=
3# 默认值为 classpath:/META-INF/resources/,classpath:/resources/,classpath:/static/,classpath:/public/
4spring.resources.static-locations=这里设置要指向的路径,多个使用英文逗号隔开
5
我们可以通过修改spring.mvc.static-path-pattern来修改默认的映射,例如我改成/aa/**,那运行的时候访问 http://lcoalhost:8080/aa/index.html 才对应到index.html页面。
接管Spring Boot的Web配置—-WebMvcConfigurer
如果Spring Boot提供的Sping MVC不符合要求,则可以通过一个配置类(注解有@Configuration的类)加上@EnableWebMvc注解来实现完全自己控制的MVC配置。
当然,通常情况下,Spring Boot的自动配置是符合我们大多数需求的。在你既需要保留Spring Boot提供的便利,有需要增加自己的额外的配置的时候,可以定义一个配置类实现WebMvcConfigurer,无需使用@EnableWebMvc注解。
关于WebMvcConfigurer介绍可以参考 https://blog.csdn.net/fmwind/article/details/81235401
拦截器addInterceptors
拦截器在我们项目中经常使用的,这里就来介绍下最简单的判断是否登录的使用。
要实现拦截器功能需要完成以下2个步骤:
- 创建我们自己的拦截器类并实现 HandlerInterceptor 接口
- 其实重写WebMvcConfigurer中的addInterceptors方法把自定义的拦截器类添加进来即可
关于HandlerInterceptor 简介参考 https://blog.csdn.net/fmwind/article/details/81234753
首先,自定义拦截器代码:
2
3
4
5
6
7
8
9
10
11
12
13
14
15
16
17
18
19
20
21
22
23
24
2public class MyInterceptor implements HandlerInterceptor {
3 @Override
4 public boolean preHandle(HttpServletRequest request, HttpServletResponse response, Object handler) throws Exception {
5 boolean flag =true;
6 User user=(User)request.getSession().getAttribute("user");
7 if(null==user){
8 response.sendRedirect("toLogin");
9 flag = false;
10 }else{
11 flag = true;
12 }
13 return flag;
14 }
15
16 @Override
17 public void postHandle(HttpServletRequest request, HttpServletResponse response, Object handler, ModelAndView modelAndView) throws Exception {
18 }
19
20 @Override
21 public void afterCompletion(HttpServletRequest request, HttpServletResponse response, Object handler, Exception ex) throws Exception {
22 }
23}
24
这里我们简单实现了根据session中是否有User对象来判断是否登录,为空就跳转到登录页,不为空就通过。
接着,重写WebMvcConfigurer中的addInterceptors方法如下:
2
3
4
5
6
7
8
9
10
11
12
2* 拦截器
3* @param registry
4*/
5@Override
6public void addInterceptors(InterceptorRegistry registry) {
7 // addPathPatterns 用于添加拦截规则
8 // excludePathPatterns 用户排除拦截
9 registry.addInterceptor(new MyInterceptor()).addPathPatterns("/**").excludePathPatterns("/toLogin","/login");
10 super.addInterceptors(registry);
11}
12
addPathPatterns("/**")对所有请求都拦截,但是排除了/toLogin和/login请求的拦截。
页面登录关键代码
2
3
4
5
6
7
8
9
10
11
12
13
14
15
16
17
18
19
20
2$("#doLogin").click(function (e) {
3 $.ajax({
4 type : "POST",
5 url : "/login",
6 data : {
7 "userName" : $("#userName").val(),
8 "password" : $("#password").val()
9 },
10 dataType : "json",
11 success : function(data) {
12 if (data.result == "1") {
13 window.location.href ="/learn";
14 } else {
15 alert("账号密码不能为空!");
16 }
17 }
18 });
19});
20
控制器代码:
2
3
4
5
6
7
8
9
10
11
12
13
14
15
16
17
18
19
20
21
22
23
24
25
2@Controller
3public class LearnController {
4 /**
5 *登录操作
6 **/
7 @RequestMapping(value = "/login",method = RequestMethod.POST)
8 @ResponseBody
9 public Map<String,Object> login(HttpServletRequest request, HttpServletResponse response){
10 Map<String,Object> map =new HashMap<String,Object>();
11 String userName=request.getParameter("userName");
12 String password=request.getParameter("password");
13 if(!userName.equals("") && password!=""){
14 User user =new User(userName,password);
15 request.getSession().setAttribute("user",user);
16 map.put("result","1");
17 }else{
18 map.put("result","0");
19 }
20 return map;
21 }
22
23
24}
25
这样访问的时候,如果未登录就会跳转到login.html页面,而访问http://localhost:8080/toLogin 和http://localhost:8080/login 不会被拦截。
