RabbitMQ介绍
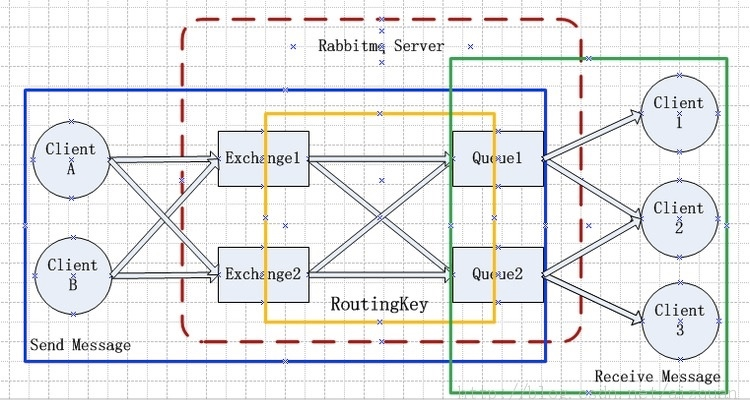
RabbitMQ是一个由erlang开发的AMQP(Advanced Message Queue)的开源实现的产品,RabbitMQ是一个消息代理,从“生产者”接收消息并传递消息至“消费者”,期间可根据规则路由、缓存、持久化消息。“生产者”也即message发送者以下简称P,相对应的“消费者”乃message接受者以下简称C,message通过queue由P到C,queue存在于RabbitMQ,可存储尽可能多的message,多个P可向同一queue发送message,多个C可从同一个queue接收message
- 内部架构:
-
说明
-
Message (消息):RabbitMQ 转发的二进制对象,包括Headers(头)、Properties (属性)和 Data (数据),其中数据部分不是必要的。Producer(生产者): 消息的生产者,负责产生消息并把消息发到交换机
- Exhange的应用。
-
Consumer (消费者):使用队列 Queue 从 Exchange 中获取消息的应用。
* Exchange (交换机):负责接收生产者的消息并把它转到到合适的队列
* Queue (队列):一个存储Exchange 发来的消息的缓冲,并将消息主动发送给Consumer,或者 Consumer 主动来获取消息。见 1.4 部分的描述。1
2
3
41 * Binding (绑定):队列 和 交换机 之间的关系。Exchange 根据消息的属性和 Binding 的属性来转发消息。绑定的一个重要属性是 binding_key。
2
3 * Connection (连接)和 Channel (通道):生产者和消费者需要和 RabbitMQ 建立 TCP 连接。一些应用需要多个connection,为了节省TCP 连接,可以使用 Channel,它可以被认为是一种轻型的共享 TCP 连接的连接。连接需要用户认证,并且支持 TLS (SSL)。连接需要显式关闭。
4
参考:RabbitMQ百度百科
RabbitMQ安装
centos安装:
2
2
windows安装:
2
2
安装python rabbitMQ module:
2
3
4
5
6
7
8
2or
3easy_install pika
4or
5源码
6
7https://pypi.python.org/pypi/pika
8
Python操作RabbitMQ
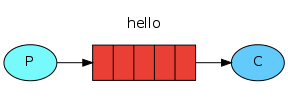
1.实现简单消息队列
一个Product向queue发送一个message,一个Client从该queue接收message并打印
远程连接rabbitmq server,需要配置权限:
首先在rabbitmq server上创建一个用户
2
2
同时还要配置权限,允许从外面访问
2
2
set_permissions [-p vhost] {user} {conf} {write} {read}
vhost
The name of the virtual host to which to grant the user access, defaulting to
/.user
The name of the user to grant access to the specified virtual host.
conf
A regular expression matching resource names for which the user is granted configure permissions.
write
A regular expression matching resource names for which the user is granted write permissions.
read
A regular expression matching resource names for which the user is granted read permissions.
-
发消息 product
2
3
4
5
6
7
8
9
10
11
12
13
14
15
16
17
18
19
20
21
2
3credentials = pika.PlainCredentials('alex','alex3714')
4# 凭证
5
6connection = pika.BlockingConnection(pika.ConnectionParameters(host='192.168.152.134',port=5672,credentials=credentials))
7# 定义连接池
8
9channel = connection.channel()
10# 生成连接通道
11
12channel.queue_declare(queue='test')
13# 声明队列以向其发送消息
14
15channel.basic_publish(exchange='',routing_key='test',body='Hello World!')
16# 注意当未定义exchange时,routing_key需和queue的值保持一致
17
18print('send success msg to rabbitmq')
19connection.close()
20# 关闭连接
21
-
收消息,client
2
3
4
5
6
7
8
9
10
11
12
13
14
15
16
17
18
19
20
21
22
23
24
25
26
27
28
29
30
31
32
33
34
35
36
37
38
39
40
41
2
3credentials = pika.PlainCredentials('alex','alex3714')
4# 凭证
5
6connection = pika.BlockingConnection(pika.ConnectionParameters(host='192.168.152.134',port=5672,credentials=credentials))
7# 连接参数
8
9channel = connection.channel()
10# 生成连接通道
11
12channel.queue_declare(queue='test')
13# 声明队列。之所以消费者也需要声明队列,是为了防止生产者未声明队列,导致运行报错。
14
15
16def callback(ch, method, properties, body):
17 """
18 回调函数,处理从rabbitmq中取出的消息
19 :param ch: 通道
20 :param method: 方法
21 :param properties: 属性
22 :param body: 内容
23 :return: 接收到得信息
24 """
25 print("[x] Received %r" % body)
26
27 # print(ch,method,properties,body)
28 """
29 <pika.adapters.blocking_connection.BlockingChannel object at 0x0000000002F1DB70>
30 <Basic.Deliver(['consumer_tag=ctag1.3c1d688587c447e5ac3a72ea99e98cac', 'delivery_tag=1', 'exchange=', 'redelivered=False', 'routing_key=test'])>
31 <BasicProperties> b'Hello World!'
32 """
33
34
35channel.basic_consume(callback, queue='test', no_ack=True)
36# no_ack 表示不需要发送ack。默认是False,表示开启状态。
37
38print('[*] Waiting for messages. To exit press CTRL+C')
39channel.start_consuming()
40# 开始监听,接收消息
41
执行效果:
2
3
4
5
6
7
2send success msg to rabbitmq
3
4#client端:
5 [*] Waiting for messages. To exit press CTRL+C
6 [x] Received b'Hello World!'
7
- 消息确认
当客户端从队列中取出消息之后,可能需要一段时间才能处理完成,如果在这个过程中,客户端出错了,异常退出了,而数据还没用处理完成,那么非常不幸,这段数据就丢失了,因为rabbitmq默认会把此消息标记为已完成,然后从队列中移除。
消息确认是客户端从rabbitmq中取出消息,并处理完成之后,会发送一个ack告诉rabbitmq,消息处理完成,当rabbitmq收到客户端的获取消息请求之后,或标记为处理中,当再次收到ack之后,才会标记为已完成,然后从队列中删除。当rabbitmq检测到客户端和自己断开链接之后,还没收到ack,则会重新将消息放回消息队列,交给下一个客户端处理,保证消息不丢失,也就是说,RabbitMQ给了客户端足够长的时间来做数据处理。
在客户端使用no_ack来标记是否需要发送ack,默认是False,开启状态。
product向rabbitmq发送两条消息:
2
3
4
5
6
7
8
9
10
11
12
13
2
3connection = pika.BlockingConnection(pika.ConnectionParameters(
4 host='127.0.0.1', port=5672, )) #定义连接池
5channel = connection.channel() #声明队列以向其发送消息消息
6
7channel.queue_declare(queue='test')
8channel.basic_publish(exchange='', routing_key='test', body='1')
9channel.basic_publish(exchange='', routing_key='test', body='2')
10channel.basic_publish(exchange='', routing_key='test', body='3')
11print('send success msg to rabbitmq')
12connection.close() #关闭连接
13
客户端接受消息,不发送ack
2
3
4
5
6
7
8
9
10
11
12
13
14
15
16
17
18
19
20
21
22
23
2import time
3
4connection = pika.BlockingConnection(pika.ConnectionParameters(
5 host='127.0.0.1', port=5672))
6channel = connection.channel()
7
8channel.queue_declare(queue='test')
9
10
11def callback(ch, method, properties, body):
12 '''回调函数,处理从rabbitmq中取出的消息'''
13 print(" [x] Received %r" % body)
14 time.sleep(5)
15 #ch.basic_ack(delivery_tag = method.delivery_tag) #发送ack消息
16
17
18
19
20channel.basic_consume(callback,queue='test',no_ack=False)
21print(' [*] Waiting for messages. To exit press CTRL+C')
22channel.start_consuming() #开始监听 接受消息
23
执行结果,发现消息并没有从队列中删除
2
3
4
5
6
7
8
9
10
11
2 [*] Waiting for messages. To exit press CTRL+C
3 [x] Received b'1'
4 [x] Received b'2'
5 [x] Received b'3'
6第二次执行:
7 [*] Waiting for messages. To exit press CTRL+C
8 [x] Received b'1'
9 [x] Received b'2'
10 [x] Received b'3'
11
加入ack之后:
2
3
4
5
6
7
8
9
10
11
12
13
14
15
16
17
18
19
20
21
22
23
2import time
3
4connection = pika.BlockingConnection(pika.ConnectionParameters(
5 host='127.0.0.1', port=5672))
6channel = connection.channel()
7
8channel.queue_declare(queue='test')
9
10
11def callback(ch, method, properties, body):
12 '''回调函数,处理从rabbitmq中取出的消息'''
13 print(" [x] Received %r" % body)
14 time.sleep(5)
15 ch.basic_ack(delivery_tag = method.delivery_tag) #发送ack消息
16
17
18
19
20channel.basic_consume(callback,queue='test',no_ack=False)
21print(' [*] Waiting for messages. To exit press CTRL+C')
22channel.start_consuming() #开始监听 接受消息
23
运行结果:发现第二次运行队列中已经没有消息
2
3
4
5
6
7
8
2 [*] Waiting for messages. To exit press CTRL+C
3 [x] Received b'1'
4 [x] Received b'2'
5 [x] Received b'3
6 第二次:
7 [*] Waiting for messages. To exit press CTRL+C
8
- 改变消息获取顺序
默认消息队列里的数据是按照顺序被消费者拿走,例如:消费者1 去队列中获取 奇数 序列的任务,消费者1去队列中获取 偶数 序列的任务。
channel.basic_qos(prefetch_count=1) 表示谁来谁取,不再按照奇偶数排列
默认情况:使用product往队列中放10个数字
2
3
4
5
6
7
8
9
10
11
12
2
3connection = pika.BlockingConnection(pika.ConnectionParameters(
4 host='127.0.0.1', port=5672, )) #定义连接池
5channel = connection.channel() #声明队列以向其发送消息消息
6
7channel.queue_declare(queue='test')
8for i in range(10):
9 channel.basic_publish(exchange='', routing_key='test', body=str(i))
10 print('send success msg[%s] to rabbitmq' %i)
11connection.close() #关闭连接
12
2
2
2
3
4
5
6
7
8
9
10
2send success msg[2] to rabbitmq
3send success msg[3] to rabbitmq
4send success msg[4] to rabbitmq
5send success msg[5] to rabbitmq
6send success msg[6] to rabbitmq
7send success msg[7] to rabbitmq
8send success msg[8] to rabbitmq
9send success msg[9] to rabbitmq
10
客户端1收消息:
2
3
4
5
6
7
8
9
10
11
12
13
14
15
16
17
18
19
20
21
22
23
2import time
3
4connection = pika.BlockingConnection(pika.ConnectionParameters(
5 host='127.0.0.1', port=5672))
6channel = connection.channel()
7
8channel.queue_declare(queue='test')
9
10
11def callback(ch, method, properties, body):
12 '''回调函数,处理从rabbitmq中取出的消息'''
13 print(" [x] Received %r" % body)
14 #time.sleep(5)
15 ch.basic_ack(delivery_tag = method.delivery_tag) #发送ack消息
16
17
18
19
20channel.basic_consume(callback,queue='test',no_ack=False)
21print(' [*] Waiting for messages. To exit press CTRL+C')
22channel.start_consuming() #开始监听 接受消息
23
2
2
2
3
4
5
6
7
2 [x] Received b'0'
3 [x] Received b'2'
4 [x] Received b'4'
5 [x] Received b'6'
6 [x] Received b'8'
7
客户端2收消息:和client1的区别是加了一个sleep(1)
2
3
4
5
6
7
8
9
10
11
12
13
14
15
16
17
18
19
20
2import time
3
4connection = pika.BlockingConnection(pika.ConnectionParameters(
5 host='127.0.0.1', port=5672))
6channel = connection.channel()
7
8channel.queue_declare(queue='test')
9
10
11def callback(ch, method, properties, body):
12 '''回调函数,处理从rabbitmq中取出的消息'''
13 print(" [x] Received %r" % body)
14 time.sleep(1)
15 ch.basic_ack(delivery_tag = method.delivery_tag) #发送ack消息
16
17channel.basic_consume(callback,queue='test',no_ack=False)
18print(' [*] Waiting for messages. To exit press CTRL+C')
19channel.start_consuming() #开始监听 接受消息
20
2
2
2
3
4
5
6
7
2 [x] Received b'1'
3 [x] Received b'3'
4 [x] Received b'5'
5 [x] Received b'7'
6 [x] Received b'9'
7
在两个客户端里加入channel.basic_qos(prefetch_count=1)参数
客户端1:
2
3
4
5
6
7
8
9
10
11
12
13
14
15
16
17
18
19
20
21
2import time
3
4connection = pika.BlockingConnection(pika.ConnectionParameters(
5 host='127.0.0.1', port=5672))
6channel = connection.channel()
7
8channel.queue_declare(queue='test')
9
10
11def callback(ch, method, properties, body):
12 '''回调函数,处理从rabbitmq中取出的消息'''
13 print(" [x] Received %r" % body)
14 ##time.sleep(1)
15 ch.basic_ack(delivery_tag = method.delivery_tag) #发送ack消息
16
17channel.basic_qos(prefetch_count=1) #添加不按顺序分配消息的参数
18channel.basic_consume(callback,queue='test',no_ack=False)
19print(' [*] Waiting for messages. To exit press CTRL+C')
20channel.start_consuming() #开始监听 接受消息
21
2
2
2
3
4
5
6
7
8
9
10
11
2 [x] Received b'0'
3 [x] Received b'2'
4 [x] Received b'3'
5 [x] Received b'4'
6 [x] Received b'5'
7 [x] Received b'6'
8 [x] Received b'7'
9 [x] Received b'8'
10 [x] Received b'9'
11
客户端2:
2
3
4
5
6
7
8
9
10
11
12
13
14
15
16
17
18
19
20
21
22
23
2import time
3
4connection = pika.BlockingConnection(pika.ConnectionParameters(
5 host='127.0.0.1', port=5672))
6channel = connection.channel()
7
8channel.queue_declare(queue='test')
9
10
11def callback(ch, method, properties, body):
12 '''回调函数,处理从rabbitmq中取出的消息'''
13 print(" [x] Received %r" % body)
14 time.sleep(1)
15 ch.basic_ack(delivery_tag = method.delivery_tag) #发送ack消息
16
17
18
19channel.basic_qos(prefetch_count=1)
20channel.basic_consume(callback,queue='test',no_ack=False)
21print(' [*] Waiting for messages. To exit press CTRL+C')
22channel.start_consuming() #开始监听 接受消息
23
2
2
2
3
2[x] Received b'1'
3
发现,加入channel.basic_qos(prefetch_count=1)参数之后,客户端2由于sleep了1s,所以只拿到了一个消息,其他的消息都被client1拿到了
-
消息持久化 消息确认机制使得客户端在崩溃的时候,服务端消息不丢失,但是如果rabbitmq奔溃了呢?该如何保证队列中的消息不丢失? 此就需要product在往队列中push消息的时候,告诉rabbitmq,此队列中的消息需要持久化,用到的参数:durable=True,再次强调,Producer和client都应该去创建这个queue,尽管只有一个地方的创建是真正起作用的:
2
3
4
5
6
7
2 routing_key="test",
3 body=message,
4 properties=pika.BasicProperties(
5 delivery_mode = 2, # make message persistent
6 ))
7
具体代码:
product端:
2
3
4
5
6
7
8
9
10
11
12
2
3connection = pika.BlockingConnection(pika.ConnectionParameters(
4 host='127.0.0.1', port=5672, )) #定义连接池
5channel = connection.channel() #声明队列以向其发送消息消息
6
7channel.queue_declare(queue='test_persistent',durable=True)
8for i in range(10):
9 channel.basic_publish(exchange='', routing_key='test_persistent', body=str(i),properties=pika.BasicProperties(delivery_mode=2))
10 print('send success msg[%s] to rabbitmq' %i)
11connection.close() #关闭连接
12
client端:
2
3
4
5
6
7
8
9
10
11
12
13
14
15
16
17
18
19
20
21
22
23
24
25
26
2import time
3
4connection = pika.BlockingConnection(pika.ConnectionParameters(
5 host='127.0.0.1', port=5672))
6channel = connection.channel()
7
8channel.queue_declare(queue='test_persistent',durable=True)
9
10
11def callback(ch, method, properties, body):
12 '''回调函数,处理从rabbitmq中取出的消息'''
13 print(" [x] Received %r" % body)
14 #time.sleep(5)
15 ch.basic_ack(delivery_tag = method.delivery_tag) #发送ack消息
16
17
18
19channel.basic_qos(prefetch_count=1)
20channel.basic_consume(callback,queue='test_persistent',no_ack=False)
21print(' [*] Waiting for messages. To exit press CTRL+C')
22channel.start_consuming() #开始监听 接受消息
23注意:client端也需配置durable=True,否则将报下面错误:
24
25pika.exceptions.ChannelClosed: (406, "PRECONDITION_FAILED - parameters for queue 'test_persistent' in vhost '/' not equivalent")
26
配置完之后,发现product往rabbitmq端push消息之后,重启rabbitmq,消息依然存在
2
3
4
5
6
7
8
9
10
11
12
13
14
15
16
17
18
19
20
21
2Listing queues ...
3abc 0
4abcd 0
5hello2 300
6test 0
7test1 20
8test_persistent 10
9...done.
10[root@dns ~]# /etc/init.d/rabbitmq-server restart
11Restarting rabbitmq-server: SUCCESS
12rabbitmq-server.
13[root@dns ~]# rabbitmqctl list_queues
14Listing queues ...
15abc 0
16abcd 0
17hello2 300
18test1 20
19test_persistent 10
20...done.
21
参考文档:参考文档:http://www.rabbitmq.com/tutorials/tutorial-two-python.html
2.使用Exchanges:
2
2
-
Exchange 类型
-
direct 关键字类型
- topic 模糊匹配类型
- fanout 广播类型
-
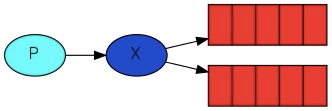
使用fanout实现发布订阅者模型
发布订阅和简单的消息队列区别在于,发布订阅会将消息发送给所有的订阅者,而消息队列中的数据被消费一次便消失。所以,RabbitMQ实现发布和订阅时,会为每一个订阅者创建一个队列,而发布者发布消息时,会将消息放置在所有相关队列中
订阅者:
2
3
4
5
6
7
8
9
10
11
12
13
14
15
16
17
18
19
20
21
22
23
24
25
26
2import time
3
4connection = pika.BlockingConnection(pika.ConnectionParameters(
5 host='127.0.0.1', port=5672))
6channel = connection.channel()
7
8channel.exchange_declare(exchange='test123',type='fanout') #定义一个exchange ,类型为fanout
9rest = channel.queue_declare(exclusive=True) #创建一个随机队列,并启用exchange
10queue_name = rest.method.queue #获取队列名
11channel.queue_bind(exchange='test123',queue=queue_name) #将随机队列名和exchange进行绑定
12
13
14def callback(ch, method, properties, body):
15 '''回调函数,处理从rabbitmq中取出的消息'''
16 print(" [x] Received %r" % body)
17 time.sleep(1)
18 ch.basic_ack(delivery_tag = method.delivery_tag) #发送ack消息
19
20
21
22channel.basic_qos(prefetch_count=1)
23channel.basic_consume(callback,queue=queue_name,no_ack=False)
24print(' [*] Waiting for messages. To exit press CTRL+C')
25channel.start_consuming() #开始监听 接受消息
26
发布者:
2
3
4
5
6
7
8
9
10
11
12
2
3connection = pika.BlockingConnection(pika.ConnectionParameters(
4 host='127.0.0.1', port=5672, )) #定义连接池
5channel = connection.channel() #声明队列以向其发送消息消息
6
7channel.exchange_declare(exchange='test123',type='fanout')
8for i in range(10):
9 channel.basic_publish(exchange='test123', routing_key='', body=str(i),properties=pika.BasicProperties(delivery_mode=2))
10 print('send success msg[%s] to rabbitmq' %i)
11connection.close() #关闭连接
12
注意:
需先定义订阅者,启动订阅者,否则发布者publish到一个不存在的exchange是被禁止的。如果没有queue bindings exchange的话,msg是被丢弃的。
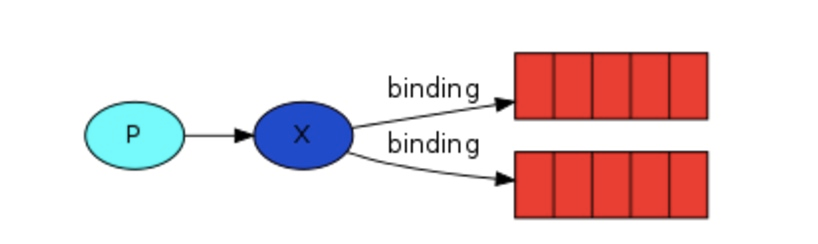
- 使用direct 实现根据关键字发布消息
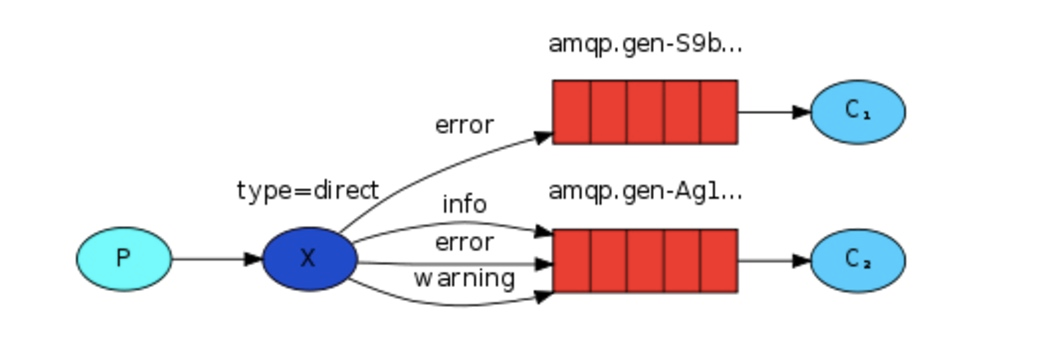
消息发布订阅者模型是发布者发布一条消息,所有订阅者都可以收到,现在rabbitmq还支持根据关键字发送,在发送消息的时候使用routing_key参数指定关键字,rabbitmq的exchange会判断routing_key的值,然后只将消息转发至匹配的队列,注意,此时需要订阅者先创建队列
配置参数为exchange的type=direct,然后定义routing_key即可
订阅者1: 订阅error,warning,info
2
3
4
5
6
7
8
9
10
11
12
13
14
15
16
17
18
19
20
21
22
23
24
25
26
27
28
29
2import time
3
4connection = pika.BlockingConnection(pika.ConnectionParameters(
5 host='127.0.0.1', port=5672))
6channel = connection.channel()
7
8channel.exchange_declare(exchange='test321',type='direct') #定义一个exchange ,类型为fanout
9rest = channel.queue_declare(exclusive=True) #创建一个随机队列,并启用exchange
10queue_name = rest.method.queue #获取队列名
11
12severities = ['error','warning','info'] #定义三个routing_key
13
14for severity in severities:
15 channel.queue_bind(exchange='test321', routing_key=severity,queue=queue_name)
16
17
18def callback(ch, method, properties, body):
19 '''回调函数,处理从rabbitmq中取出的消息'''
20 print(" [x] Received %r" % body)
21 time.sleep(1)
22 ch.basic_ack(delivery_tag = method.delivery_tag) #发送ack消息
23
24
25channel.basic_qos(prefetch_count=1)
26channel.basic_consume(callback,queue=queue_name,no_ack=False)
27print(' [*] Waiting for messages. To exit press CTRL+C')
28channel.start_consuming() #开始监听 接受消息
29
订阅者2:订阅error,warning
2
3
4
5
6
7
8
9
10
11
12
13
14
15
16
17
18
19
20
21
22
23
24
25
26
27
28
29
30
2import time
3
4connection = pika.BlockingConnection(pika.ConnectionParameters(
5 host='127.0.0.1', port=5672))
6channel = connection.channel()
7
8channel.exchange_declare(exchange='test321',type='direct') #定义一个exchange ,类型为fanout
9rest = channel.queue_declare(exclusive=True) #创建一个随机队列,并启用exchange
10queue_name = rest.method.queue #获取队列名
11
12severities = ['error','warning'] #定义两个routing_key
13
14for severity in severities:
15 channel.queue_bind(exchange='test321', routing_key=severity,queue=queue_name)
16
17
18def callback(ch, method, properties, body):
19 '''回调函数,处理从rabbitmq中取出的消息'''
20 print(" [x] Received %r" % body)
21 time.sleep(1)
22 ch.basic_ack(delivery_tag = method.delivery_tag) #发送ack消息
23
24
25
26channel.basic_qos(prefetch_count=1)
27channel.basic_consume(callback,queue=queue_name,no_ack=False)
28print(' [*] Waiting for messages. To exit press CTRL+C')
29channel.start_consuming() #开始监听 接受消息
30
发布者:
2
3
4
5
6
7
8
9
10
11
12
13
2
3connection = pika.BlockingConnection(pika.ConnectionParameters(
4 host='127.0.0.1', port=5672, )) #定义连接池
5channel = connection.channel() #声明队列以向其发送消息消息
6
7channel.exchange_declare(exchange='test321',type='direct')
8channel.basic_publish(exchange='test321', routing_key='info', body='info msg',properties=pika.BasicProperties(delivery_mode=2)) #发送info msg到 info routing_key
9channel.basic_publish(exchange='test321', routing_key='error', body='error msg',properties=pika.BasicProperties(delivery_mode=2)) #发送error msg到 error routing_key
10
11print('send success msg[] to rabbitmq')
12connection.close() #关闭连接**
13
效果:发现订阅者1和订阅者2都收到error消息,但是只有订阅者1收到了info消息
2
3
4
5
6
7
8
2 [*] Waiting for messages. To exit press CTRL+C
3 [x] Received b'info msg'
4 [x] Received b'error msg'
5订阅者2:
6 [*] Waiting for messages. To exit press CTRL+C
7 [x] Received b'error msg'
8
- 使用topic实现模糊匹配发布消息
direct实现了根据自定义的routing_key来标示不同的queue,使用topic可以让队列绑定几个模糊的关键字,之后发送者将数据发送到exchange,exchange将传入”路由值“和 ”关键字“进行匹配,匹配成功,则将数据发送到指定队列
2
3
4
5
6
7
8
9
10
2* 表示只能匹配 一个 单词
3
4如:
5fuzj.test 和fuzj.test.test
6fuzj.# 会匹配到 fuzj.test 和fuzj.test.test
7fuzj.* 只会匹配到fuzj.test
8
9
10
订阅者1: 使用#匹配
2
3
4
5
6
7
8
9
10
11
12
13
14
15
16
17
18
19
20
21
22
23
24
25
26
27
2import time
3
4connection = pika.BlockingConnection(pika.ConnectionParameters(
5 host='127.0.0.1', port=5672))
6channel = connection.channel()
7
8channel.exchange_declare(exchange='test333',type='topic') #定义一个exchange ,类型为fanout
9rest = channel.queue_declare(exclusive=True) #创建一个随机队列,并启用exchange
10queue_name = rest.method.queue #获取队列名
11
12channel.queue_bind(exchange='test333', routing_key='test.#',queue=queue_name)
13
14
15def callback(ch, method, properties, body):
16 '''回调函数,处理从rabbitmq中取出的消息'''
17 print(" [x] Received %r" % body)
18 time.sleep(1)
19 ch.basic_ack(delivery_tag = method.delivery_tag) #发送ack消息
20
21
22
23channel.basic_qos(prefetch_count=1)
24channel.basic_consume(callback,queue=queue_name,no_ack=False)
25print(' [*] Waiting for messages. To exit press CTRL+C')
26channel.start_consuming() #开始监听 接受消息
27
订阅者2:使用*匹配
2
3
4
5
6
7
8
9
10
11
12
13
14
15
16
17
18
19
20
21
22
23
24
25
26
2import time
3
4connection = pika.BlockingConnection(pika.ConnectionParameters(
5 host='127.0.0.1', port=5672))
6channel = connection.channel()
7
8channel.exchange_declare(exchange='test333',type='topic') #定义一个exchange ,类型为fanout
9rest = channel.queue_declare(exclusive=True) #创建一个随机队列,并启用exchange
10queue_name = rest.method.queue #获取队列名
11
12channel.queue_bind(exchange='test333', routing_key='test.*',queue=queue_name)
13
14def callback(ch, method, properties, body):
15 '''回调函数,处理从rabbitmq中取出的消息'''
16 print(" [x] Received %r" % body)
17 time.sleep(1)
18 ch.basic_ack(delivery_tag = method.delivery_tag) #发送ack消息
19
20
21
22channel.basic_qos(prefetch_count=1)
23channel.basic_consume(callback,queue=queue_name,no_ack=False)
24print(' [*] Waiting for messages. To exit press CTRL+C')
25channel.start_consuming() #开始监听 接受消息
26
发布者:
2
3
4
5
6
7
8
9
10
11
12
13
2
3connection = pika.BlockingConnection(pika.ConnectionParameters(
4 host='127.0.0.1', port=5672, )) #定义连接池
5channel = connection.channel() #声明队列以向其发送消息消息
6
7channel.exchange_declare(exchange='test333',type='topic')
8channel.basic_publish(exchange='test333', routing_key='test.123', body='test.123 msg',properties=pika.BasicProperties(delivery_mode=2))
9channel.basic_publish(exchange='test333', routing_key='test.123.321', body=' test.123.321 msg',properties=pika.BasicProperties(delivery_mode=2))
10
11print('send success msg[] to rabbitmq')
12connection.close() #关闭连接
13
输出效果:
2
3
4
5
6
7
8
9
2 [*] Waiting for messages. To exit press CTRL+C
3 [x] Received b'test.123 msg'
4 [x] Received b' test.123.321 msg'
5
6订阅者2:
7 [*] Waiting for messages. To exit press CTRL+C
8 [x] Received b'test.123 msg'
9
- 实现RPC
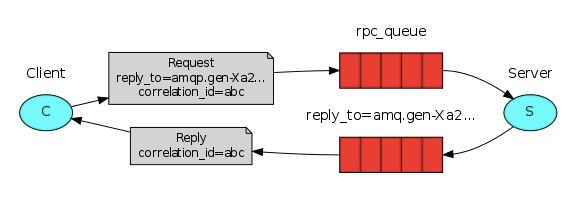
- 过程:
客户端 Client 设置消息的 routing key 为 Service 的队列 op_q,设置消息的 reply-to 属性为返回的 response 的目标队列 reponse_q,设置其 correlation_id 为以随机UUID,然后将消息发到 exchange。比如channel.basic_publish(exchange='', routing_key='op_q', properties=pika.BasicProperties(reply_to = reponse_q, correlation_id = self.corr_id),body=request)
Exchange 将消息转发到 Service 的 op_q
Service 收到该消息后进行处理,然后将response 发到 exchange,并设置消息的 routing_key 为原消息的 reply_to 属性,以及设置其 correlation_id 为原消息的 correlation_id 。
ch.basic_publish(exchange='', routing_key=props.reply_to, properties=pika.BasicProperties(correlation_id = props.correlation_id), body=str(response))
2
3
4
2
3* Client 逐一接受 response_q 中的消息,检查消息的 correlation_id 是否为等于它发出的消息的correlation_id,是的话表明该消息为它需要的response。
4
-
代码实现:
-
服务端:
2
3
4
5
6
7
8
9
10
11
12
13
14
15
16
17
18
19
20
21
22
23
24
25
26
27
28
29
30
31
32
33
34
2import subprocess
3connection = pika.BlockingConnection(pika.ConnectionParameters(
4 host='127.0.0.1', port=5672, )) #定义连接池
5
6channel = connection.channel() #创建通道
7
8channel.queue_declare(queue='rpc_queue') #创建rpc_queue队列
9
10def operating(arg):
11 p = subprocess.Popen(arg, shell=True, stdout=subprocess.PIPE, stderr=subprocess.PIPE) #执行系统命令
12 res = p.stdout.read() #取出标准输出
13 if not res: #判断是否有执行结果
14 responses_msg = p.stderr.read() #没有执行结果则取出标准错误输出
15 else:
16 responses_msg = res
17 return responses_msg
18
19def on_request(ch, method, props, body):
20 command = str(body,encoding='utf-8')
21 print(" [.] start Processing command : %s" % command)
22 response_msg = operating(command) #调用函数执行命令
23 ch.basic_publish(exchange='',
24 routing_key=props.reply_to,
25 properties=pika.BasicProperties(correlation_id = props.correlation_id),body=str(response_msg))
26 ch.basic_ack(delivery_tag = method.delivery_tag)
27
28
29channel.basic_qos(prefetch_count=1) #消息不平均分配,谁取谁得
30channel.basic_consume(on_request, queue='rpc_queue') #监听队列
31
32print(" [x] Awaiting RPC requests")
33channel.start_consuming()
34
2
2
2
3
4
5
6
7
8
9
10
11
12
13
14
15
16
17
18
19
20
21
22
23
24
25
26
27
28
29
30
31
32
33
34
35
36
37
38
39
40
41
42
43
44
2import uuid
3import time
4
5class FibonacciRpcClient(object):
6 def __init__(self):
7 self.connection = pika.BlockingConnection(pika.ConnectionParameters(
8 host='127.0.0.1',port=5672,)) #定义连接池
9
10 self.channel = self.connection.channel() #创建通道
11
12 result = self.channel.queue_declare(exclusive=True,auto_delete=True) #创建客户端短接受服务端回应消息的队列,\exclusive=True表示只队列只允许当前链接进行连接,auto_delete=True表示自动删除
13 self.callback_queue = result.method.queue #获取队列名称
14
15 self.channel.basic_consume(self.on_response, no_ack=True,
16 queue=self.callback_queue) #从队列中获取消息
17
18 def on_response(self, ch, method, props, body):
19 if self.corr_id == props.correlation_id: #判断
20 self.response = body
21
22 def call(self, n):
23 self.response = None
24 self.corr_id = str(uuid.uuid4())
25 self.channel.basic_publish(exchange='',
26 routing_key='rpc_queue',
27 properties=pika.BasicProperties(
28 reply_to = self.callback_queue, #回应消息的队列
29 correlation_id = self.corr_id, #correlation id可以理解为请求的唯一标识码
30 ),
31 body=str(n))
32 while self.response is None: #不断从自己监听的队列里取消息,直到取到消息
33 self.connection.process_data_events()
34 return self.response.decode()
35
36fibonacci_rpc = FibonacciRpcClient()
37
38print(" [x] Requesting server" )
39time.sleep(0.1)
40while True:
41 command = input('>> ')
42 response = fibonacci_rpc.call(command)
43 print(" [.] Get %r \n" % response)
44
