Tip: 此篇已加入.NET Core微服务基础系列文章索引
一、啥是API网关?
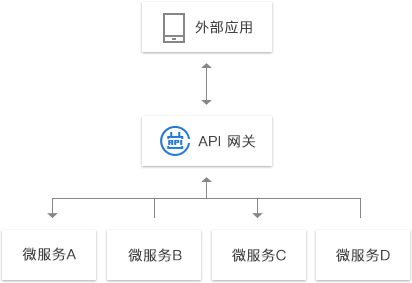
API 网关一般放到微服务的最前端,并且要让API 网关变成由应用所发起的每个请求的入口。这样就可以明显的简化客户端实现和微服务应用程序之间的沟通方式。以前的话,客户端不得不去请求微服务A(假设为Customers),然后再到微服务B(假设为Orders),然后是微服务C(假设为Invoices)。客户端需要去知道怎么去一起来消费这三个不同的service。使用API网关,我们可以抽象所有这些复杂性,并创建客户端们可以使用的优化后的端点,并向那些模块们发出请求。API网关的核心要点是:所有的客户端和消费端都通过统一的网关接入微服务,在网关层处理所有的非业务功能(比如验证、鉴权、监控等等)。
微服务架构中的任何一个环节,都是可以说很久的,而我没有太多经验,也就不多谈了。
二、开源项目:Ocelot

Ocelot是一个使用.NET Core平台上的一个API Gateway,这个项目的目标是在.NET上面运行微服务架构。Ocelot框架内部集成了IdentityServer(身份验证)和Consul(服务注册发现),还引入了Polly(上一篇博文中提到过)来处理进行故障处理。
Ocelot github : https://github.com/TomPallister/Ocelot
三、快速开始第一个API网关
3.1 安装Ocelot
NuGet>Install-Package Ocelot
3.2 快速准备两个API服务
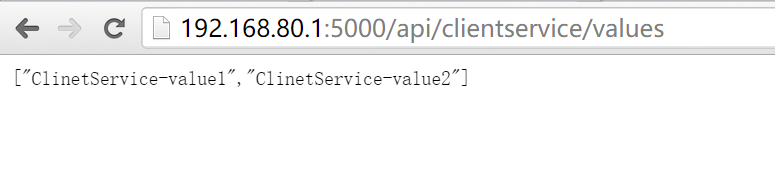
(1)准备一个ClientService
创建一个ASP.NET Core WebAPI程序,保留默认ValuesController,做一下修改:
2
3
4
5
6
7
8
9
10
11
12
13
2 public class ValuesController : Controller
3 {
4 // GET api/values
5 [HttpGet]
6 public IEnumerable<string> Get()
7 {
8 return new string[] { "ClinetService-value1", "ClinetService-value2" };
9 }
10
11 ......
12 }
13
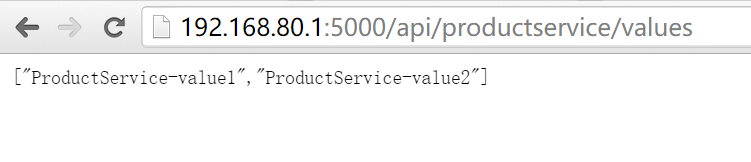
(2)准备一个ProductService
创建一个ASP.NET Core WebAPI程序,保留默认ValuesController,做一下修改:
2
3
4
5
6
7
8
9
10
11
12
13
2 public class ValuesController : Controller
3 {
4 // GET api/values
5 [HttpGet]
6 public IEnumerable<string> Get()
7 {
8 return new string[] { "ProductService-value1", "ProductService-value2" };
9 }
10
11 ......
12 }
13
3.3 静态配置两个API服务
创建一个ASP.NET Core WebAPI程序,这里命名为APIGateway.
(1)新建一个json文件:eg.configuration.json
首先,一个最基本的配置文件如下:
2
3
4
5
6
7
2 "ReRoutes": [],
3 "GlobalConfiguration": {
4 "BaseUrl": "https://api.mybusiness.com"
5 }
6}
7
这里特别注意一下BaseUrl是我们外部暴露的Url,比如我们的Ocelot运行在http://123.111.11.1的一个地址上,但是前面有一个Nginx绑定了域名http://api.edisonchou.cn,那这里我们的BaseUrl就是 http://api.edisonchou.cn。现在我们的实验环境不存在这个条件,所以我们暂时不需要配置这个option。下面我们根据模板将刚刚创建并启动的两个Service的信息进行了配置:
2
3
4
5
6
7
8
9
10
11
12
13
14
15
16
17
18
19
20
21
22
23
24
25
26
27
28
29
30
31
2 "ReRoutes": [
3 // API:CAS.ClientService
4 {
5 "DownstreamPathTemplate": "/api/{url}",
6 "DownstreamScheme": "http",
7 "DownstreamHostAndPorts": [
8 {
9 "Host": "192.168.2.231",
10 "Port": "8810"
11 }
12 ],
13 "UpstreamPathTemplate": "/ClientService/{url}",
14 "UpstreamHttpMethod": [ "Get", "Post" ]
15 },
16 // API:CAS.ProductService
17 {
18 "DownstreamPathTemplate": "/api/{url}",
19 "DownstreamScheme": "http",
20 "DownstreamHostAndPorts": [
21 {
22 "Host": "192.168.2.231",
23 "Port": "8820"
24 }
25 ],
26 "UpstreamPathTemplate": "/ProductService/{url}",
27 "UpstreamHttpMethod": [ "Get", "Post" ]
28 }
29 ]
30}
31
其中,我们得了解一下微服务架构中的上游服务器和下游服务器,一般下游服务器指的是提供API服务的REST Service Server(比如WebAPI、WCF App等),而上游服务器则指的是提供Web网页服务的Web Server(比如MVC Application,可能需要访问REST Service)。那么,这里我们可以了解到:
- Downstream 是下游服务配置 => 即我们刚刚创建的提供API服务的配置,我们会指定PathTemplate,Host和Port等信息(具体调哪一台服务器是由我说了算)
- UpStream 是上游服务配置 => 即服务消费方(eg.MVC Server, SPA App)的调用配置(你要怎么按照什么URL格式和什么HTTP类型调用我才能理解)
通过配置文件,我们可以猜测Ocelot的实现原理大致应该就是把客户端对网关的请求(Request),按照configuration.json的映射配置,转发给对应的后端http service,然后从后端http service获取响应(Response)后,再返回给客户端。当然,具体细节应该十分复杂,等后面有时间深入看看实现机制。
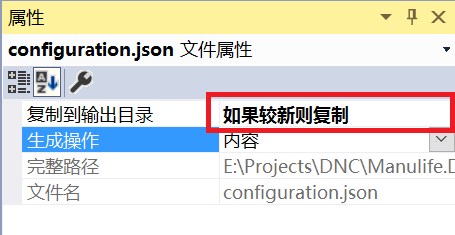
其他不再解释,可以看明白,另外,需要对这个配置文件进行以下设置:为了确保直接运行时能够找到这个configuration.json文件
*.通过配置文件可以完成对Ocelot的功能配置:路由、服务聚合、服务发现、认证、鉴权、限流、熔断、缓存、Header头传递等。在配置文件中包含两个根节点:ReRoutes和GlobalConfiguration。ReRoutes是一个数组,其中的每一个元素代表了一个路由,我们可以针对每一个路由进行以上功能配置。
(2)改写Program和StartUp类,才能正常使用Ocelot
①在Program类的BuildWebHost中让程序读取configuration.json文件
2
3
4
5
6
7
8
9
10
11
12
13
14
15
16
17
18
19
20
2 {
3 public static void Main(string[] args)
4 {
5 BuildWebHost(args).Run();
6 }
7
8 public static IWebHost BuildWebHost(string[] args)
9 {
10 return WebHost.CreateDefaultBuilder(args)
11 .UseStartup<Startup>()
12 .UseUrls($"http://{IP}:{Port}")
13 .ConfigureAppConfiguration((hostingContext, builder) =>
14 {
15 builder.AddJsonFile("configuration.json", false, true);
16 })
17 .Build();
18 }
19 }
20
②在StartUp类中为Ocelot注入配置,并启动Ocelot
2
3
4
5
6
7
8
9
10
11
12
13
14
15
16
17
18
19
20
21
22
23
24
25
26
27
28
29
30
31
2 {
3 public Startup(IConfiguration configuration)
4 {
5 Configuration = configuration;
6 }
7
8 public IConfiguration Configuration { get; }
9
10 // This method gets called by the runtime. Use this method to add services to the container.
11 public void ConfigureServices(IServiceCollection services)
12 {
13 //services.AddMvc(); -- no need MVC
14 // Ocelot
15 services.AddOcelot(Configuration);
16 }
17
18 // This method gets called by the runtime. Use this method to configure the HTTP request pipeline.
19 public void Configure(IApplicationBuilder app, IHostingEnvironment env)
20 {
21 if (env.IsDevelopment())
22 {
23 app.UseDeveloperExceptionPage();
24 }
25
26 //app.UseMvc(); -- no need MVC
27 // Ocelot
28 app.UseOcelot().Wait();
29 }
30 }
31
3.3 测试一下
(1)先启动ClientService和ProductService => 也可以通过在VS中更改启动顺序来指定
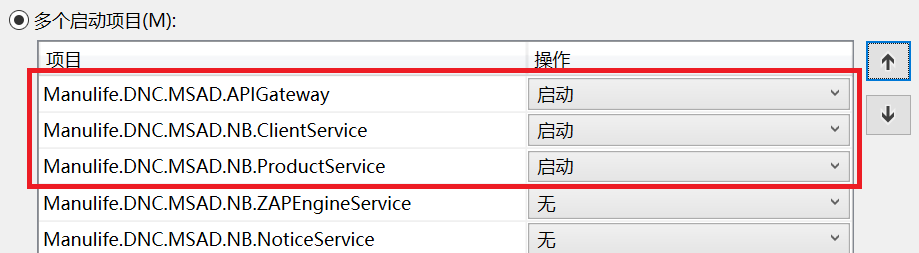
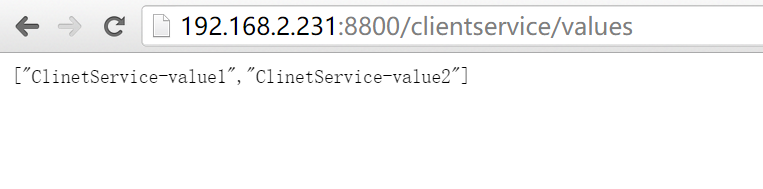
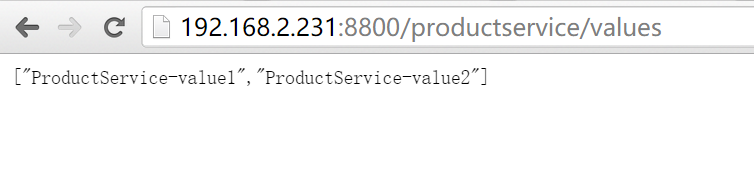
(2)再启动APIGateway,在浏览器中直接访问API网关所在的地址和端口(这里是192.168.2.231:8800)进行测试:先请求ClientService,再请求ProductService,可以看到API网关对请求进行了转发,服务消费方不需要记住每个service所在的IP和端口,而是只需要告诉网关我需要消费哪个service即可。
*._tip:_这里配置的PathTemplate大小写不敏感,可以选择通过设置ReRouteIsCaseSensitive:true来实现大小写敏感
到这里,第一个API网关的实现就结束了,但是对于众多的微服务,如果我们都一一硬编码地配置其IP和Port在配置文件中,不适合微服务架构的风格,因为众多的服务地址变化会让静态配置的工作变得越来越大。因此,我们学习了服务发现,那么是否可以结合服务发现呢?Ocelot + Consul的方式为我们给出了答案。
四、Ocelot+Consul的结合
4.1 实验节点部署结构
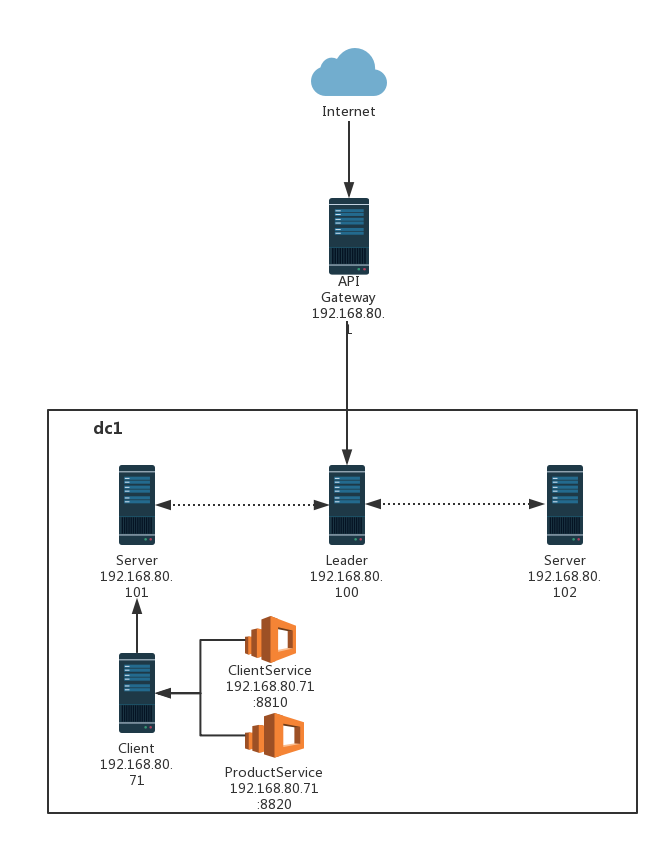
这里仍然采用之前的Consul实验集群,三个Consul Server节点(1个leader,2个follwer),一个Consul Client节点(部署了两个服务ClientService和ProductService),以及一个API网关节点(基于Ocelot)。
4.2 启动Consul
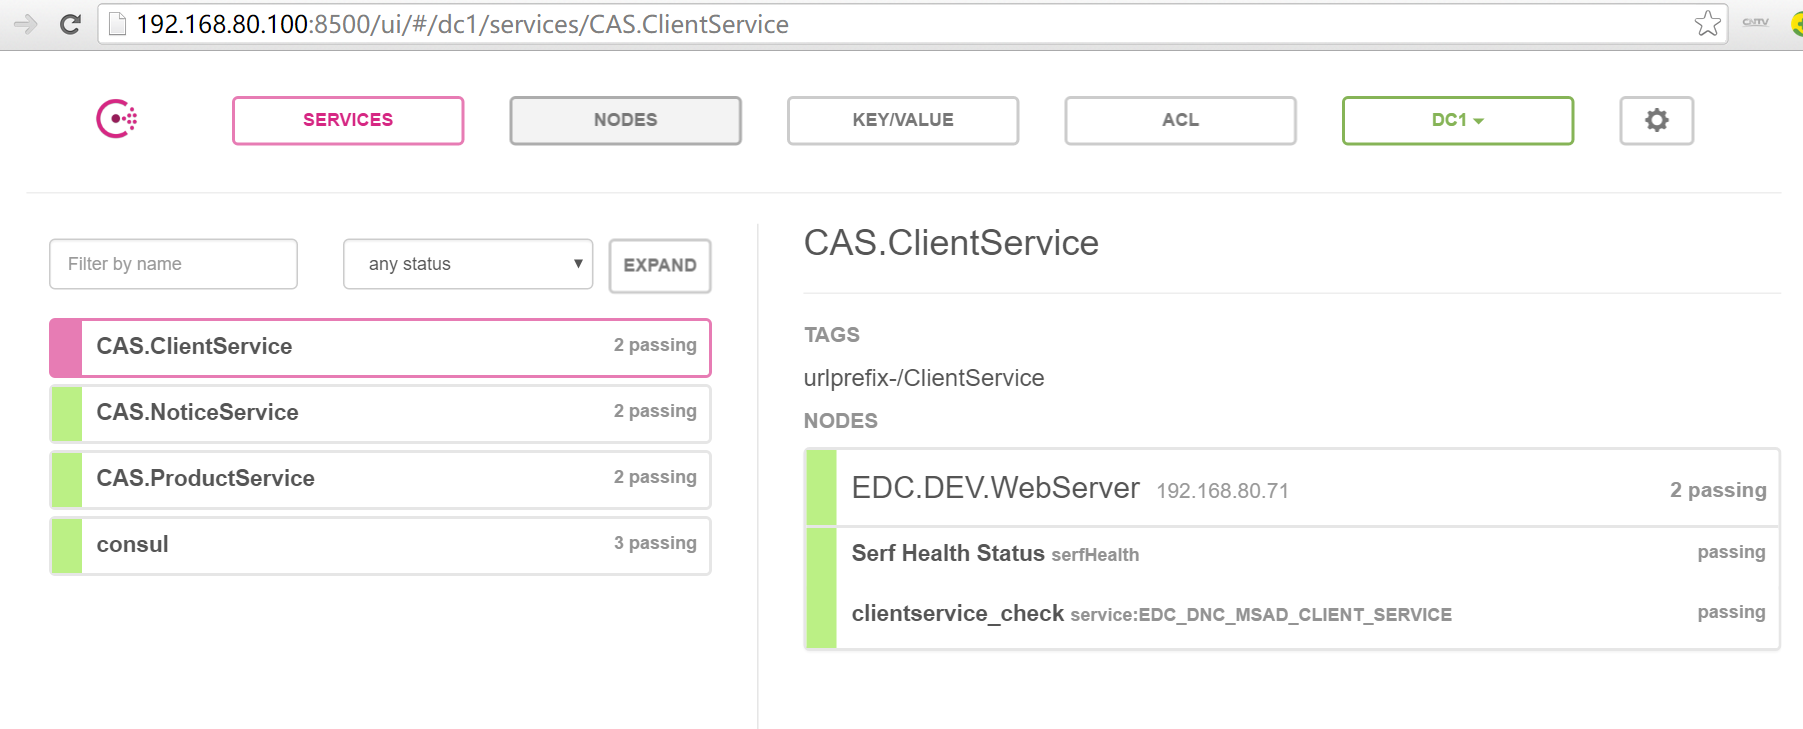
启动方式以及步骤这里不再赘述,如不了解请浏览我的前两篇博文《.NET Core微服务之基于Consul实现服务治理》以及《.NET Core微服务之基于Consul实现服务治理(续)》。这里可以看到,我们已经成功地注册了ClientService和ProductService。
4.3 启动API Gateway
(1)为了适配Consul服务发现,减少服务IP和Port的hard-code,我们需要改一下配置文件:
2
3
4
5
6
7
8
9
10
11
12
13
14
15
16
17
18
19
20
21
22
23
24
25
26
27
28
29
30
31
32
33
34
35
36
37
38
2 "ReRoutes": [
3 // API01:CAS.ClientService
4 {
5 "UseServiceDiscovery": true, // use Consul service discovery
6 "DownstreamPathTemplate": "/api/{url}",
7 "DownstreamScheme": "http",
8 "ServiceName": "CAS.ClientService",
9 "LoadBalancerOptions": {
10 "Type": "RoundRobin"
11 },
12 "UpstreamPathTemplate": "/api/clientservice/{url}",
13 "UpstreamHttpMethod": [ "Get", "Post" ],
14 "ReRoutesCaseSensitive": false // non case sensitive
15 },
16 // API02:CAS.ProductService
17 {
18 "UseServiceDiscovery": true, // use Consul service discovery
19 "DownstreamPathTemplate": "/api/{url}",
20 "DownstreamScheme": "http",
21 "ServiceName": "CAS.ProductService",
22 "LoadBalancerOptions": {
23 "Type": "RoundRobin"
24 },
25 "UpstreamPathTemplate": "/api/productservice/{url}",
26 "UpstreamHttpMethod": [ "Get", "Post" ],
27 "ReRoutesCaseSensitive": false // non case sensitive
28 }
29 ],
30 "GlobalConfiguration": {
31 //"BaseUrl": "https://api.mybusiness.com"
32 "ServiceDiscoveryProvider": {
33 "Host": "192.168.80.100", // Consul Service IP
34 "Port": 8500 // Consul Service Port
35 }
36 }
37}
38
Ocelot提供了基本的负载均衡选项(LoadBalanceOptions):轮询和最小连接数,如果我们部署了多个一样的服务,那么我们设置一个选项。
(2)其他代码无须更改,对于基本用法,我们要做的基本只是对配置文件的修改。配置完成后,即可启动API网关项目。
4.4 测试
(1)请求ClientService
(2)请求ProductService
五、小结
本篇介绍了API网关的基础概念以及一个基于适合于.NET Core的开源项目Ocelot,并通过两个小案例(一个静态配置服务,一个结合Consul服务发现)来了解了API网关的作用和Ocelot的最基础的用法。下一篇会继续Ocelot的一些比较有用的功能(比如:限流、熔断、缓存,以及结合Swagger),继续做一些实践,也希望到时可以总结下来与各位园友分享。
示例代码
Click here => 点我下载
参考资料
杨晓东,《谈谈微服务中的API网关》
桂素伟,《Ocelot + Consul实践》
杨中科,《.NET微服务直播课课件pdf》
李朝强,《ASP.NET Core API网关Ocelot》
jesse 腾飞,《.NET Core开源API网关 – Ocelot中文文档》
Ocelot官网:https://github.com/ThreeMammals/Ocelot => tip: 张善友大队长为主要贡献者之一
Ocelot官方文档:http://ocelot.readthedocs.io/en/latest/index.html
