https://www.cnblogs.com/ysw-go/p/5432921.html
原文:
责任链模式是一种对象的行为模式。在责任链模式里,很多对象由每一个对象对其下家的引用而连接起来形成一条链。请求在这个链上传递,直到链上的某一个对象决定处理此请求。发出这个请求的客户端并不知道链上的哪一个对象最终处理这个请求,这使得系统可以在不影响客户端的情况下动态地重新组织和分配责任。Tomcat中的Filter就是使用了责任链模式,创建一个Filter除了要在web.xml文件中做相应配置外,还需要实现javax.servlet.Filter接口。
为了方便理解,责任链模式直接用马士兵老师中的一个例子来讲解,做下笔记也方便自己以后的复习查询:
我们有一个字符串String msg = ":):,<script>,敏感,被就业,网络授课";我们希望应用以下三个规则对字符串进行过滤和谐处理:
(1)将字符串中出现的"<>"符号替换成"[]"
(2)处理字符串中的敏感信息,将被就业和谐成就业
(3)将字符串中出现的":):"转换成"^V^";
字符串会依次运用这三条规则,对字符串进行处理,每个规则都有自己需要完成的责任和任务。
第一步:定义封装请求的类Request和封装处理结果响应的类Response
2
3
4
5
6
7
8
9
10
11
12
13
14
15
2 1 //封装请求的类Request
3 2 public class Request {
4 3 String requestStr;
5 4
6 5 public String getRequest() {
7 6 return requestStr;
8 7 }
9 8
10 9 public void setRequest(String request) {
1110 this.requestStr = request;
1211 }
1312
1413 }
15
2
3
4
5
6
7
8
9
10
11
12
13
14
15
2 1 //封装响应信息的类Response
3 2 public class Response {
4 3 String responseStr;
5 4
6 5 public String getResponse() {
7 6 return responseStr;
8 7 }
9 8
10 9 public void setResponse(String response) {
1110 this.responseStr = response;
1211 }
1312
1413 }
15
第二步:定义具有过滤功能的接口Filter,具体的过滤规则需要实现该接口
2
3
4
5
6
7
8
9
10
11
21 /*
32 * 定义接口Filter,具体的过滤规则需要实现这个接口,最后一个参数添加的意义是我们在Main函数中:
43 * fc.doFilter(request, response,fc);执行这一步的时候可以按照规则链条一次使用三个过滤规则对字符串进行处理
54 * 因为
65 *
76 */
87 public interface Filter {
98 void doFilter(Request request,Response response,FilterChain chain);
109 }
11
第三步:定义具体的过滤处理规则
规则一
2
3
4
5
6
7
8
9
10
11
12
13
14
15
16
17
18
2 1 package com.bjsxt.dp.filter;
3 2
4 3 //处理字符串中的HTML标记
5 4 public class HTMLFilter implements Filter {
6 5
7 6 public void doFilter(Request request, Response response,FilterChain chain) {
8 7 //将字符串中出现的"<>"符号替换成"[]"
9 8 request.requestStr=request.requestStr
10 9 .replace('<', '[').replace('>', ']')+
1110 //后面添加的是便于我们观察代码执行步骤的字符串
1211 "----HTMLFilter()";
1312 chain.doFilter(request, response,chain);
1413 response.responseStr+="---HTMLFilter()";
1514 }
1615
1716 }
18
规则二
2
3
4
5
6
7
8
9
10
11
12
13
14
15
16
17
18
2 1 package com.bjsxt.dp.filter;
3 2
4 3 //定义的过滤敏感字眼的过滤规则
5 4 public class SensitiveFilter implements Filter{
6 5
7 6 public void doFilter(Request request, Response response,FilterChain chain) {
8 7 //处理字符串中的敏感信息,将被就业和谐成就业
9 8 request.requestStr=request.requestStr
10 9 .replace("被就业", "就业").replace("敏感", "")+
1110 //后面添加的是便于我们观察代码执行步骤的字符串
1211 " ---sensitiveFilter()";
1312 chain.doFilter(request, response,chain);
1413 response.responseStr+="---sensitiveFilter()";
1514 }
1615
1716 }
18
规则三
2
3
4
5
6
7
8
9
10
11
12
13
14
15
16
17
18
2 1 package com.bjsxt.dp.filter;
3 2
4 3 //定义FaceFilter
5 4 public class FaceFilter implements Filter {
6 5
7 6 public void doFilter(Request request, Response response, FilterChain chain) {
8 7
9 8 //将字符串中出现的":):"转换成"^V^";
10 9 request.requestStr = request.requestStr.replace(":):", "^V^")
1110 //后面添加的是便于我们观察代码执行步骤的字符串
1211 + "----FaceFilter()";
1312 chain.doFilter(request, response, chain);
1413 response.responseStr += "---FaceFilter()";
1514 }
1615
1716 }
18
第四步:定义责任链FilterChain
2
3
4
5
6
7
8
9
10
11
12
13
14
15
16
17
18
19
20
21
22
23
24
25
26
27
28
29
30
31
2 1 package com.bjsxt.dp.filter;
3 2
4 3 import java.util.ArrayList;
5 4 import java.util.List;
6 5
7 6 //过滤链条
8 7 public class FilterChain implements Filter{
9 8 //用List集合来存储过滤规则
10 9 List<Filter> filters = new ArrayList<Filter>();
1110 //用于标记规则的引用顺序
1211 int index=0;
1312 //往规则链条中添加规则
1413 public FilterChain addFilter(Filter f) {
1514 filters.add(f);
1615 //代码的设计技巧:Chain链添加过滤规则结束后返回添加后的Chain,方便我们下面doFilter函数的操作
1716 return this;
1817 }
1918 public void doFilter(Request request,Response response,FilterChain chain){
2019 //index初始化为0,filters.size()为3,不会执行return操作
2120 if(index==filters.size()){
2221 return;
2322 }
2423 //每添加一个过滤规则,index自增1
2524 Filter f=filters.get(index);
2625 index++;
2726 //根据索引值获取对应的规律规则对字符串进行处理
2827 f.doFilter(request, response, chain);
2928 }
3029 }
31
第五步:测试一下我们的代码
2
3
4
5
6
7
8
9
10
11
12
13
14
15
16
17
18
19
20
21
22
23
24
25
26
27
28
29
30
31
32
33
34
35
36
37
38
39
40
2 1 package com.bjsxt.dp.filter;
3 2
4 3 /*
5 4 * 责任链模式:
6 5 * 数据消息在进入数据库之前,要被多种过滤规则进行处理,多种规则形成一种链,依次处理
7 6 * 给定的数据消息
8 7 */
9 8 public class Main {
10 9 public static void main(String args[]) {
1110 //设定过滤规则,对msg字符串进行过滤处理
1211 String msg = ":):,<script>,敏感,被就业,网络授课";
1312 //过滤请求
1413 Request request=new Request();
1514 //set方法,将待处理字符串传递进去
1615 request.setRequest(msg);
1716 //处理过程结束,给出的响应
1817 Response response=new Response();
1918 //设置响应信息
2019 response.setResponse("response:");
2120 //FilterChain,过滤规则形成的拦截链条
2221 FilterChain fc=new FilterChain();
2322 //规则链条添加过滤规则,采用的是链式调用
2423 fc.addFilter(new HTMLFilter())
2524 .addFilter(new SensitiveFilter())
2625 .addFilter(new FaceFilter());
2726 //按照FilterChain的规则顺序,依次应用过滤规则
2827 fc.doFilter(request, response,fc);
2928 //打印请求信息
3029 System.out.println(request.getRequest());
3130 //打印响应信息
3231 System.out.println(response.getResponse());
3332 /*
3433 * 处理器对数据进行处理
3534 * --|----|---数据--|-----|---
3635 * 规则1 规则2 规则3 规则4
3736 */
3837 }
3938 }
40
运行结果:
2
3
4
2^V^,[script],,就业,网络授课----HTMLFilter() ---sensitiveFilter()----FaceFilter()
3response:---FaceFilter()---sensitiveFilter()---HTMLFilter()
4
代码可以使用Eclipse中设置断点,debug单步调试去验证,我们下面带着大家一块执行一下上面的代码。
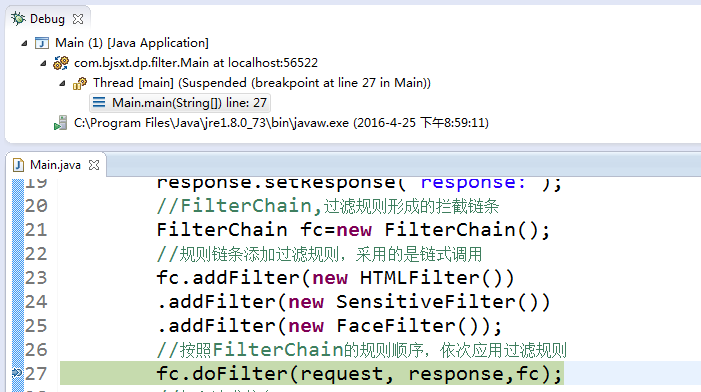
(1)主函数中执行到fc.doFilter(request, response,fc);我们在此处设置断点(Eclipse设置断点的方式:在这行左面,双击那个竖边框的对应位置即可设置断点),现在的执行情况是下面这样,代码上面可以看到执行过程,现在停留在Main.main函数中。

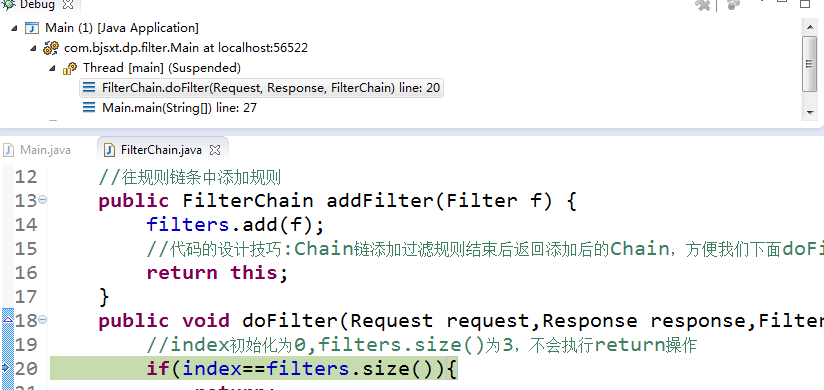
(2)我们点击左上角的Step Into(F5)进入到doFilter(request,response,fc)中

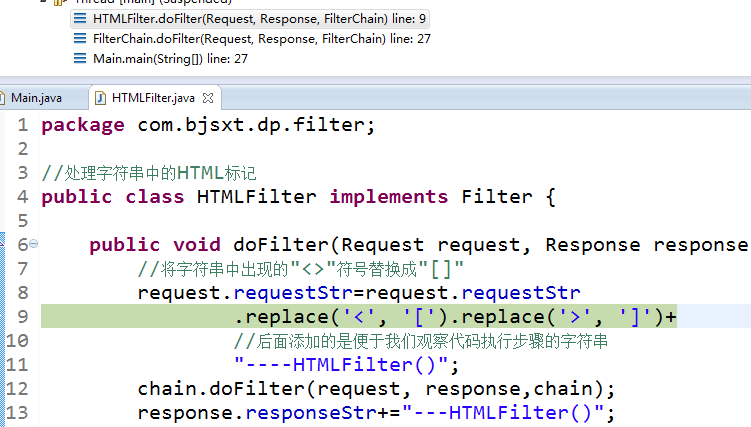
现在执行位置在FilterChain.doFilter,依次执行代码,因为此时的index还是0,因此不可能执行return操作,跳过if代码块,调用索引值为0的规则HTMLFilter,index自增1,执行f.doFilter(request, response, chain);现在进入到了HTMLFilter类中的doFilter方法中

依次执行代码,对字符串请求进行处理,执行到chain.doFilter(request, response,chain)这一句,会再次进入FilterChain中的doFilter方法内

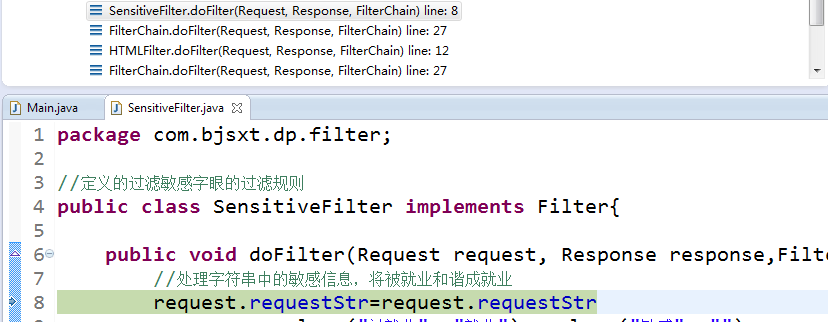
此时的index为1,仍然跳过if代码块执行下面的步骤,和上面一样,用索引值为1的规则进行处理,index自增1现在变成2了。执行f.doFilter(request, response, chain);会进入到SensitiveFilter中的doFilter方法执行

第三个规则的应用和前两个一致,直接给出执行到FaceFilter类中的doFilter方法的结果截图

现在执行到if判断,index的值为3,满足判断条件返回,上图中最上面的函数退栈,回到FaceFilter.doFilter函数中执行response.responseStr += "—FaceFilter()";这就是我们运行结果中response中的第一部分。函数会依次退栈,response不断添加已经做过处理的规则的信息response.responseStr+="—sensitiveFilter()";response.responseStr+="—HTMLFilter()";最终回到Main.main函中打印reponse信息
运行过程用下图表示:

在Android中,view的invalidate的调用触发的viewgroup的invalidateChild方法内部的do…while循环,就是运用了责任链模式,通过不断的执行父布局(即parent)的invalidateChildInParent方法来进行重绘区域的计算。
2
3
4
5
6
7
8
9
10
11
12
13
14
15
16
17
18
19
20
21
22
23
24
25
26
27
28
29
30
31
32
33
34
35
36
37
38
39
40
41
42
43
44
45
46
47
48
49
50
51
52
53
54
55
56
57
58
59
60
61
62
63
64
65
66
67
68
69
70
71
72
73
74
75
2
3
4 @Override
5 public final void invalidateChild(View child, final Rect dirty) {
6 ViewParent parent = this;
7
8 final AttachInfo attachInfo = mAttachInfo;
9 if (attachInfo != null) {
10
11 RectF boundingRect = attachInfo.mTmpTransformRect;
12 boundingRect.set(dirty);
13
14 ``````
15 //父容器根据自身对子View的脏区域进行调整
16
17 transformMatrix.mapRect(boundingRect);
18 dirty.set((int) Math.floor(boundingRect.left),
19 (int) Math.floor(boundingRect.top),
20 (int) Math.ceil(boundingRect.right),
21 (int) Math.ceil(boundingRect.bottom));
22
23 // 这里的do while方法,不断的去调用父类的invalidateChildInParent方法来传递重绘请求
24 //直到调用到ViewRootImpl的invalidateChildInParent(责任链模式)
25 do {
26 View view = null;
27 if (parent instanceof View) {
28 view = (View) parent;
29 }
30
31 if (drawAnimation) {
32 if (view != null) {
33 view.mPrivateFlags |= PFLAG_DRAW_ANIMATION;
34 } else if (parent instanceof ViewRootImpl) {
35 ((ViewRootImpl) parent).mIsAnimating = true;
36 }
37 }
38
39 //如果父类是"实心"的,那么设置它的mPrivateFlags标识
40 // If the parent is dirty opaque or not dirty, mark it dirty with the opaque
41 // flag coming from the child that initiated the invalidate
42 if (view != null) {
43 if ((view.mViewFlags & FADING_EDGE_MASK) != 0 &&
44 view.getSolidColor() == 0) {
45 opaqueFlag = PFLAG_DIRTY;
46 }
47 if ((view.mPrivateFlags & PFLAG_DIRTY_MASK) != PFLAG_DIRTY) {
48 view.mPrivateFlags = (view.mPrivateFlags & ~PFLAG_DIRTY_MASK) | opaqueFlag;
49 }
50 }
51
52 //***往上递归调用父类的invalidateChildInParent***
53 parent = parent.invalidateChildInParent(location, dirty);
54
55 //设置父类的脏区域
56 //父容器会把子View的脏区域转化为父容器中的坐标区域
57 if (view != null) {
58 // Account for transform on current parent
59 Matrix m = view.getMatrix();
60 if (!m.isIdentity()) {
61 RectF boundingRect = attachInfo.mTmpTransformRect;
62 boundingRect.set(dirty);
63 m.mapRect(boundingRect);
64 dirty.set((int) Math.floor(boundingRect.left),
65 (int) Math.floor(boundingRect.top),
66 (int) Math.ceil(boundingRect.right),
67 (int) Math.ceil(boundingRect.bottom));
68 }
69 }
70 }
71 while (parent != null);
72 }
73 }
74
75
原文资料:Android view的工作流程
