docker微服务部署之:一,搭建Eureka微服务项目
一、新增demo_article模块,并编写代码
右键demo_parent->new->Module->Maven,选择Module SK为jdk8->ArtifactId:demo_article
1.修改pom.xml文件
2
3
4
5
6
7
8
9
10
11
12
13
14
15
16
17
18
19
20
21
22
23
24
25
26
27
28
29
30
31
32
2<project xmlns="http://maven.apache.org/POM/4.0.0"
3 xmlns:xsi="http://www.w3.org/2001/XMLSchema-instance"
4 xsi:schemaLocation="http://maven.apache.org/POM/4.0.0 http://maven.apache.org/xsd/maven-4.0.0.xsd">
5 <parent>
6 <artifactId>demo_parent</artifactId>
7 <groupId>com.demo</groupId>
8 <version>1.0-SNAPSHOT</version>
9 </parent>
10 <modelVersion>4.0.0</modelVersion>
11
12 <artifactId>demo_article</artifactId>
13
14 <dependencies>
15 <!-- jpa依赖 -->
16 <dependency>
17 <groupId>org.springframework.boot</groupId>
18 <artifactId>spring-boot-starter-data-jpa</artifactId>
19 </dependency>
20 <!-- mysql依赖-->
21 <dependency>
22 <groupId>mysql</groupId>
23 <artifactId>mysql-connector-java</artifactId>
24 </dependency>
25 <!-- eureka客户端依赖 -->
26 <dependency>
27 <groupId>org.springframework.cloud</groupId>
28 <artifactId>spring-cloud-starter-netflix-eureka-client</artifactId>
29 </dependency>
30 </dependencies>
31</project>
32
2.在resources目录下新增application.yml文件
2
3
4
5
6
7
8
9
10
11
12
13
14
15
16
17
18
19
20
21
22
23
2 port: 9001 #article启动端口,可自定义
3spring:
4 application:
5 name: demo-article #article项目名称,可自定义
6 datasource:
7 url: jdbc:mysql://192.168.31.181:3306/docker?characterEncoding=UTF8 #192.168.31.181为虚拟机宿主机的ip地址,mysql是安装在docker容器里。详见:Centos7下安装Docker和Docker安装Mysql
8 driver-class-name: com.mysql.jdbc.Driver
9 username: root
10 password: 123456
11 jpa:
12 database: mysql
13 show-sql: true
14 generate-ddl: false
15eureka:
16 client:
17 fetch-registry: true
18 register-with-eureka: true
19 service-url:
20 defaultZone: http://192.168.31.181:7000/eureka #在IDEA中运行时使用127.0.0.1,部署发布时,请修改为虚拟机宿主机的ip地址
21 instance:
22 prefer-ip-address: true
23
3.新建com.demo.article包,并在该包下新建启动类ArticleApplication
2
3
4
5
6
7
8
9
10
11
12
13
14
15
16
17
18
19
2
3import org.springframework.boot.SpringApplication;
4import org.springframework.boot.autoconfigure.SpringBootApplication;
5import org.springframework.cloud.netflix.eureka.EnableEurekaClient;
6
7/**
8 * 文章微服务
9 */
10// 标注为一个spring boot项目
11@SpringBootApplication
12// 标注为一个eureka客户端
13@EnableEurekaClient
14public class ArticleApplication {
15 public static void main(String[] args) {
16 SpringApplication.run(ArticleApplication.class, args);
17 }
18}
19
4.编写pojo类
2
3
4
5
6
7
8
9
10
11
12
13
14
15
16
17
18
19
20
21
2
3import lombok.Data;
4
5import javax.persistence.*;
6import java.io.Serializable;
7import java.util.Date;
8
9@Entity
10@Table(name = "tb_article")
11@Data //使用该注解,相当于自动生成了getter和setter方法
12public class Article implements Serializable {
13 @Id
14 @GeneratedValue(strategy = GenerationType.IDENTITY) #id自增
15 private Integer id;
16 private String title;
17 private String content;
18 private String author;
19 private Date addTime;
20}
21
5.编写dao类
2
3
4
5
6
7
8
9
2
3import com.demo.article.pojo.Article;
4import org.springframework.data.jpa.repository.JpaRepository;
5
6public interface ArticleDao extends JpaRepository<Article,Integer> {
7
8}
9
6.编写service类
2
3
4
5
6
7
8
9
10
11
12
13
14
15
16
17
18
2
3import com.demo.article.pojo.Article;
4
5import java.util.List;
6
7public interface ArticleService {
8 List<Article> findAll();
9
10 Article findById(Integer id);
11
12 void add(Article article);
13
14 void updae(Article article);
15
16 void deleteById(Integer id);
17}
18
2
3
4
5
6
7
8
9
10
11
12
13
14
15
16
17
18
19
20
21
22
23
24
25
26
27
28
29
30
31
32
33
34
35
36
37
38
39
40
2
3import com.demo.article.dao.ArticleDao;
4import com.demo.article.pojo.Article;
5import org.springframework.beans.factory.annotation.Autowired;
6import org.springframework.stereotype.Service;
7
8import java.util.List;
9
10@Service
11public class ArticleServiceImpl implements ArticleService {
12 @Autowired
13 ArticleDao articleDao;
14
15 @Override
16 public List<Article> findAll() {
17 return articleDao.findAll();
18 }
19
20 @Override
21 public Article findById(Integer id) {
22 return articleDao.findById(id).get();
23 }
24
25 @Override
26 public void add(Article article) {
27 articleDao.save(article);
28 }
29
30 @Override
31 public void updae(Article article) {
32 articleDao.save(article);
33 }
34
35 @Override
36 public void deleteById(Integer id) {
37 articleDao.deleteById(id);
38 }
39}
40
7.编写vo类
2
3
4
5
6
7
8
9
10
11
12
13
14
15
16
17
18
19
20
21
22
23
24
25
26
27
2
3import lombok.Data;
4
5import java.io.Serializable;
6
7/**
8 * 统一返回数据实体类
9 */
10@Data
11public class Result implements Serializable {
12 private Boolean flag;//是否成功
13 private String message;//消息
14 private Object data;//返回数据
15
16 public Result(Boolean flag, String message) {
17 this.flag = flag;
18 this.message = message;
19 }
20
21 public Result(Boolean flag, String message, Object data) {
22 this.flag = flag;
23 this.message = message;
24 this.data = data;
25 }
26}
27
8.编写controller类
2
3
4
5
6
7
8
9
10
11
12
13
14
15
16
17
18
19
20
21
22
23
24
25
26
27
28
29
30
31
32
33
34
35
36
37
38
39
40
41
42
43
44
2
3import com.demo.article.pojo.Article;
4import com.demo.article.service.ArticleService;
5import com.demo.article.vo.Result;
6import org.springframework.beans.factory.annotation.Autowired;
7import org.springframework.web.bind.annotation.*;
8
9@RestController
10@RequestMapping("/article")
11public class ArticleController {
12 @Autowired
13 ArticleService articleService;
14
15 @RequestMapping(method = RequestMethod.GET)
16 public Result findAll(){
17 return new Result(true, "查询成功", articleService.findAll());
18 }
19
20 @RequestMapping(value = "/{id}",method = RequestMethod.GET)
21 public Result findById(@PathVariable Integer id) {
22 return new Result(true, "查询成功", articleService.findById(id));
23 }
24
25 @RequestMapping(method = RequestMethod.POST)
26 public Result add(@RequestBody Article article) {
27 articleService.add(article);
28 return new Result(true, "添加成功");
29 }
30
31 @RequestMapping(value = "/{id}",method = RequestMethod.PUT)
32 public Result update(@RequestBody Article article, @PathVariable("id") Integer id) {
33 article.setId(id);
34 articleService.updae(article);
35 return new Result(true,"修改成功");
36 }
37
38 @RequestMapping(value = "/{id}", method = RequestMethod.DELETE)
39 public Result deleteById(@PathVariable("id") Integer id) {
40 articleService.deleteById(id);
41 return new Result(true, "删除成功");
42 }
43}
44
9.数据库sql脚本
先创建数据库docker,字符集utf8,排序规则utf8-general_ci
2
3
4
5
6
7
8
9
10
11
12
13
14
15
16
2SET FOREIGN_KEY_CHECKS = 0;
3
4-- ----------------------------
5-- Table structure for tb_article
6-- ----------------------------
7DROP TABLE IF EXISTS `tb_article`;
8CREATE TABLE `tb_article` (
9 `id` int(11) NOT NULL AUTO_INCREMENT,
10 `title` varchar(200) CHARACTER SET utf8 COLLATE utf8_general_ci NULL DEFAULT NULL,
11 `content` mediumtext CHARACTER SET utf8 COLLATE utf8_general_ci NULL,
12 `author` varchar(100) CHARACTER SET utf8 COLLATE utf8_general_ci NULL DEFAULT NULL,
13 `add_time` datetime(0) NULL DEFAULT NULL,
14 PRIMARY KEY (`id`) USING BTREE
15) ENGINE = MyISAM AUTO_INCREMENT = 3 CHARACTER SET = utf8 COLLATE = utf8_general_ci ROW_FORMAT = Dynamic;
16
10.运行ArticleApplication启动类
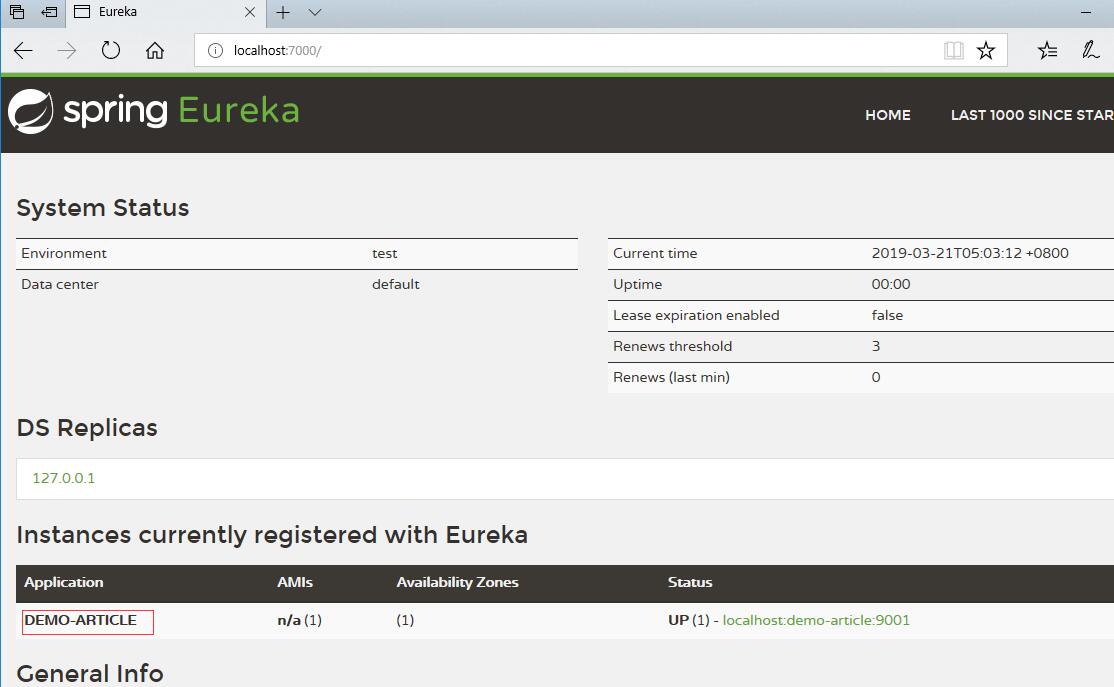
刷新eureka界面,可以看到有一个名为DEMO-ARTICLE的服务已经注册上来了
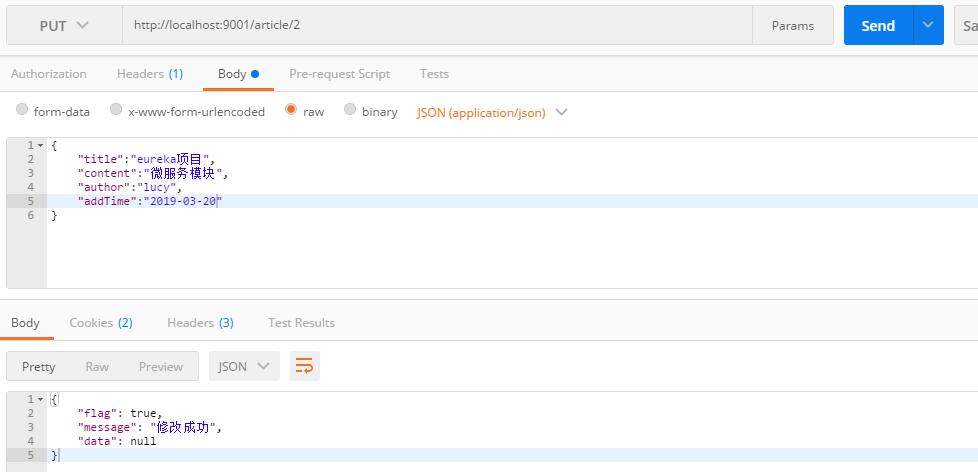
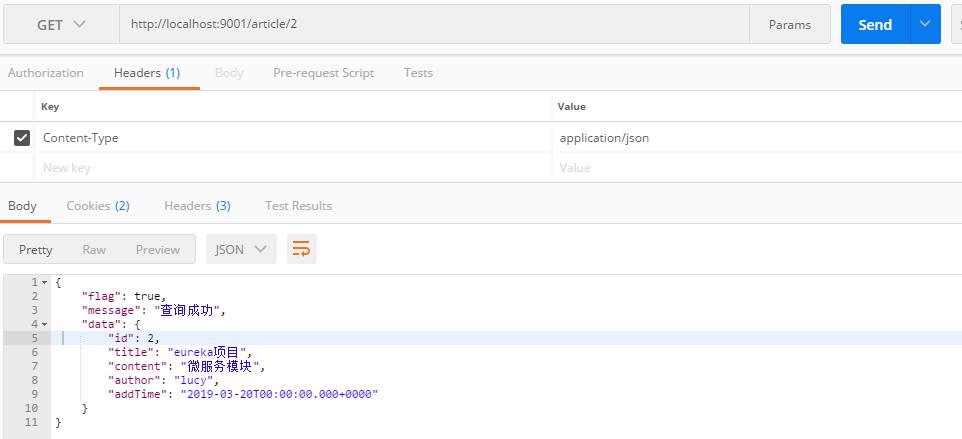
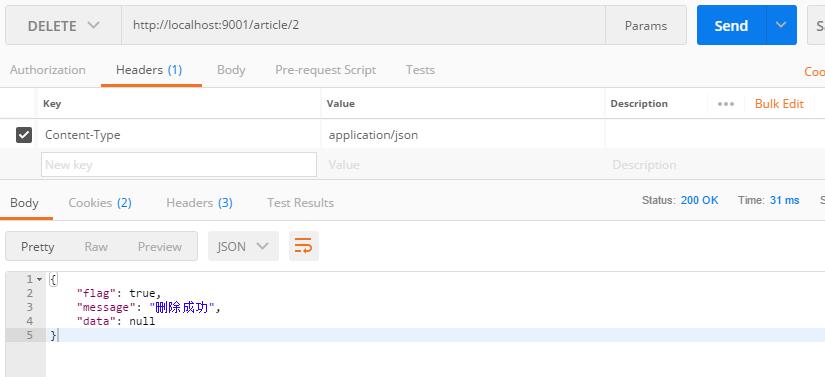
11.使用Postman进行CRUD测试
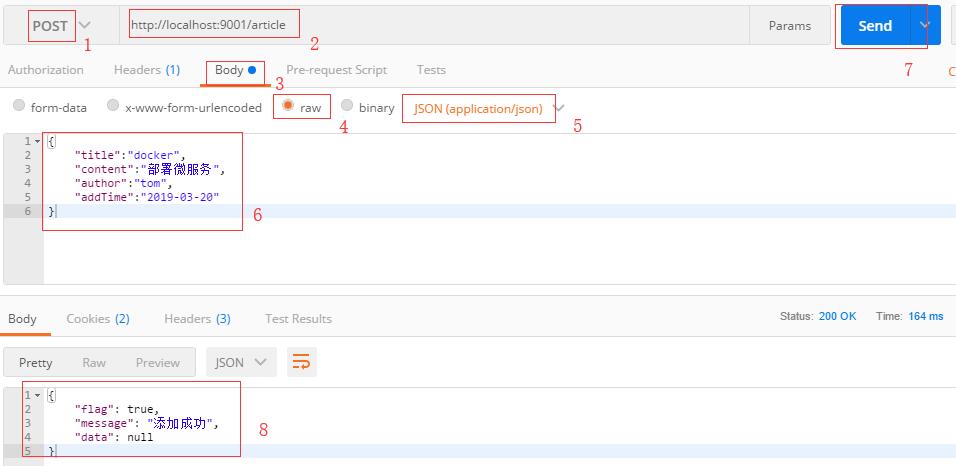
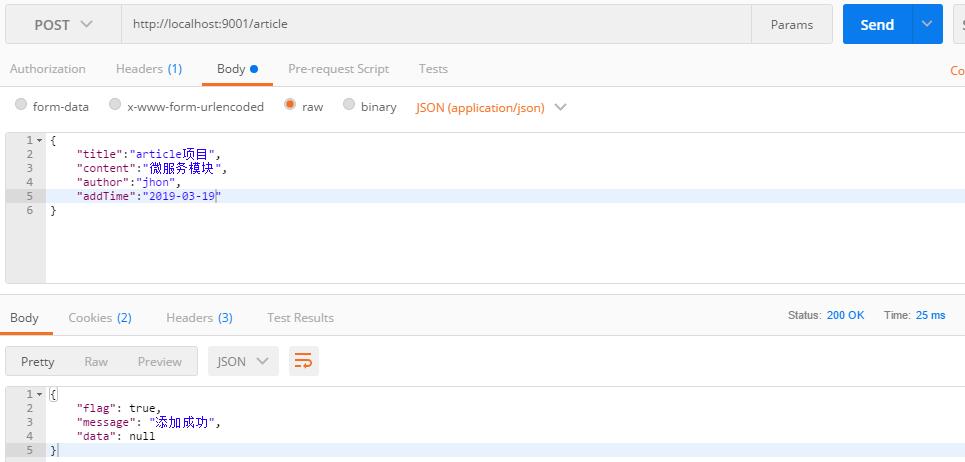
11.1 测试add方法
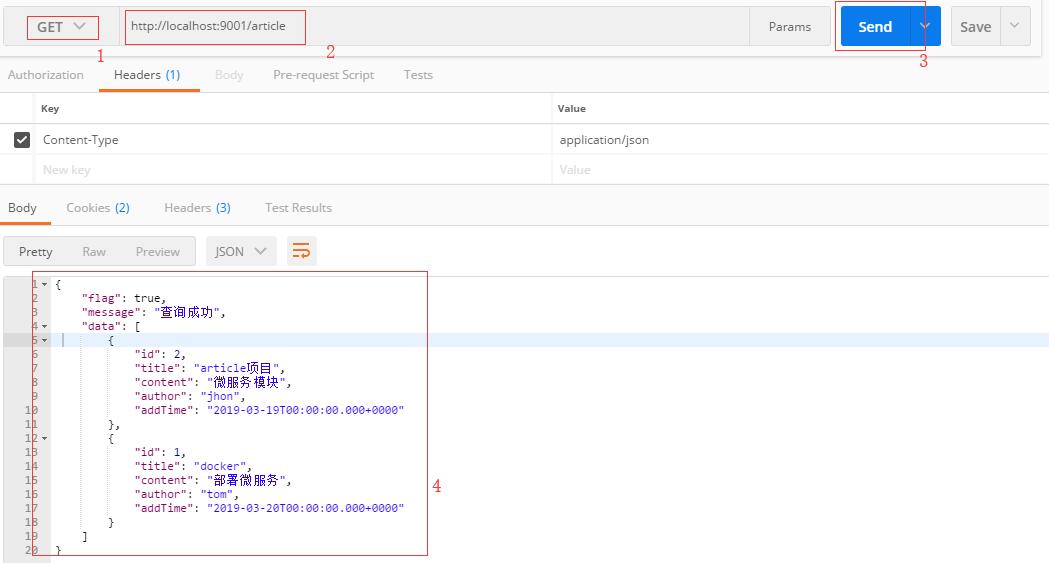
11.2 测试findAll方法
11.3 测试udpate方法
11.4 测试findById方法
11.5 测试delete方法
** docker微服务部署之:三,搭建Zuul微服务项目**
