开源单点登录系统CAS入门
什么是单点登录
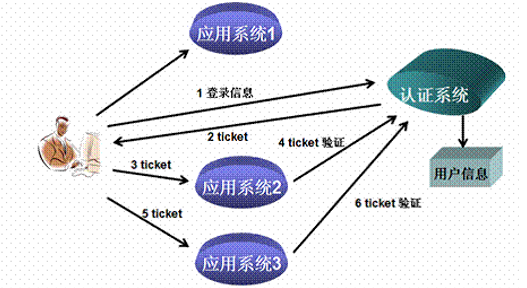
单点登录(Single Sign On),简称为 SSO,是目前比较流行的企业业务整合的解决方案之一。SSO的定义是在多个应用系统中,用户只需要登录一次就可以访问所有相互信任的应用系统。
我们目前的系统存在诸多子系统,而这些子系统是分别部署在不同的服务器中,那么使用传统方式的session是无法解决的,我们需要使用相关的单点登录技术来解决。
什么是CAS
CAS 是 Yale 大学发起的一个开源项目,旨在为 Web 应用系统提供一种可靠的单点登录方法,CAS 在 2004 年 12 月正式成为 JA-SIG 的一个项目。CAS 具有以下特点:
- 开源的企业级单点登录解决方案。
- CAS Server 为需要独立部署的 Web 应用。
- CAS Client 支持非常多的客户端(这里指单点登录系统中的各个 Web 应用),包括 Java, .Net, PHP, Perl, Apache, uPortal, Ruby 等。
从结构上看,CAS 包含两个部分: CAS Server 和 CAS Client。CAS Server 需要独立部署,主要负责对用户的认证工作;CAS Client 负责处理对客户端受保护资源的访问请求,需要登录时,重定向到 CAS Server。下图是 CAS 最基本的协议过程:
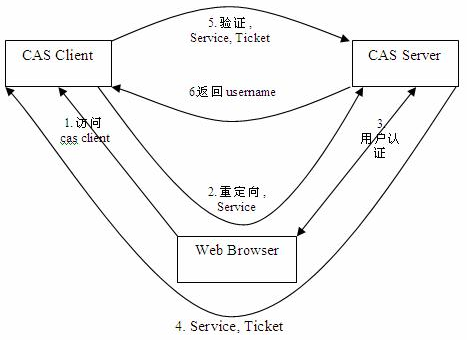
SSO单点登录访问流程主要有以下步骤:
- 访问服务:SSO客户端发送请求访问应用系统提供的服务资源。
- 定向认证:SSO客户端会重定向用户请求到SSO服务器。
- 用户身份认证
- 发放票据:SSO服务器会产生一个随机的Service Ticket。
- 验证票据:SSO服务器验证票据Service Ticket的合法性,验证通过后,允许客户端访问服务。
- 传输用户信息:SSO服务器验证票据通过后,传输用户认证结果信息给客户端。
CAS服务端部署
Cas服务端其实就是一个war包。
在资源\cas\source\cas-server-4.0.0-release\cas-server-4.0.0\modules目录下cas-server-webapp-4.0.0.war 将其改名为cas.war放入tomcat目录下的webapps下。启动tomcat自动解压war包。浏览器输入http://localhost:8080/cas/login ,可看到登录页面:

不要嫌弃这个页面丑,我们后期可以再提升它的颜值。暂时把注意力放在功能实现上。
这里有个固定的用户名和密码 casuser /Mellon
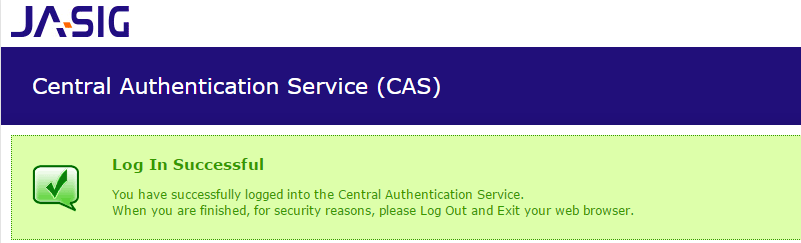
登录成功后会跳到登录成功的提示页面:
CAS服务端配置
端口修改
(1)修改tomcat的端口
- 打开tomcat 目录 conf\server.xml 找到下面的配置

将端口8080,改为9100。
(2)修改CAS配置文件
修改cas的WEB-INF/cas.properties
2
3
2
3
去除https认证
CAS默认使用的是HTTPS协议,如果使用HTTPS协议需要SSL安全证书(需向特定的机构申请和购买) 。如果对安全要求不高或是在开发测试阶段,可使用HTTP协议。我们这里讲解通过修改配置,让CAS使用HTTP协议。
(1)修改cas的WEB-INF/deployerConfigContext.xml。找到下面的配置
2
3
4
2p:httpClient-ref="httpClient"/>
3
4
这里需要增加参数p:requireSecure="false",requireSecure属性意思为是否需要安全验证,即HTTPS,false为不采用
(2)修改cas的/WEB-INF/spring-configuration/ticketGrantingTicketCookieGenerator.xml。找到下面配置:
2
3
4
5
6
7
2 p:cookieSecure="true"
3 p:cookieMaxAge="-1"
4 p:cookieName="CASTGC"
5 p:cookiePath="/cas" />
6
7
参数p:cookieSecure=“true”,同理为HTTPS验证相关,TRUE为采用HTTPS验证,FALSE为不采用https验证。
参数p:cookieMaxAge="-1",是COOKIE的最大生命周期,-1为无生命周期,即只在当前打开的窗口有效,关闭或重新打开其它窗口,仍会要求验证。可以根据需要修改为大于0的数字,比如3600等,意思是在3600秒内,打开任意窗口,都不需要验证。
我们这里将cookieSecure改为false , cookieMaxAge 改为3600
(3)修改cas的WEB-INF/spring-configuration/warnCookieGenerator.xml。找到下面配置
2
3
4
5
6
7
2p:cookieSecure="true"
3p:cookieMaxAge="-1"
4p:cookieName="CASPRIVACY"
5p:cookiePath="/cas" />
6
7
我们这里将cookieSecure改为false , cookieMaxAge 改为3600
CAS客户端入门小Demo
客户端工程1搭建
(1)搭建工程引入依赖
-
创建Maven工程 (war)casclient_demo1 引入cas客户端依赖并制定tomcat运行端口为9001
2
3
4
5
6
7
8
9
10
11
12
13
14
15
16
17
18
19
20
21
22
23
24
25
26
27
28
29
30
31
32
33
34
35
36
37
38
39
40
41
42
43
44
45
46
47
48
49
2 <modelVersion>4.0.0</modelVersion>
3 <groupId>cn.itcast.demo</groupId>
4 <artifactId>casclient_demo1</artifactId>
5 <version>0.0.1-SNAPSHOT</version>
6 <packaging>war</packaging>
7
8 <dependencies>
9 <!-- cas -->
10 <dependency>
11 <groupId>org.jasig.cas.client</groupId>
12 <artifactId>cas-client-core</artifactId>
13 <version>3.3.3</version>
14 </dependency>
15
16 <dependency>
17 <groupId>javax.servlet</groupId>
18 <artifactId>servlet-api</artifactId>
19 <version>2.5</version>
20 <scope>provided</scope>
21 </dependency>
22 </dependencies>
23
24 <build>
25 <plugins>
26 <plugin>
27 <groupId>org.apache.maven.plugins</groupId>
28 <artifactId>maven-compiler-plugin</artifactId>
29 <version>2.3.2</version>
30 <configuration>
31 <source>1.7</source>
32 <target>1.7</target>
33 </configuration>
34 </plugin>
35 <plugin>
36 <groupId>org.apache.tomcat.maven</groupId>
37 <artifactId>tomcat7-maven-plugin</artifactId>
38 <configuration>
39 <!-- 指定端口 -->
40 <port>9001</port>
41 <!-- 请求路径 -->
42 <path>/</path>
43 </configuration>
44 </plugin>
45 </plugins>
46 </build>
47</project>
48
49
(2)添加web.xml
2
3
4
5
6
7
8
9
10
11
12
13
14
15
16
17
18
19
20
21
22
23
24
25
26
27
28
29
30
31
32
33
34
35
36
37
38
39
40
41
42
43
44
45
46
47
48
49
50
51
52
53
54
55
56
57
58
59
60
61
62
63
64
65
66
67
68
69
70
71
72
73
74
75
76
77
78
79
80
81
82
83
84
85
86
87
2<web-app xmlns:xsi="http://www.w3.org/2001/XMLSchema-instance"
3 xmlns="http://java.sun.com/xml/ns/javaee"
4 xsi:schemaLocation="http://java.sun.com/xml/ns/javaee http://java.sun.com/xml/ns/javaee/web-app_2_5.xsd"
5 version="2.5">
6
7 <!-- ======================== 单点登录开始 ======================== -->
8 <!-- 用于单点退出,该过滤器用于实现单点登出功能,可选配置 -->
9 <listener>
10 <listener-class>org.jasig.cas.client.session.SingleSignOutHttpSessionListener</listener-class>
11 </listener>
12
13 <!-- 该过滤器用于实现单点登出功能,可选配置。 -->
14 <filter>
15 <filter-name>CAS Single Sign Out Filter</filter-name>
16 <filter-class>org.jasig.cas.client.session.SingleSignOutFilter</filter-class>
17 </filter>
18 <filter-mapping>
19 <filter-name>CAS Single Sign Out Filter</filter-name>
20 <url-pattern>/*</url-pattern>
21 </filter-mapping>
22
23 <!-- 该过滤器负责用户的认证工作,必须启用它 -->
24 <filter>
25 <filter-name>CASFilter</filter-name>
26 <filter-class>org.jasig.cas.client.authentication.AuthenticationFilter</filter-class>
27 <init-param>
28 <param-name>casServerLoginUrl</param-name>
29 <param-value>http://localhost:9100/cas/login</param-value>
30 <!--这里的server是服务端的IP -->
31 </init-param>
32 <init-param>
33 <param-name>serverName</param-name>
34 <param-value>http://localhost:9001</param-value>
35 </init-param>
36 </filter>
37 <filter-mapping>
38 <filter-name>CASFilter</filter-name>
39 <url-pattern>/*</url-pattern>
40 </filter-mapping>
41
42 <!-- 该过滤器负责对Ticket的校验工作,必须启用它 -->
43 <filter>
44 <filter-name>CAS Validation Filter</filter-name>
45 <filter-class>
46 org.jasig.cas.client.validation.Cas20ProxyReceivingTicketValidationFilter</filter-class>
47 <init-param>
48 <param-name>casServerUrlPrefix</param-name>
49 <param-value>http://localhost:9100/cas</param-value>
50 </init-param>
51 <init-param>
52 <param-name>serverName</param-name>
53 <param-value>http://localhost:9001</param-value>
54 </init-param>
55 </filter>
56 <filter-mapping>
57 <filter-name>CAS Validation Filter</filter-name>
58 <url-pattern>/*</url-pattern>
59 </filter-mapping>
60
61 <!-- 该过滤器负责实现HttpServletRequest请求的包裹, 比如允许开发者通过HttpServletRequest的getRemoteUser()方法获得SSO登录用户的登录名,可选配置。 -->
62 <filter>
63 <filter-name>CAS HttpServletRequest Wrapper Filter</filter-name>
64 <filter-class>
65 org.jasig.cas.client.util.HttpServletRequestWrapperFilter</filter-class>
66 </filter>
67 <filter-mapping>
68 <filter-name>CAS HttpServletRequest Wrapper Filter</filter-name>
69 <url-pattern>/*</url-pattern>
70 </filter-mapping>
71
72 <!-- 该过滤器使得开发者可以通过org.jasig.cas.client.util.AssertionHolder来获取用户的登录名。 比如AssertionHolder.getAssertion().getPrincipal().getName()。 -->
73 <filter>
74 <filter-name>CAS Assertion Thread Local Filter</filter-name>
75 <filter-class>org.jasig.cas.client.util.AssertionThreadLocalFilter</filter-class>
76 </filter>
77 <filter-mapping>
78 <filter-name>CAS Assertion Thread Local Filter</filter-name>
79 <url-pattern>/*</url-pattern>
80 </filter-mapping>
81
82 <!-- ======================== 单点登录结束 ======================== -->
83
84
85</web-app>
86
87
(3)在webapp下新建index.jsp,编写index.jsp
2
3
4
5
6
7
8
9
10
11
12
13
14
15
2<!DOCTYPE html PUBLIC "-//W3C//DTD HTML 4.01 Transitional//EN" "http://www.w3.org/TR/html4/loose.dtd">
3<html>
4<head>
5 <meta http-equiv="Content-Type" content="text/html; charset=UTF-8">
6 <title>cas client demo1</title>
7</head>
8<body>
9欢迎来到一品优购 <%=request.getRemoteUser() %>
10
11<a href="http://localhost:9100/cas/logout?service=http://www.baidu.com">退出登录</a>
12</body>
13</html>
14
15
request.getRemoteUser()为获取远程登录名。
客户端工程2搭建
- 创建Maven工程 (war)casclient_demo2 引入cas客户端依赖并制定tomcat运行端口为9002
- 创建web.xml,参照casclient_demo1 ,将serverName的值改为http://localhost:9002,一共两处
- 创建index.jsp ,内容显示“欢迎来到二品优购”
单点登录测试
- 启动cas部署的tomcat
- 启动客户端工程1和客户端工程2
- 地址栏输入http://localhost:9001/ 和http://localhost:9002/ ,地址均会跳转到CAS登录页
- 输入用户名和密码后,页面跳转回9002 ,再次访问9001也可以打开主页面。
单点登录退出
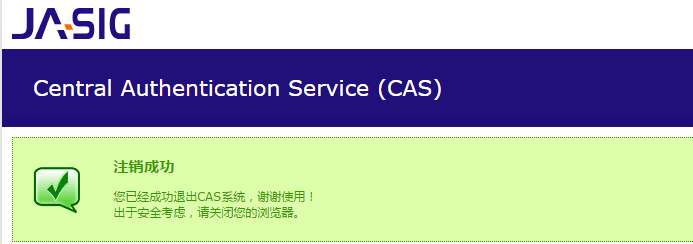
地址栏输入 http://localhost:9100/cas/logout
即可看到退出后的提示页面
我们可以将这个链接添加到index.jsp中
2
3
2
3
但我们更希望退出登录后,能自动跳转到某个页面,那如何处理呢?
修改cas系统的配置文件cas-servlet.xml
2
3
4
5
2 p:servicesManager-ref="servicesManager"
3 p:followServiceRedirects="${cas.logout.followServiceRedirects:true}"/>
4
5
改为true后,可以在退出时跳转页面到目标页面,修改index.jsp的退出链接
2
3
2
3
CAS客服端与SpringSecurity集成
Spring Security测试工程搭建
-
建立maven项目casclient_demo3 ,引入spring依赖和spring secrity 相关依赖 ,tomcat端口设置为9003
2
3
4
5
6
7
8
9
10
11
12
13
14
15
16
17
18
19
20
21
22
23
24
25
26
27
28
29
30
31
32
33
34
35
36
37
38
39
40
41
42
43
44
45
46
47
48
49
50
51
52
53
54
55
56
57
58
59
60
61
62
63
64
65
66
67
68
69
70
71
72
73
74
75
76
77
78
79
80
81
82
83
84
85
86
87
88
89
90
91
92
93
94
95
96
97
98
99
100
101
102
103
104
105
106
107
108
109
110
111
112
113
114
115
2 <modelVersion>4.0.0</modelVersion>
3 <groupId>cn.itcast.demo</groupId>
4 <artifactId>casclient_demo3</artifactId>
5 <version>0.0.1-SNAPSHOT</version>
6 <packaging>war</packaging>
7
8
9 <properties>
10 <spring.version>4.2.4.RELEASE</spring.version>
11 </properties>
12
13 <dependencies>
14
15 <dependency>
16 <groupId>org.springframework</groupId>
17 <artifactId>spring-core</artifactId>
18 <version>${spring.version}</version>
19 </dependency>
20 <dependency>
21 <groupId>org.springframework</groupId>
22 <artifactId>spring-web</artifactId>
23 <version>${spring.version}</version>
24 </dependency>
25
26 <dependency>
27 <groupId>org.springframework</groupId>
28 <artifactId>spring-webmvc</artifactId>
29 <version>${spring.version}</version>
30 </dependency>
31
32 <dependency>
33 <groupId>org.springframework</groupId>
34 <artifactId>spring-context-support</artifactId>
35 <version>${spring.version}</version>
36 </dependency>
37
38 <dependency>
39 <groupId>org.springframework</groupId>
40 <artifactId>spring-test</artifactId>
41 <version>${spring.version}</version>
42 </dependency>
43
44 <dependency>
45 <groupId>org.springframework</groupId>
46 <artifactId>spring-jdbc</artifactId>
47 <version>${spring.version}</version>
48 </dependency>
49
50 <dependency>
51 <groupId>javax.servlet</groupId>
52 <artifactId>servlet-api</artifactId>
53 <version>2.5</version>
54 <scope>provided</scope>
55 </dependency>
56
57 <dependency>
58 <groupId>org.springframework.security</groupId>
59 <artifactId>spring-security-web</artifactId>
60 <version>4.1.0.RELEASE</version>
61 </dependency>
62
63 <dependency>
64 <groupId>org.springframework.security</groupId>
65 <artifactId>spring-security-config</artifactId>
66 <version>4.1.0.RELEASE</version>
67 </dependency>
68
69
70
71 <dependency>
72 <groupId>org.springframework.security</groupId>
73 <artifactId>spring-security-cas</artifactId>
74 <version>4.1.0.RELEASE</version>
75 </dependency>
76 <dependency>
77 <groupId>org.jasig.cas.client</groupId>
78 <artifactId>cas-client-core</artifactId>
79 <version>3.3.3</version>
80 <exclusions>
81 <exclusion>
82 <groupId>org.slf4j</groupId>
83 <artifactId>log4j-over-slf4j</artifactId>
84 </exclusion>
85 </exclusions>
86 </dependency>
87 </dependencies>
88 <build>
89 <plugins>
90 <!-- java编译插件 -->
91 <plugin>
92 <groupId>org.apache.maven.plugins</groupId>
93 <artifactId>maven-compiler-plugin</artifactId>
94 <version>3.2</version>
95 <configuration>
96 <source>1.7</source>
97 <target>1.7</target>
98 <encoding>UTF-8</encoding>
99 </configuration>
100 </plugin>
101 <plugin>
102 <groupId>org.apache.tomcat.maven</groupId>
103 <artifactId>tomcat7-maven-plugin</artifactId>
104 <configuration>
105 <!-- 指定端口 -->
106 <port>9003</port>
107 <!-- 请求路径 -->
108 <path>/</path>
109 </configuration>
110 </plugin>
111 </plugins>
112 </build>
113</project>
114
115
-
建立web.xml ,添加过滤器等配置
2
3
4
5
6
7
8
9
10
11
12
13
14
15
16
17
18
19
20
21
22
23
24
25
26
27
28
29
30
31
32
33
34
35
36
37
38
39
40
41
42
2<web-app xmlns:xsi="http://www.w3.org/2001/XMLSchema-instance"
3 xmlns="http://java.sun.com/xml/ns/javaee"
4 xsi:schemaLocation="http://java.sun.com/xml/ns/javaee http://java.sun.com/xml/ns/javaee/web-app_2_5.xsd"
5 version="2.5">
6
7 <context-param>
8 <param-name>contextConfigLocation</param-name>
9 <param-value>classpath:spring-security.xml</param-value>
10 </context-param>
11 <listener>
12 <listener-class>
13 org.springframework.web.context.ContextLoaderListener
14 </listener-class>
15 </listener>
16
17 <filter>
18 <filter-name>springSecurityFilterChain</filter-name>
19 <filter-class>org.springframework.web.filter.DelegatingFilterProxy</filter-class>
20 </filter>
21 <filter-mapping>
22 <filter-name>springSecurityFilterChain</filter-name>
23 <url-pattern>/*</url-pattern>
24 </filter-mapping>
25
26
27 <servlet>
28 <servlet-name>springmvc</servlet-name>
29 <servlet-class>org.springframework.web.servlet.DispatcherServlet</servlet-class>
30 <!-- 指定加载的配置文件 ,通过参数 contextConfigLocation 加载-->
31 <init-param>
32 <param-name>contextConfigLocation</param-name>
33 <param-value>classpath:springmvc.xml</param-value>
34 </init-param>
35 </servlet>
36 <servlet-mapping>
37 <servlet-name>springmvc</servlet-name>
38 <url-pattern>*.do</url-pattern>
39 </servlet-mapping>
40</web-app>
41
42
-
创建配置文件springmvc.xml
2
3
4
5
6
7
8
9
10
11
12
13
14
15
16
17
2<beans xmlns="http://www.springframework.org/schema/beans"
3 xmlns:xsi="http://www.w3.org/2001/XMLSchema-instance" xmlns:p="http://www.springframework.org/schema/p"
4 xmlns:context="http://www.springframework.org/schema/context"
5 xmlns:dubbo="http://code.alibabatech.com/schema/dubbo" xmlns:mvc="http://www.springframework.org/schema/mvc"
6 xsi:schemaLocation="http://www.springframework.org/schema/beans http://www.springframework.org/schema/beans/spring-beans.xsd
7 http://www.springframework.org/schema/mvc http://www.springframework.org/schema/mvc/spring-mvc.xsd
8 http://code.alibabatech.com/schema/dubbo http://code.alibabatech.com/schema/dubbo/dubbo.xsd
9 http://www.springframework.org/schema/context http://www.springframework.org/schema/context/spring-context.xsd">
10
11
12 <context:component-scan base-package="cn.itcast.demo" />
13 <mvc:annotation-driven />
14
15</beans>
16
17
-
创建spring-security.xml文件
2
3
4
5
6
7
8
9
10
11
12
13
14
15
16
17
18
19
20
21
22
23
24
25
26
27
28
29
30
31
32
33
34
35
36
37
38
39
40
41
42
43
44
45
46
47
48
49
50
51
52
53
54
55
56
57
58
59
60
61
62
63
64
65
66
67
68
69
70
2<beans:beans xmlns="http://www.springframework.org/schema/security"
3 xmlns:beans="http://www.springframework.org/schema/beans" xmlns:xsi="http://www.w3.org/2001/XMLSchema-instance"
4 xsi:schemaLocation="http://www.springframework.org/schema/beans http://www.springframework.org/schema/beans/spring-beans.xsd
5 http://www.springframework.org/schema/security http://www.springframework.org/schema/security/spring-security.xsd">
6
7 <!-- entry-point-ref 入口点引用 -->
8 <http use-expressions="false" entry-point-ref="casProcessingFilterEntryPoint">
9 <intercept-url pattern="/**" access="ROLE_USER"/>
10 <csrf disabled="true"/>
11 <!-- custom-filter为过滤器, position 表示将过滤器放在指定的位置上,before表示放在指定位置之前 ,after表示放在指定的位置之后 -->
12 <custom-filter ref="casAuthenticationFilter" position="CAS_FILTER" />
13 <custom-filter ref="requestSingleLogoutFilter" before="LOGOUT_FILTER"/>
14 <custom-filter ref="singleLogoutFilter" before="CAS_FILTER"/>
15 </http>
16
17 <!-- CAS入口点 开始 -->
18 <beans:bean id="casProcessingFilterEntryPoint" class="org.springframework.security.cas.web.CasAuthenticationEntryPoint">
19 <!-- 单点登录服务器登录URL -->
20 <beans:property name="loginUrl" value="http://localhost:9100/cas/login"/>
21 <beans:property name="serviceProperties" ref="serviceProperties"/>
22 </beans:bean>
23 <beans:bean id="serviceProperties" class="org.springframework.security.cas.ServiceProperties">
24 <!--service 配置自身工程的根地址+/login/cas -->
25 <beans:property name="service" value="http://localhost:9003/login/cas"/>
26 </beans:bean>
27 <!-- CAS入口点 结束 -->
28
29 <!-- 认证过滤器 开始 -->
30 <beans:bean id="casAuthenticationFilter" class="org.springframework.security.cas.web.CasAuthenticationFilter">
31 <beans:property name="authenticationManager" ref="authenticationManager"/>
32 </beans:bean>
33 <!-- 认证管理器 -->
34 <authentication-manager alias="authenticationManager">
35 <authentication-provider ref="casAuthenticationProvider">
36 </authentication-provider>
37 </authentication-manager>
38 <!-- 认证提供者 -->
39 <beans:bean id="casAuthenticationProvider" class="org.springframework.security.cas.authentication.CasAuthenticationProvider">
40 <beans:property name="authenticationUserDetailsService">
41 <beans:bean class="org.springframework.security.core.userdetails.UserDetailsByNameServiceWrapper">
42 <beans:constructor-arg ref="userDetailsService" />
43 </beans:bean>
44 </beans:property>
45 <beans:property name="serviceProperties" ref="serviceProperties"/>
46 <!-- ticketValidator 为票据验证器 -->
47 <beans:property name="ticketValidator">
48 <beans:bean class="org.jasig.cas.client.validation.Cas20ServiceTicketValidator">
49 <beans:constructor-arg index="0" value="http://localhost:9100/cas"/>
50 </beans:bean>
51 </beans:property>
52 <beans:property name="key" value="an_id_for_this_auth_provider_only"/>
53 </beans:bean>
54 <!-- 认证类 -->
55 <beans:bean id="userDetailsService" class="cn.itcast.demo.service.UserDetailServiceImpl"/>
56
57 <!-- 认证过滤器 结束 -->
58 <!-- 单点登出 开始 -->
59 <beans:bean id="singleLogoutFilter" class="org.jasig.cas.client.session.SingleSignOutFilter"/>
60 <beans:bean id="requestSingleLogoutFilter" class="org.springframework.security.web.authentication.logout.LogoutFilter">
61 <beans:constructor-arg value="http://localhost:9100/cas/logout?service=http://www.baidu.com"/>
62 <beans:constructor-arg>
63 <beans:bean class="org.springframework.security.web.authentication.logout.SecurityContextLogoutHandler"/>
64 </beans:constructor-arg>
65 <beans:property name="filterProcessesUrl" value="/logout/cas"/>
66 </beans:bean>
67 <!-- 单点登出 结束 -->
68</beans:beans>
69
70
- 添加html页面
-
index.html
2
3
4
5
6
7
8
9
10
11
12
2<html>
3<head>
4<meta charset="UTF-8">
5<title>首页</title>
6</head>
7<body>
8欢迎进入神奇的spring security世界~~~ <a href="logout/cas">退出</a>
9</body>
10</html>
11
12
-
index2.html
2
3
4
5
6
7
8
9
10
11
12
2<html>
3<head>
4<meta charset="UTF-8">
5<title>首页</title>
6</head>
7<body>
8你已退出神奇的spring security世界~~~ 再见!
9</body>
10</html>
11
12
-
login_error.html
2
3
4
5
6
7
8
9
10
11
12
2<html>
3<head>
4<meta charset="UTF-8">
5<title>首页</title>
6</head>
7<body>
8用户名或密码错误~~~
9</body>
10</html>
11
12
-
login.html
2
3
4
5
6
7
8
9
10
11
12
13
14
15
16
17
18
19
20
2<html>
3<head>
4<meta charset="UTF-8">
5<title>登陆</title>
6</head>
7<body>
8
9--欢迎的登陆我的系统--
10<form action="/login" method="post">
11 用户名:<input name="username"><br>
12 密码:<input name="password"><br>
13 <button>登陆</button>
14</form>
15
16
17</body>
18</html>
19
20
以上步骤参照我们第四章的spring-security-demo
Spring Security与CAS集成
(1)引入依赖
2
3
4
5
6
7
8
9
10
11
12
13
14
15
16
17
18
2 <groupId>org.springframework.security</groupId>
3 <artifactId>spring-security-cas</artifactId>
4 <version>4.1.0.RELEASE</version>
5</dependency>
6<dependency>
7 <groupId>org.jasig.cas.client</groupId>
8 <artifactId>cas-client-core</artifactId>
9 <version>3.3.3</version>
10 <exclusions>
11 <exclusion>
12 <groupId>org.slf4j</groupId>
13 <artifactId>log4j-over-slf4j</artifactId>
14 </exclusion>
15 </exclusions>
16</dependency>
17
18
(2)修改spring-security.xml
2
3
4
5
6
7
8
9
10
11
12
13
14
15
16
17
18
19
20
21
22
23
24
25
26
27
28
29
30
31
32
33
34
35
36
37
38
39
40
41
42
43
44
45
46
47
48
49
50
51
52
53
54
55
56
57
58
59
60
61
62
63
64
65
66
67
68
69
70
2<beans:beans xmlns="http://www.springframework.org/schema/security"
3 xmlns:beans="http://www.springframework.org/schema/beans" xmlns:xsi="http://www.w3.org/2001/XMLSchema-instance"
4 xsi:schemaLocation="http://www.springframework.org/schema/beans http://www.springframework.org/schema/beans/spring-beans.xsd
5 http://www.springframework.org/schema/security http://www.springframework.org/schema/security/spring-security.xsd">
6
7 <!-- entry-point-ref 入口点引用 -->
8 <http use-expressions="false" entry-point-ref="casProcessingFilterEntryPoint">
9 <intercept-url pattern="/**" access="ROLE_USER"/>
10 <csrf disabled="true"/>
11 <!-- custom-filter为过滤器, position 表示将过滤器放在指定的位置上,before表示放在指定位置之前 ,after表示放在指定的位置之后 -->
12 <custom-filter ref="casAuthenticationFilter" position="CAS_FILTER" />
13 <custom-filter ref="requestSingleLogoutFilter" before="LOGOUT_FILTER"/>
14 <custom-filter ref="singleLogoutFilter" before="CAS_FILTER"/>
15 </http>
16
17 <!-- CAS入口点 开始 -->
18 <beans:bean id="casProcessingFilterEntryPoint" class="org.springframework.security.cas.web.CasAuthenticationEntryPoint">
19 <!-- 单点登录服务器登录URL -->
20 <beans:property name="loginUrl" value="http://localhost:9100/cas/login"/>
21 <beans:property name="serviceProperties" ref="serviceProperties"/>
22 </beans:bean>
23 <beans:bean id="serviceProperties" class="org.springframework.security.cas.ServiceProperties">
24 <!--service 配置自身工程的根地址+/login/cas -->
25 <beans:property name="service" value="http://localhost:9003/login/cas"/>
26 </beans:bean>
27 <!-- CAS入口点 结束 -->
28
29 <!-- 认证过滤器 开始 -->
30 <beans:bean id="casAuthenticationFilter" class="org.springframework.security.cas.web.CasAuthenticationFilter">
31 <beans:property name="authenticationManager" ref="authenticationManager"/>
32 </beans:bean>
33 <!-- 认证管理器 -->
34 <authentication-manager alias="authenticationManager">
35 <authentication-provider ref="casAuthenticationProvider">
36 </authentication-provider>
37 </authentication-manager>
38 <!-- 认证提供者 -->
39 <beans:bean id="casAuthenticationProvider" class="org.springframework.security.cas.authentication.CasAuthenticationProvider">
40 <beans:property name="authenticationUserDetailsService">
41 <beans:bean class="org.springframework.security.core.userdetails.UserDetailsByNameServiceWrapper">
42 <beans:constructor-arg ref="userDetailsService" />
43 </beans:bean>
44 </beans:property>
45 <beans:property name="serviceProperties" ref="serviceProperties"/>
46 <!-- ticketValidator 为票据验证器 -->
47 <beans:property name="ticketValidator">
48 <beans:bean class="org.jasig.cas.client.validation.Cas20ServiceTicketValidator">
49 <beans:constructor-arg index="0" value="http://localhost:9100/cas"/>
50 </beans:bean>
51 </beans:property>
52 <beans:property name="key" value="an_id_for_this_auth_provider_only"/>
53 </beans:bean>
54 <!-- 认证类 -->
55 <beans:bean id="userDetailsService" class="cn.itcast.demo.service.UserDetailServiceImpl"/>
56
57 <!-- 认证过滤器 结束 -->
58 <!-- 单点登出 开始 -->
59 <beans:bean id="singleLogoutFilter" class="org.jasig.cas.client.session.SingleSignOutFilter"/>
60 <beans:bean id="requestSingleLogoutFilter" class="org.springframework.security.web.authentication.logout.LogoutFilter">
61 <beans:constructor-arg value="http://localhost:9100/cas/logout?service=http://www.baidu.com"/>
62 <beans:constructor-arg>
63 <beans:bean class="org.springframework.security.web.authentication.logout.SecurityContextLogoutHandler"/>
64 </beans:constructor-arg>
65 <beans:property name="filterProcessesUrl" value="/logout/cas"/>
66 </beans:bean>
67 <!-- 单点登出 结束 -->
68</beans:beans>
69
70
(3)创建UserDetailsServiceImpl
2
3
4
5
6
7
8
9
10
11
12
13
14
2 * 认证类
3 */
4public class UserDetailServiceImpl implements UserDetailsService {
5 @Override
6 public UserDetails loadUserByUsername(String username) throws UsernameNotFoundException {
7 //构建角色集合
8 List<GrantedAuthority> authorities=new ArrayList();
9 authorities.add(new SimpleGrantedAuthority("ROLE_USER"));
10 return new User(username, "" , authorities);
11 }
12}
13
14
这个类的主要作用是在登陆后得到用户名,可以根据用户名查询角色或执行一些逻辑。
获取登录名
我们在处理后端逻辑需要获得登录名,那么如何获取单点登录的用户名呢? 其实和我们之前获得用户名的方式是完全相同的,我们下面来做个测试。
(1)web.xml 添加springmvc
2
3
4
5
6
7
8
9
10
11
12
13
14
15
16
2 <servlet-name>springmvc</servlet-name>
3 <servlet-class>org.springframework.web.servlet.DispatcherServlet</servlet-class>
4<!-- 指定加载的配置文件 ,通过参数contextConfigLocation加载-->
5<init-param>
6 <param-name>contextConfigLocation</param-name>
7 <param-value>classpath:springmvc.xml</param-value>
8</init-param>
9</servlet>
10
11<servlet-mapping>
12 <servlet-name>springmvc</servlet-name>
13 <url-pattern>*.do</url-pattern>
14</servlet-mapping>
15
16
(2)创建springmvc.xml
2
3
4
2 <mvc:annotation-driven />
3
4
(3)创建UserController
2
3
4
5
6
7
8
9
10
2public class UserController {
3 @RequestMapping("/findLoginUser")
4 public void findLoginUser(){
5 String name = SecurityContextHolder.getContext().getAuthentication().getName();
6 System.out.println(name);
7 }
8}
9
10
地址栏输入http://localhost:9003/findLoginUser.do 即可在控制台看到输出的登录名。
退出登录
修改spring-security.xml
2
3
4
5
6
7
8
9
2 <beans:constructor-arg value="http://localhost:9100/cas/logout?service=http://localhost:9003/index2.html"/>
3 <beans:constructor-arg>
4 <beans:bean class="org.springframework.security.web.authentication.logout.SecurityContextLogoutHandler"/>
5 </beans:constructor-arg>
6 <beans:property name="filterProcessesUrl" value="/logout/cas"/>
7</beans:bean>
8
9
修改spring-security.xml
在页面上添加链接
2
3
2
3
创建index2.html,将index2.html设置为可匿名访问
2
3
2
3
