1.生成HTTPS证书
打开cmd执行命令
-alias设置别名
-storetype 设置证书格式
-keyalg设置加密算法
-keysize设置证书大小
-keystore设置证书文件地址
-validity设置有效天数。
2
2
执行后根据提示输入相关内容,输入完毕后会得到一个是否确认的提示,输入y 按回车确认就可以了
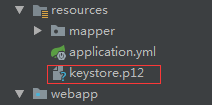
最后会得到一个keystore.p12文件,文件位置一般在 C://users/当前用户名 这个目录下,找不到的可以在users下进行文件检索
把它复制到项目resources目录下。

2.在application.yml中配置HTTPS相关信息
我把我的文件都粘出来,大家查漏补缺吧
2
3
4
5
6
7
8
9
10
11
12
13
14
15
16
17
18
19
20
21
22
23
24
25
26
27
28
29
30
31
2 port: 8443 <!-- https链接端口 -->
3 ssl:
4 key-store: classpath:keystore.p12 <!-- 刚才生成的https证书地址 -->
5 key-store-password: wangyongqi <!-- 刚才在命令行中输入的密码 -->
6 key-store-type: PKCS12 <!-- 协议类型 -->
7 key-alias: tomcat
8 enabled: true
9
10spring:
11 datasource:
12 username: <!-- mysql用户名 -->
13 password: <!-- mysql密码 -->
14 url: <!-- mysql链接地址 -->
15 driver-class-name: com.mysql.jdbc.Driver
16 type: com.alibaba.druid.pool.DruidDataSource
17 application:
18 name: <!-- 这个是当前访问的用户名,可以使用mysql用户名或者随意设置一个 -->
19 http:
20 encoding:
21 charset: UTF-8
22 force: true
23 jackson:
24 default-property-inclusion: non_null
25
26mybatis:
27 mapper-locations: classpath:mapper/*Mapper.xml <!-- mybatis文件位置扫描 -->
28 type-aliases-package: com.xxx.entity <!-- mybatis文件实体类扫描 -->
29
30
31
3.配置https请求映射
2
3
4
5
6
7
8
9
10
11
12
13
14
15
16
17
18
19
20
21
22
23
24
25
26
27
28
29
30
31
32
33
34
35
36
37
38
39
40
41
42
43
44
45
2
3import org.apache.catalina.Context;
4import org.apache.catalina.connector.Connector;
5import org.apache.tomcat.util.descriptor.web.SecurityCollection;
6import org.apache.tomcat.util.descriptor.web.SecurityConstraint;
7import org.springframework.boot.web.embedded.tomcat.TomcatServletWebServerFactory;
8import org.springframework.boot.web.servlet.server.ServletWebServerFactory;
9import org.springframework.context.annotation.Bean;
10import org.springframework.context.annotation.Configuration;
11
12/**
13 * https 请求配置类
14 */
15@Configuration
16public class ConnectorConfig {
17
18 @Bean
19 public ServletWebServerFactory servletContainer() {
20 TomcatServletWebServerFactory tomcat = new TomcatServletWebServerFactory() {
21 @Override
22 protected void postProcessContext(Context context) {
23 SecurityConstraint securityConstraint = new SecurityConstraint();
24 securityConstraint.setUserConstraint("CONFIDENTIAL");
25 SecurityCollection collection = new SecurityCollection();
26 collection.addPattern("/*");//设置所有路径都配置https
27 securityConstraint.addCollection(collection);
28 context.addConstraint(securityConstraint);
29 }
30 };
31 tomcat.addAdditionalTomcatConnectors(getHttpConnector());
32 return tomcat;
33 }
34
35 private Connector getHttpConnector() {
36 Connector connector = new Connector("org.apache.coyote.http11.Http11NioProtocol");
37 connector.setScheme("http");
38 connector.setPort(8088);
39 connector.setSecure(false);
40 connector.setRedirectPort(8443);
41 return connector;
42 }
43}
44
45
配置好这些就可以根据 https://localhost:8443/hello 进行访问了
