使用中断,时钟中断,键盘驱动
-
定义一个中断处理函数
-
定义中断向量
- 时钟中断
- 关于时钟中断
- 键盘中断
-
下一步要做什么
在上一篇文章中我们讲述了如何定义一个异常处理函数以及如何向IDT注册异常处理函数,在本篇中我们开始定义一个中断处理函数以及启用我们的中断处理函数
定义一个中断处理函数
定义一个中断函数很简单,函数的签名与异常处理函数的签名一致,只不过中断处理函数是不需要错误返回码的
定义一个基本中断处理函数如下
2
3
4
5
6
7
8
9
10
2use system::ia_32e::cpu::ChainedPics;
3...
4pub static PICS: Mutex<ChainedPics> = Mutex::new(unsafe { ChainedPics::new(PIC_MAIN, PIC_SLAVE) });
5...
6extern "x86-interrupt" fn example_interrupt(_stackframe: &mut InterruptStackFrame) {
7...
8}
9
10
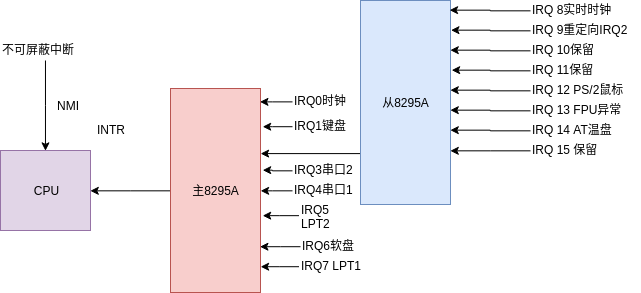
很简单不是吗,相比于异常处理函数,中断处理函数除了函数名不同以外还需要做一些额外的工作,还记得我们的PIC嘛?我们初始化一直冷落它,现在是它该发挥作用的时候了具体请查看使用Rust开发操作系统(可编程中断控制器(PIC)8259A)
我们把之前的PIC图拿过来
定义中断向量
我们编写中断属于硬件中断,主要是通过8259A来完成,不属于软件中断,注册中断时我们需要提供中断向量号,那么注册IRQ时钟中断时向量号为多少呢,向量号可以自定义的~那么给多少合适呢,我们需要看一看下表
0
#DE
Divide Error Fault No DIV and IDIV instructions.
1
#DB
Debug Exception Fault/ Trap No Instruction, data, and I/O breakpoints; single-step; and others.
2
—
NMI Interrupt Interrupt No Nonmaskable external interrupt.
3
#BP
Breakpoint Trap No INT3 instruction.
4
#OF
Overflow Trap No INTO instruction.
5
#BR
BOUND Range Exceeded Fault No BOUND instruction.
6
#UD
Invalid Opcode (Undefined Opcode) Fault No UD instruction or reserved opcode.
7
#NM
Device Not Available (No MathCoprocessor) Fault No Floating-point or WAIT/FWAIT instruction.
8
#DF
Double Fault Abort Yes(zero) Any instruction that can generate anexception, an NMI, or an INTR.
9
Coprocessor Segment Overrun (reserved) Fault No Floating-point instruction.
10
#TS
Invalid TSS Fault Yes Task switch or TSS access.
11
#NP
Segment Not Present Fault Yes Loading segment registers or accessingsystem segments.
12
#SS
Stack-Segment Fault Fault Yes Stack operations and SS register loads.
13
#GP
General Protection Fault Yes Any memory reference and otherprotection checks.
14
#PF
Page Fault Fault Yes Any memory reference.
15
reserved
16
#MF
x87 FPU Floating-Point Error
17
#AC
Alignment Check Exception
18
#MC
Machine Check Exception
19
#XM
SIMD Floating-Point Exception
20
#VE
Virtualization Exception
21
#CP
Contorl Protection Exception
22-31
Intel 保留使用
32-255
用户自定义
IDT最多可注册255个中断/异常,前21个已经给异常使用了,22-31为intel保留 那么我们中断号可以从32,这个中断号固定不会改变,我们可以把他设为常量
2
3
4
5
6
2pub const PIC_MAIN: u8 = 32;
3// 8259A从片
4pub const PIC_SLAVE: u8 = PIC_MAIN + 8;
5
6
时钟中断
那么可以定义一个枚举用来表示这些中断向量
2
3
4
5
6
7
8
9
10
11
12
13
14
15
16
17
18
19
20
21
22
23
24
25
26
27
28
29
30
31
32
33
34
35
36
37
38
39
40
41
42
43
44
45
46
47
48
2// 8259A主片
3pub const PIC_MAIN: u8 = 32;
4// 8259A从片
5pub const PIC_SLAVE: u8 = PIC_MAIN + 8;
6
7#[derive(Copy, Clone, Debug)]
8#[repr(u8)]
9enum InterruptIndex {
10 // 时钟中断
11 Timer = PIC_MAIN,
12}
13
14impl From<usize> for InterruptIndex {
15 fn from(index: usize) -> Self {
16 Self::from(index as u8)
17 }
18}
19
20impl From<u8> for InterruptIndex {
21 fn from(index: u8) -> Self {
22 match index {
23 32 => InterruptIndex::Timer,
24
25 0..32 => {
26 panic!("0-31 vector already used for exception!")
27 }
28 other => {
29 panic!("the index is invalid!")
30 }
31 }
32 }
33}
34
35impl From<InterruptIndex> for u8{
36 fn from(index: InterruptIndex) -> Self {
37 index as u8
38 }
39}
40
41impl From<InterruptIndex> for usize{
42 fn from(index: InterruptIndex) -> Self {
43 u8::from(index) as usize
44 }
45}
46
47
48
我们暂时定义了一个时钟中断处理函数,并且提供了From<u8>和From<usize>两个方法,主要方便进行类型转换,有了时钟中断向量我们要定义一个时钟中断处理函数,
2
3
4
5
6
7
2/// 时钟中断
3extern "x86-interrupt" fn timer_interrupt(_stackframe: &mut InterruptStackFrame) {
4 println(".");
5}
6
7
现在我们向IDT中注册一个时钟中断
2
3
4
5
6
7
8
2 let mut idt = InterruptDescriptorTable::new();
3 .....
4 idt[InterruptIndex::Timer.into()].set_handler_fn(timer_interrupt);
5 idt
6};
7
8
好了这样子就完成了注册,运行后会出现一个.后就停止了,并不是我们期待的一直显示.,主要是因为我们接收到中断并跳转到对应的中断处理函数后只进行了打印,并没有通知8259A中断处理已经结束,现在依旧认为我们在处理中断,因此我们需要添加一个EOI(End Of Interrupt)使用Rust开发操作系统(可编程中断控制器(PIC)8259A)
2
3
4
5
6
7
8
9
10
11
2
3....
4extern "x86-interrupt" fn timer_interrupt(_stackframe: &mut InterruptStackFrame) {
5 println(".");
6 unsafe {
7 PICS.lock().notify_end_of_interrupt(InterruptIndex::Timer.into());
8 }
9}
10
11
然后再次执行,就能看到屏幕源源不断的显示.,说明我们的时钟中断已经完成
关于时钟中断
时钟中断可以每隔一段时间自动触发一次,时钟中断的硬件为CMOS时钟,它是主机板上的一块芯片,它靠依靠CMOS电池供电,可以维持时间和日期。它独立于操作系统,所以也被称之为硬件时钟,硬件时钟为整个计算机提供计时标准,是最原始最底层的时钟数据,我们可以基于硬件时钟来编写系统时间,时钟中断的频率是HZ,该值一般是在100 ~ 1000之间,时钟中断频率可通过设置8253芯片(可编程计数器/定时器)来完成,因为我们后期会使用APIC替换8285A,因此对8253设置就不过多阐述了
键盘中断
我们根据8259A图也可以看到键盘中断,我们如法炮制定义一个键盘中断
2
3
4
5
6
7
8
9
10
11
12
13
14
15
16
17
18
19
20
21
22
23
24
25
26
27
28
29
30
31
32
33
34
2#[derive(Copy, Clone, Debug)]
3#[repr(u8)]
4enum InterruptIndex {
5 // 时钟中断
6 Timer = PIC_MAIN,
7 // 键盘中断
8 KeyBoard,
9}
10...
11
12impl From<u8> for InterruptIndex {
13 fn from(index: u8) -> Self {
14 match index {
15 32 => InterruptIndex::Timer,
16 33 => InterruptIndex::KeyBoard,
17 0..32 => {
18 panic!("0-31 vector already used for exception!")
19 }
20 other => {
21 panic!("the index is invalid!")
22 }
23 }
24 }
25}
26
27/// 键盘中断
28extern "x86-interrupt" fn keyboard_interrupt(_stackframe: &mut InterruptStackFrame) {
29 unsafe {
30 PICS.lock().notify_end_of_interrupt(InterruptIndex::KeyBoard.into());
31 }
32}
33
34
定义完中断向量和中断处理函数后我们向IDT中注册
2
3
4
5
6
7
2idt[InterruptIndex::Timer.into()].set_handler_fn(timer_interrupt);
3idt[InterruptIndex::KeyBoard.into()].set_handler_fn(keyboard_interrupt);
4idt
5....
6
7
现在我们系统就支持键盘了,但是运行后敲键盘时没有反应的,以为我们没有读取键盘的输入,键盘的读取需要操作PS/2控制器端口,端口地址为0x60,下面我们编写使用之前编写好的Port来完成读取写入操作具体实现请查看使用Rust开发操作系统(可编程中断控制器(PIC)8259A)
2
3
4
5
6
7
8
9
10
11
12
2extern "x86-interrupt" fn keyboard_interrupt(_stackframe: &mut InterruptStackFrame) {
3 use system::ia_32e::cpu::Port;
4 let mut port = unsafe { Port::new(0x60) };
5 let scan_code: u8 = unsafe { port.read() };
6 println!("{}",scan_code);
7 unsafe {
8 PICS.lock().notify_end_of_interrupt(InterruptIndex::KeyBoard.into());
9 }
10}
11
12
现在我们敲键盘后便可看到输入的结果,但是输入的结果并不是预期的字符,也不是ASCII码,输入的是键盘扫描码,键盘扫描码是绝大多数计算机键盘向计算机发送的一项数据,用以报告哪些键被按下。它使用一个数字或数字序列来表示分配到键盘上的每个按键,IBM PC兼容机键盘上的扫描码是由键盘发送的1至3个字节为一组。大多数字符键具有单字节扫描码,执行特殊功能的按键用2字节或3字节扫描码,通常以下列字节开头E0、E1或E2,我们把输入的扫描码转为ASCII字符也不是不可以,想想要把全键盘的都输入一遍这样就有点耗时间了,我们可以使用别人写好的crate(还是感谢大佬们啊)
在kernel/Cargo.toml中添加以下内容
2
3
4
5
2# 键盘键位映射
3pc-keyboard = "0.3.1"
4
5
然后编写解析方法
2
3
4
5
6
7
8
9
10
11
12
13
14
15
16
17
18
19
20
21
22
23
24
25
26
27
28
2 use system::ia_32e::cpu::Port;
3 use pc_keyboard::{Keyboard, layouts, ScancodeSet1, DecodedKey};
4
5 lazy_static! {
6 static ref KEYBOARD:Mutex<Keyboard<layouts::Us104Key,ScancodeSet1>> =
7 Mutex::new(Keyboard::new(layouts::Us104Key,ScancodeSet1));
8 }
9
10 let mut keyboard = KEYBOARD.lock();
11 let mut port = unsafe { Port::new(0x60) };
12 let scan_code: u8 = unsafe { port.read() };
13 // 解析读取的数据
14 if let Ok(Some(key_event)) = keyboard.add_byte(scan_code) {
15 if let Some(key) = keyboard.process_keyevent(key_event) {
16 match key {
17 DecodedKey::Unicode(character) => print!("{}", character),
18 DecodedKey::RawKey(key) => print!("{:?}", key),
19 }
20 }
21 }
22
23 unsafe {
24 PICS.lock().notify_end_of_interrupt(InterruptIndex::KeyBoard.into());
25 }
26}
27
28
需要注意的是键盘也是临界资源,我们使用编写好的自旋锁来完成,因为代码逻辑本身比较简单,因此不过多及解释
现在我们就完成了键盘的驱动,编译运行后敲击键盘便可显示敲击的内容,是不是很激动
下一步要做什么
在接下来的文章中,我们需要对现有的整个系统做一次大规模升级,现在我们的内核运行方式是基于rust-osdev大佬们写的Bootloader使用的是BIOS引导系统,BIOS引导方式过于古老,我们让我们的系统更现代化一些,因此我们将会采取UEFI启用,并且为系统开启分页,编写类似于malloc功能(有考虑添加APIC等功能)
