thrift简介
Thrift server是HBase中的一种服务,主要用于对多语言API的支持。基于Apache Thrift(多语言支持的通信框架)开发,目前有两种版本thrift和thrift2。
thrift2是当时为了适应新的Java API,提出来的。由于种种原因,thrift2没有完美兼容并替代thrift,所有就留下了两个版本。
Thrift 和 Thrift2 的区别
接口设计上Thrift2要比Thrfit更优雅,或者说和现在的API更贴近。比如两者的get接口:


Thrift2没有DDL方面的接口,所以现在Hue还是用Thrift的接口。如果你只想读写数据,建议用Thrift2。
Thrift server原理

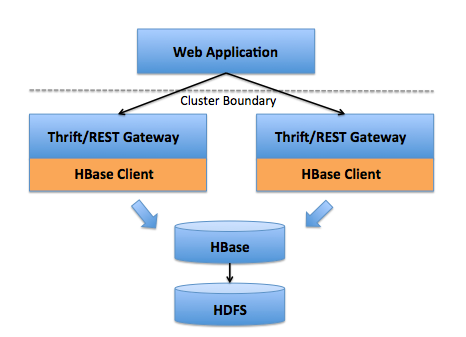
Thrfit其实就是个代理,你的请求发到Thrift server上后,server通过Java API再帮你访问HBase。
Thrift实现类是org.apache.hadoop.hbase.thrift.ThriftServer
thrift2的实现类是org.apache.hadoop.hbase.thrift2.ThriftServer
它们访问HBase使用的也是普通的HBase client API,所以当你的请求到达Thrift server后,它通过client API去帮你定位数据,然后读取数据。这么来看,Thrift Server比较灵活,我们可以部署在客户机上,也可以独立部署一个thrift集群。
Thrift server 参数选择
TServer的选择
这是Thrift框架server端处理模型的选择。有三种,TNonblockingServer,THsHaServer,TThreadPoolServer。可以通过启动命令参数指定,具体运行./bin/hbase thrift可以看到命令帮助(or ./bin/hbase thrift2)。默认是用TThreadPoolServer,建议就不用改了,除非你特别了解你的场景。
hbase.regionserver.thrift.compact
是否使用Thrift TCompactProtocol,默认false。如果你每列数据比较大,可以试着开启,减少带宽。
hbase.thrift.connection.cleanup-interval
server清理与HBase连接的周期,与HBase的是一个长连接,默认10秒
hbase.thrift.connection.max-idletime
如果与HBase的长连接超过这个时间没有被使用,则会被清理,默认10分钟
hbase.thrift.minWorkerThreads
TThreadPoolServer的线程池中的corePoolSize,也就是即便空闲时候保持的线程数,默认16。
hbase.thrift.maxWorkerThreads
TThreadPoolServer的线程池中的maximumPoolSize,默认1000。这个会影响server最大处理能力,需要根据硬件衡量。
hbase.thrift.maxQueuedRequests
TThreadPoolServer的线程池队列长度上限,超过这个值时会去创建一个新的线程处理请求(前提是没有达到maxWorkerThreads,否则拒绝请求)
注:上述最后三个值对thrift2无效。1.3之前的版本中,thrift2无法设定这些值。2.0版本中在thrift2启动命令里通过指定’w’选项来设置maxWorkerThreads。具体可以运行上文中提到的命令,查看是否支持’w’选项,如果不支持,默认max=int最大值。
Thrift部署模式
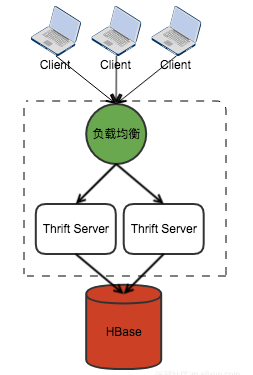
集群模式

这是最常见的模式,集群模式中的thrift建议不要和RS或者DN混部署。并且如果你使用集群模式的部署方案,你的client端不要去维护长连接。因为如果你维护一个长连接,负载均衡就会失效,如果thrift集群重启,大部分连接会连上第一个起来的thrfit server。
本地模式

本地模式就是在每个节点上起一个thrift,这个节点独享一个thrift。优点是部署简单,网络开销少。并且这种模式可以使用长连接,自己维护TTransport池。对于持续的写入或者读取,效果要比短连接好很多。HBase IPC本身也是维护一个长连接。缺点是,可靠性略差,如果thrift server挂了的话。但本身如果是多Client,其实也无所谓。
启动和停止thrift
hbase本身已经集成了thrift服务端,使用以下命令开启hbase thrift的服务器端。关闭是将start修改为stop即可。默认情况下监听9090端口。
使用命令
2
3
4
5
6
2hbase thrift start
3hbase thrift2 stop
4hbase thrift stop
5
6
但这种启动方式一把当前窗口关闭则 thirift服务停止,所以一般我们使用后台方式启动
2
3
2
3
检查系统进程
使用命令可以查看ThriftServer是否启动
2
3
2
3

配置Thrift端口
端口默认是9090,可以在cdh操作后台中hbase–》配置—》搜索参数hbase.regionserver.thrift.port进行修改。

也可以在配置文件中修改。
修改hbase-site.xml配置文件中的hbase.thrift.info.port和hbase.regionserver.thrift.port。
第二种方法,启动的时候使用参数指定
2
3
2
3
thift客户端安装
thrift官网http://thrift.apache.org/
下载镜像地址选择页面
http://www.apache.org/dyn/closer.cgi?path=/thrift/0.11.0/thrift-0.11.0.tar.gz
安装参考
http://thrift.apache.org/docs/install/
http://thrift.apache.org/docs/install/centos
Thrift的编译器使用C++编写的,在安装编译器之前,首先应该保证操作系统基本环境支持C++的编译,安装相关依赖的软件包,如下所示
使用命令
更新系统环境
2
3
2
3
更新开发工具
2
3
2
3
更新底层依赖组件
2
3
4
5
2cd /usr
3
4
5
更新autoconf
2
3
4
5
6
7
8
9
2tar xvf autoconf-2.69.tar.gz
3cd autoconf-2.69
4./configure --prefix=/usr
5make
6sudo make install
7cd ..
8
9
更新 automake
2
3
4
5
6
7
8
9
2tar xvf automake-1.14.tar.gz
3cd automake-1.14
4./configure --prefix=/usr
5make
6sudo make install
7cd ..
8
9
更新 bison
2
3
4
5
6
7
8
9
2tar xvf bison-2.5.1.tar.gz
3cd bison-2.5.1
4./configure --prefix=/usr
5make
6sudo make install
7cd ..
8
9
增加lib依赖
2
3
2
3
更新Boost到1.53
2
3
4
5
6
7
2tar xvf boost_1_53_0.tar.gz
3cd boost_1_53_0
4./bootstrap.sh
5sudo ./b2 install
6
7
安装Thrift
使用命令查看gcc版本
2
3
4
5
6
7
2gcc (GCC) 4.8.1
3Copyright (C) 2013 Free Software Foundation, Inc.
4This is free software; see the source for copying conditions. There is NO
5warranty; not even for MERCHANTABILITY or FITNESS FOR A PARTICULAR PURPOSE.
6
7
如果gcc版本比较低建议安装 0.10以下的版本
2
3
4
5
6
7
2tar -xvf thrift-0.10.0.tar.gz
3cd thrift-0.10.0
4sudo ./configure --with-lua=no --with-cpp=no
5make && make install
6
7
如果gcc版本在 4.9以上才能安装比较新的版本,否则会报错A compiler with support for C++11 language features is required.
2
3
4
5
6
7
8
2cd thrift
3./bootstrap.sh
4./configure --with-lua=no
5make
6sudo make install
7
8
或者
2
3
4
5
6
7
8
9
2sudo wget http://mirrors.tuna.tsinghua.edu.cn/apache/thrift/0.11.0/thrift-0.11.0.tar.gz
3sudo tar -zvxf thrift-0.11.0.tar.gz
4cd ./thrift-0.11.0
5sudo ./configure --prefix=/usr/local/thrift
6sudo make && sudo make install
7
8
9
configure时会输出包含的环境路径

增加到环境变量
2
3
2
3
加到PATH里
需要注意是要写安装文件的完整路径 …/bin 而不是到thift的根目录
否则提示failed error: /bin/sh: thrift: command not found。
立即生效
2
3
2
3
查看环境变量
2
3
2
3
配置好了thift直接在命令行下输入 thrift就可以看到提示信息,否则直接报找不到。
安装成功校验
2
3
4
2Thrift version 0.10.0
3
4
可能遇到的问题 -Bison版本低
2
3
2
3
查看bison版本使用命令
2
3
2
3

如果是使用sudo执行的话,也需要注意sudo的bison版本
2
3
2
3

解决方式
2
3
4
5
6
7
8
2sudo wget http://ftp.gnu.org/gnu/bison/bison-2.5.1.tar.gz
3sudo tar xvf bison-2.5.1.tar.gz
4cd bison-2.5.1
5sudo ./configure
6sudo make && sudo make install
7
8
如果出现sudo –version与 –version版本不一致的情况,则需要进入root角色进行安装
使用命令如下:
2
3
4
5
6
7
8
9
10
2cd /usr/local/
3wget http://ftp.gnu.org/gnu/bison/bison-2.5.1.tar.gz
4tar xvf bison-2.5.1.tar.gz
5cd bison-2.5.1
6./configure
7make
8make install
9
10
如果在多个路径都有bison路径 注意环境变量 使用命令调整如下:
2
3
4
5
6
7
8
9
10
11
12
13
2
3ls -l /usr/bin/bison
4
5/usr/bin/bison -version
6
7/usr/local/bin/bison --version
8
9sudo mv /usr/bin/bison /usr/bin/bison2.4.1
10
11sudo ln -s /usr/local/bin/bison /usr/bin/bison
12
13
可能遇到的问题–gcc版本过低
报错如下:
2
3
2
3
原因
是因为编译器版本不支持c++11,所以需要安装高版本gcc编译器以支持c++11,下面采用编译源码方式安装。
在编译安装高版本gcc编译器时,碰到“gcc configure: error: Building GCC requires GMP 4.2+, MPFR 2.3.1+ and MPC 0.8.0”,所以索性把所有依赖重新安装一遍。
解决方式
预装环境
2
3
2
3
把源码包上传到/usr/local/software目录
gcc 4.9.4 源码包下载
链接:https://pan.baidu.com/s/1AuS6e7bgKSWj9phVxpDn3A
提取码:8yfl
安装gmp
2
3
4
5
6
2$ tar -zxvf gmp-5.0.2.tar.gz
3$ cd gmp-5.0.2
4$ ./configure --prefix=/usr/local/ && make && make install && echo "sayok "
5
6
安装mpfr
2
3
4
5
6
2$ tar -zxvf mpfr-3.1.2.tar.gz
3$ cd mpfr-3.1.2
4$ ./configure --prefix=/usr/local/ --with-gmp=/usr/local/ && make && make install && echo "say ok"
5
6
安装mpc
2
3
4
5
6
2$ tar -zxvf mpc-0.9.tar.gz
3$ cd mpc-0.9
4$ ./configure --prefix=/usr/local/ --with-gmp=/usr/local/ --with-mpfr=/usr/local/ && make && make install && echo "say ok"
5
6
安装gcc
2
3
4
5
6
7
2$ tar -zxvf gcc-4.9.4.tar.gz
3$ cd gcc-4.9.4
4$ ./configure --prefix=/usr/local/gcc-4.9.4 --enable-threads=posix --disable-checking --disable-multilib --enable-languages=c,c++ --with-gmp=/usr/local --with-mpfr=/usr/local --with-mpc=/usr/local
5$ make && make install && echo "say ok"
6
7
编译安装过程一个多小时
卸载旧版本编译器
2
3
4
5
6
2$ ln -s /usr/local/gcc-4.9.4/bin/c++ /usr/bin/c++
3$ ln -s /usr/local/gcc-4.9.4/bin/g++ /usr/bin/g++
4$ ln -s /usr/local/gcc-4.9.4/bin/gcc /usr/bin/gcc
5
6
添加环境变量,修改profile文件,在最末添加如下两句
2
3
4
5
6
2LD_LIBRARY_PATH=/usr/local/gcc-4.9.4/lib:$LD_LIBRARY_PATH
3export LD_LIBRARY_PATH
4$ source /etc/profile
5
6
更多参考资料
https://github.com/ZhijiaYang/HbaseHelper
https://wiki.apache.org/hadoop/Hbase/ThriftApi
