一、安装
首先,在使用rabbitMQ之前需要先在本地安装,因为rabbit是基于Erlang的,所以需要先下载安装Erlang,具体的步骤请点击这个链接:https://www.cnblogs.com/ericli-ericli/p/5902270.html
Redis安装教程:https://www.runoob.com/redis/redis-install.html
RabbitMQ安装教程:https://www.linuxprobe.com/install-rabbitmq-on-centos-7.html
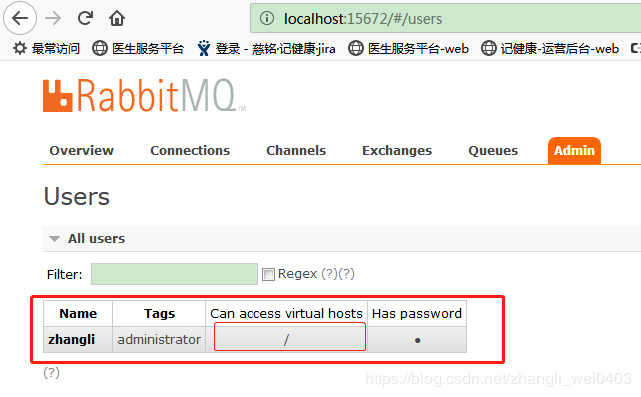
我就是按照这个步骤安装的,所以一步步来肯定没问题,需要注意的是安装成功后记得给账号分配权限,我就是因为没注意权限才导致好长时间项目不能启动,看我下面的截图注意红框中的信息,这是分配后的,如果为分配读写权限会是另一种黄色的背景颜色。
二、代码
1、创建SpringBoot项目并添加依赖
2
3
4
5
6
7
8
9
10
11
12
13
14
15
16
17
18
19
20
21
22
23
24
25
26
27
28
29
30
31
32
33
34
35
36
37
38
39
40
41
42
43
44
45
46
47
48
49
50
51
52
53
54
55
56
57
58
59
60
61
62
63
64
65
66
67
68
69
70
71
72
73
74
75
76
77
78
79
80
81
82
83
84
85
86
87
88
89
90
91
92
93
94
95
96
97
98
99
100
101
102
103
104
105
106
107
108
109
110
111
112
113
114
115
116
117
118
119
120
121
122
123
124
125
126
127
128
129
130
131
132
133
134
135
136
137
138
139
140
141
142
143
144
145
146
147
148
149
150
151
152
153
154
155
156
157
158
159
160
161
162
163
164
165
166
167
168
169
170
171
172
173
174
175
176
2
3<project xmlns="http://maven.apache.org/POM/4.0.0" xmlns:xsi="http://www.w3.org/2001/XMLSchema-instance"
4 xsi:schemaLocation="http://maven.apache.org/POM/4.0.0 http://maven.apache.org/xsd/maven-4.0.0.xsd">
5 <modelVersion>4.0.0</modelVersion>
6
7 <groupId>com.ljs</groupId>
8 <artifactId>miaosha_idea</artifactId>
9 <version>1.0-SNAPSHOT</version>
10
11 <name>miaosha_idea</name>
12 <url>http://maven.apache.org</url>
13 <parent>
14 <groupId>org.springframework.boot</groupId>
15 <artifactId>spring-boot-starter-parent</artifactId>
16 <version>1.5.9.RELEASE</version>
17 </parent>
18
19 <properties>
20 <project.build.sourceEncoding>UTF-8</project.build.sourceEncoding>
21 </properties>
22
23 <!-- FIXME change it to the project's website -->
24 <!--<url>http://www.example.com</url>-->
25 <!--<properties>-->
26 <!--<project.build.sourceEncoding>UTF-8</project.build.sourceEncoding>-->
27 <!--<maven.compiler.source>1.7</maven.compiler.source>-->
28 <!--<maven.compiler.target>1.7</maven.compiler.target>-->
29 <!--</properties>-->
30
31 <!--<dependencies>-->
32 <!--<dependency>-->
33 <!--<groupId>junit</groupId>-->
34 <!--<artifactId>junit</artifactId>-->
35 <!--<version>4.11</version>-->
36 <!--<scope>test</scope>-->
37 <!--</dependency>-->
38 <!--</dependencies>-->
39 <dependencies>
40 <dependency>
41 <groupId>junit</groupId>
42 <artifactId>junit</artifactId>
43 <version>3.8.1</version>
44 <scope>test</scope>
45 </dependency>
46 <dependency>
47 <groupId>org.springframework.boot</groupId>
48 <artifactId>spring-boot-starter-web</artifactId>
49 </dependency>
50
51 <dependency>
52 <groupId>org.springframework.boot</groupId>
53 <artifactId>spring-boot-starter-thymeleaf</artifactId>
54 </dependency>
55 <dependency>
56 <groupId>org.mybatis.spring.boot</groupId>
57 <artifactId>mybatis-spring-boot-starter</artifactId>
58 <version>1.3.1</version>
59 </dependency>
60 <dependency>
61 <groupId>mysql</groupId>
62 <artifactId>mysql-connector-java</artifactId>
63 <version>8.0.11</version>
64 </dependency>
65 <dependency>
66 <groupId>com.alibaba</groupId>
67 <artifactId>druid</artifactId>
68 <version>1.0.5</version>
69 </dependency>
70 <dependency>
71 <groupId>redis.clients</groupId>
72 <artifactId>jedis</artifactId>
73 <version>2.7.3</version>
74 </dependency>
75 <dependency>
76 <groupId>com.alibaba</groupId>
77 <artifactId>fastjson</artifactId>
78 <version>1.2.38</version>
79 </dependency>
80
81 <dependency>
82 <groupId>commons-codec</groupId>
83 <artifactId>commons-codec</artifactId>
84 <version>1.9</version>
85 </dependency>
86 <dependency>
87 <groupId>org.apache.commons</groupId>
88 <artifactId>commons-lang3</artifactId>
89 <version>3.6</version>
90 </dependency>
91 <dependency>
92 <groupId>org.springframework.boot</groupId>
93 <artifactId>spring-boot-starter-validation</artifactId>
94 </dependency>
95 <dependency>
96 <groupId>org.springframework.boot</groupId>
97 <artifactId>spring-boot-starter-amqp</artifactId>
98 </dependency>
99 <!-- <dependency>
100 <groupId>org.springframework.boot</groupId>
101 <artifactId>spring-boot-starter-tomcat</artifactId>
102 <scope>provided</scope>
103 </dependency> -->
104
105
106 </dependencies>
107
108 <build>
109 <finalName>${project.artifactId}</finalName>
110 <plugins>
111 <!-- 打war包插件 -->
112 <!-- <plugin>
113 <groupId>org.apache.maven.plugins</groupId>
114 <artifactId>maven-war-plugin</artifactId>
115 <configuration>
116 <failOnMissingWebXml>false</failOnMissingWebXml>
117 </configuration>
118 </plugin> -->
119 <!-- 打jar包插件 -->
120 <plugin>
121 <groupId>org.springframework.boot</groupId>
122 <artifactId>spring-boot-maven-plugin</artifactId>
123 </plugin>
124 </plugins>
125
126 <pluginManagement><!-- lock down plugins versions to avoid using Maven defaults (may be moved to parent pom) -->
127 <plugins>
128 <!-- clean lifecycle, see https://maven.apache.org/ref/current/maven-core/lifecycles.html#clean_Lifecycle -->
129 <plugin>
130 <artifactId>maven-clean-plugin</artifactId>
131 <version>3.1.0</version>
132 </plugin>
133 <!-- default lifecycle, jar packaging: see https://maven.apache.org/ref/current/maven-core/default-bindings.html#Plugin_bindings_for_jar_packaging -->
134 <plugin>
135 <artifactId>maven-resources-plugin</artifactId>
136 <version>3.0.2</version>
137 </plugin>
138 <plugin>
139 <artifactId>maven-compiler-plugin</artifactId>
140 <version>3.8.0</version>
141 </plugin>
142 <plugin>
143 <artifactId>maven-surefire-plugin</artifactId>
144 <version>2.22.1</version>
145 </plugin>
146 <plugin>
147 <artifactId>maven-jar-plugin</artifactId>
148 <version>3.0.2</version>
149 </plugin>
150 <plugin>
151 <artifactId>maven-install-plugin</artifactId>
152 <version>2.5.2</version>
153 </plugin>
154 <plugin>
155 <artifactId>maven-deploy-plugin</artifactId>
156 <version>2.8.2</version>
157 </plugin>
158 <!-- site lifecycle, see https://maven.apache.org/ref/current/maven-core/lifecycles.html#site_Lifecycle -->
159 <plugin>
160 <artifactId>maven-site-plugin</artifactId>
161 <version>3.7.1</version>
162 </plugin>
163 <plugin>
164 <artifactId>maven-project-info-reports-plugin</artifactId>
165 <version>3.0.0</version>
166 </plugin>
167 </plugins>
168 </pluginManagement>
169
170
171 </build>
172
173</project>
174
175
176
2、然后是项目的application配置文件加入rabbitMQ的连接信息,在下图,填入自己rabbit安装成功后设置的账号信息就行,主要配置了thymeleaf,redis,RabbitMQ,数据库的一些配置,注意redis,RabbitMQ和数据库的端口,ip和用户名,密码。
2
3
4
5
6
7
8
9
10
11
12
13
14
15
16
17
18
19
20
21
22
23
24
25
26
27
28
29
30
31
32
33
34
35
36
37
38
39
40
41
42
43
44
45
46
47
48
49
50
51
52
53
54
55
56
57
58
59
60
61
62
63
64
65
66
67
68
69
70
71
72
73
74
75
76
77
78
79
80
81
82
83
84
85
86
2spring.thymeleaf.cache=false
3spring.thymeleaf.content-type=text/html
4spring.thymeleaf.enabled=true
5spring.thymeleaf.encoding=UTF-8
6spring.thymeleaf.mode=HTML5
7#拼接前缀与后缀,去创建templates目录,里面放置模板文件
8spring.thymeleaf.prefix=classpath:/templates/
9spring.thymeleaf.suffix=.html
10#mybatis
11#是否打印sql语句
12#spring.jpa.show-sql= true
13mybatis.type-aliases-package=com.ljs.miaosha.domain
14#mybatis.type-handlers-package=com.example.typehandler
15#下划线转换为驼峰
16mybatis.configuration.map-underscore-to-camel-case=true
17mybatis.configuration.default-fetch-size=100
18#ms --3000ms--->3s
19mybatis.configuration.default-statement-timeout=3000
20#mybatis配置文件路径
21#mapperLocaitons
22mybatis.mapper-locaitons=classpath:com/ljs/miaosha/dao/*.xml
23#druid
24spring.datasource.url=jdbc:mysql://127.0.0.1:3306/seckill?useSSL=false&serverTimezone=GMT%2B8
25spring.datasource.username=root
26spring.datasource.password=sasa
27spring.datasource.driver-class-name=com.mysql.cj.jdbc.Driver
28spring.datasource.type=com.alibaba.druid.pool.DruidDataSource
29spring.datasource.filters=stat
30# 初始化大小,最小,最大
31spring.datasource.initialSize=100
32spring.datasource.minIdle=500
33spring.datasource.maxActive=1000
34spring.datasource.maxWait=60000
35spring.datasource.timeBetweenEvictionRunsMillis=60000
36spring.datasource.minEvictableIdleTimeMillis=30000
37spring.datasource.validationQuery=select 'x'
38spring.datasource.testWhileIdle=true
39spring.datasource.testOnBorrow=false
40spring.datasource.testOnReturn=false
41spring.datasource.poolPreparedStatements=true
42spring.datasource.maxPoolPreparedStatementPerConnectionSize=20
43#redis 配置服务器等信息
44redis.host=127.0.0.1
45redis.port=6379
46redis.timeout=10
47#redis.password=123456
48redis.poolMaxTotal=1000
49redis.poolMaxldle=500
50redis.poolMaxWait=500
51#static 静态资源配置,设置静态文件路径css,js,图片等等
52#spring.mvc.static-path-pattern=/static/** spring.mvc.static-path-pattern=/**
53spring.resources.add-mappings=true
54spring.resources.cache-period=3600
55spring.resources.chain.cache=true
56spring.resources.chain.enabled=true
57spring.resources.chain.gzipped=true
58spring.resources.chain.html-application-cache=true
59spring.resources.static-locations=classpath:/static/
60#RabbitMQ配置
61spring.rabbitmq.host=122.51.85.243
62spring.rabbitmq.port=5672
63spring.rabbitmq.username=admin
64spring.rabbitmq.password=StrongPassword
65spring.rabbitmq.virtual-host=/
66#消费者数量
67spring.rabbitmq.listener.simple.concurrency=10
68#消费者最大数量
69spring.rabbitmq.listener.simple.max-concurrency=10
70#消费,每次从队列中取多少个,取多了,可能处理不过来
71spring.rabbitmq.listener.simple.prefetch=1
72spring.rabbitmq.listener.auto-startup=true
73#消费失败的数据重新压入队列
74spring.rabbitmq.listener.simple.default-requeue-rejected=true
75#发送,队列满的时候,发送不进去,启动重置
76spring.rabbitmq.template.retry.enabled=true
77#一秒钟之后重试
78spring.rabbitmq.template.retry.initial-interval=1000
79#
80spring.rabbitmq.template.retry.max-attempts=3
81#最大间隔 10s
82spring.rabbitmq.template.retry.max-interval=10000
83spring.rabbitmq.template.retry.multiplier=1.0
84
85
86
因为rabbitMQ队列的模式有好几个,当前使用的为Direct模式,此模式类似于一对一的关系(放入队列的时候指定队列名称,消费当前队列消息时,使用@RabbitListener注解指定获取某个名称的队列)。
具体的实现主要为三个步骤:
1.定义一个任意名称的队列,注意类及方法上的注解
2
3
4
5
6
7
8
9
10
11
12
13
14
15
16
17
18
19
20
21
22
23
2
3import org.springframework.amqp.core.Queue;
4import org.springframework.context.annotation.Bean;
5import org.springframework.context.annotation.Configuration;
6
7@Configuration
8public class RabbitMQConfig {
9
10 static final String QUEUE = "product_secondsKill";
11
12 /**
13 * Direct模式
14 * @return
15 */
16 @Bean
17 public Queue directQueue() {
18 // 第一个参数是队列名字, 第二个参数是指是否持久化
19 return new Queue(QUEUE, true);
20 }
21}
22
23
2.消息入队方法,我是在service层调用的
2
3
4
5
6
7
8
9
10
11
12
13
14
15
16
17
18
19
20
21
22
23
24
25
26
27
28
29
30
31
32
33
34
35
36
37
38
2
3import org.slf4j.Logger;
4import org.slf4j.LoggerFactory;
5import org.springframework.amqp.AmqpException;
6import org.springframework.amqp.core.AmqpTemplate;
7import org.springframework.beans.factory.annotation.Autowired;
8import org.springframework.stereotype.Component;
9
10@Component
11public class Sender {
12
13 private final static Logger log = LoggerFactory.getLogger(Sender.class);
14
15 @Autowired
16 AmqpTemplate amqpTemplate;
17
18 int i = 0;
19
20 /**
21 * 消息入队-在需要的时候调用即可
22 * @param msg此为商品的id,根据此id在消费消息时验证Redis中商品的库存是否充足
23 */
24 public void sendDirectQueue(String msg) {
25 log.info(">>>>>>>>>>>>>>秒杀请求已发送,商品ID为:"+msg);
26 try {
27 //第一个参数是指要发送到哪个队列里面, 第二个参数是指要发送的内容
28 amqpTemplate.convertAndSend(RabbitMQConfig.QUEUE, msg);
29 //此处为了记录并发请求下,请求的次数及消息传递的次数
30 log.info("发送请求>>>>>>>>>>>>>"+i++);
31 } catch (AmqpException e) {
32 log.error("请求发送异常:"+e.getMessage());
33 e.printStackTrace();
34 }
35 }
36}
37
38
3.消息出列(消费消息)的方法,相关逻辑再次执行
2
3
4
5
6
7
8
9
10
11
12
13
14
15
16
17
18
19
20
21
22
23
24
25
26
27
28
29
30
31
32
33
34
35
36
37
38
39
40
41
42
43
44
45
46
47
48
49
50
51
52
53
54
55
56
57
58
59
60
61
62
63
64
65
66
67
68
2
3import java.io.IOException;
4import java.util.HashMap;
5import java.util.Map;
6
7import org.slf4j.Logger;
8import org.slf4j.LoggerFactory;
9import org.springframework.amqp.core.Message;
10import org.springframework.amqp.rabbit.annotation.RabbitListener;
11import org.springframework.beans.factory.annotation.Autowired;
12import org.springframework.stereotype.Component;
13
14import com.business.dao.product.ProductMapper;
15import com.enums.ErrorCodeEnum;
16import com.excetion.ServerBizException;
17import com.rabbitmq.client.Channel;
18import com.util.redis.RedisStringUtils;
19
20@Component
21public class Receiver {
22
23 private final static Logger log = LoggerFactory.getLogger(Receiver.class);
24
25 @Autowired
26 RedisStringUtils redisStringUtils;
27
28 @Autowired
29 ProductMapper productMapper;
30
31 int i = 0;
32
33 /**
34 * 消息出列(消费消息)方法-和消息入列没有直接的调用关系
35 * 是通过注解中指定的名称进行的关联
36 * @param msg-传递进来的数据
37 * @param channel-注意,注意,注意这两个参数
38 * @param message-注意,注意,注意这两个参数
39 * @throws IOException
40 */
41 @RabbitListener(queues = RabbitMQConfig.QUEUE)
42 public void receiverDirectQueue(String msg,Channel channel, Message message) throws IOException{
43 log.info(">>>>>>>>>>>>>>>>>接收到秒杀请求,商品ID为:"+msg+"检查Redis中库存是否为0");
44 try {
45 long num = redisStringUtils.decr(msg);
46 if(num < 0) {
47 /**
48 * 此处不能判断等于0,因为当商品库存为1时,Redis执行递减返回为0
49 * 如果判断为0商品最后不能卖完也就是当库存为1时此处就抛异常了
50 */
51 throw new ServerBizException(ErrorCodeEnum.PRODUCT_INVENTORY_IS_NULL);
52 }
53 log.info("接收时>>>>>>>>>>>"+i++);
54 Map map = new HashMap<>();
55 map.put("id", msg);
56 map.put("Quantity", num);
57 //根据商品的id和库存同步数据到MySQL
58 if(productMapper.updateQuantityByPid(map) == 0) {
59 throw new ServerBizException("同步到商品表异常!");
60 }
61 } catch (Exception e) {
62 channel.basicAck(message.getMessageProperties().getDeliveryTag(), false);
63 e.printStackTrace();
64 }
65 }
66}
67
68
值得注意的是上面代码方法上需要注意的两个参数,笔者就是因为一开始不懂没有做这些逻辑导致此处出现错误,错误为:当此方法出现异常(比如:并发进来两个秒杀请求而库存中只有一件商品时,判断Redis中库存会进入死循环,一直抛出异常信息直到停止项目),解决为捕获异常并且在catch下面加入此代码,此处的作用请看下图

此段代码的作用为:当消费消息出现异常时,我们需要取消确认,这时我们可以使用 Channel 的 basicReject 方法。其中第一个参数为指定 delivery tag,第二个参数说明如何处理这个失败消息:true为将该消息重新放入队列头,false为忽略该消息。
1.我使用了spring的监听器ApplicationListener,当项目初始化完成的时候自动扫描数据库中的商品信息,商品ID为key,库存为value,如果还需要其他限制逻辑(比如:秒杀的开始,结束时间和支持秒杀的某个时间段)自己去实现就行,我这里没做其他逻辑。下面为具体代码
2
3
4
5
6
7
8
9
10
11
12
13
14
15
16
17
18
19
20
21
22
23
24
25
26
27
28
29
30
31
32
33
34
35
36
37
38
39
40
41
42
43
44
45
46
47
48
49
50
51
2
3import java.util.Iterator;
4import java.util.List;
5
6import org.slf4j.Logger;
7import org.slf4j.LoggerFactory;
8import org.springframework.beans.factory.annotation.Autowired;
9import org.springframework.context.ApplicationListener;
10import org.springframework.context.annotation.Scope;
11import org.springframework.context.event.ContextRefreshedEvent;
12import org.springframework.stereotype.Service;
13
14import com.business.dao.product.ProductMapper;
15import com.business.model.product.Product;
16import com.util.redis.RedisStringUtils;
17@Service
18@Scope("singleton")
19public class ApplicationInitListener implements ApplicationListener<ContextRefreshedEvent>{
20
21 private static final Logger logger = LoggerFactory.getLogger(ApplicationInitListener.class);
22
23 @Autowired
24 ProductMapper productMapper;
25
26 @Autowired
27 RedisStringUtils redisStringUtils;
28
29 @Override
30 public void onApplicationEvent(ContextRefreshedEvent event) {
31 if(event.getApplicationContext().getParent() == null) {
32 logger.info(">>>>>>>>>>>>项目初始化完成,执行监听器中逻辑");
33 //mapper中的sql,返回全部上架(支持秒杀)的商品集合
34 List<Product> list = productMapper.selectTimerTask();
35 Iterator<Product> it = list.iterator();
36 while(it.hasNext()) {
37 Product p = it.next();
38 logger.info("商品ID:"+p.getId()+"商品库存:"+p.getpQuantity());
39 try {
40 redisStringUtils.set(String.valueOf(p.getId()), String.valueOf(p.getpQuantity()));
41 } catch (Exception e) {
42 logger.error("当前商品ID:"+p.getId()+"库存:"+p.getpQuantity()+"放入Redis缓存异常<<<<<<<<<<<<<<<<<<<<");
43 e.printStackTrace();
44 }
45 }
46 }
47 }
48
49}
50
51
上边代码很简洁也有相关的注释,所以不再废话,下面就贴一下从请求进入到返回的全部逻辑,先来controller的代码,方法中只是调用了service中的方法,不多说
2
3
4
5
6
7
8
9
10
11
12
13
14
15
16
17
18
19
20
21
22
23
24
2 * 秒杀入口
3 * @param response
4 * @param Pid-商品id,做检查库存使用
5 * @param Uid-用户id,做订单和用户关联使用(比如生成成功秒杀商品的用户订单表)
6 * 我这里没做多余的逻辑,只看了相关情况的返回结果,有需要的可以自己去实现
7 */
8 @RequestMapping(value = "secondsKill", method = RequestMethod.POST)
9 public void secondsKill(HttpServletResponse response, String Pid, Integer Uid) {
10 try {
11 //模拟发送100次请求,库存设置为少于100查看结果,此100次请求为顺序请求(未并发)
12 //for(int i=0; i<100; i++) {
13 boolean result = productService.secondsKill(Pid, String.valueOf(Uid));
14 if(result) {
15 ResponseUtil.renderSuccessJson(response, "success", result);
16 }
17 //}
18 } catch (ServerBizException e) {
19 ResponseUtil.renderFailJson(response, e.getErrCode());
20 e.printStackTrace();
21 }
22 }
23
24
接下来是service的方法。
2
3
4
5
6
7
8
9
10
11
12
13
14
15
16
17
18
19
20
21
22
23
24
25
2 * 商品秒杀
3 * @param Pid
4 * @param Uid
5 * @return
6 * @throws ServerBizException
7 */
8 int i = 0;
9 public boolean secondsKill(String Pid, String Uid) throws ServerBizException {
10 boolean result = true;
11 //根据商品id获取Redis中的库存数量
12 String num = redisStringUtils.get(Pid).toString();
13 System.out.println("redis>>>>>>>>>>"+num);
14 if(new Long(num) <= 0) {
15 result = false;
16 throw new ServerBizException(ErrorCodeEnum.PRODUCT_INVENTORY_IS_NULL);
17 }
18 //消息入队,调用相关方法
19 sender.sendDirectQueue(Pid);
20 //只为验证请求及发送消息次数
21 System.out.println("service>>>>>>>>>>"+i++);
22 return result;
23 }
24
25
还有一个模拟多线程请求的方法,在下边
2
3
4
5
6
7
8
9
10
11
12
13
14
15
16
17
18
2 // 运用java工具类中线程池
3 ExecutorService pool = Executors.newCachedThreadPool();
4 for (int i = 0; i < 5; i++) { // 开启五个线程
5 String url = "http://localhost:8080/product/secondsKill";
6 Map<String, Object> paramStr = getHttpParamStr();
7 pool.execute(new ServiceThreadTest(url, paramStr));
8 }
9 }
10
11 public static Map<String, Object> getHttpParamStr() {
12 Map<String, Object> param = new HashMap<String, Object>();
13 param.put("Pid", "1");
14 param.put("Uid", "10");
15 return param;
16 }
17
18
下面测试一下,首先在商品表中设置库存,我先设置10个。

然后我们启动项目,看有没有执行监听器中的逻辑,自动把商品库存放入Redis

项目启动完成,我们往上翻看下控制台信息
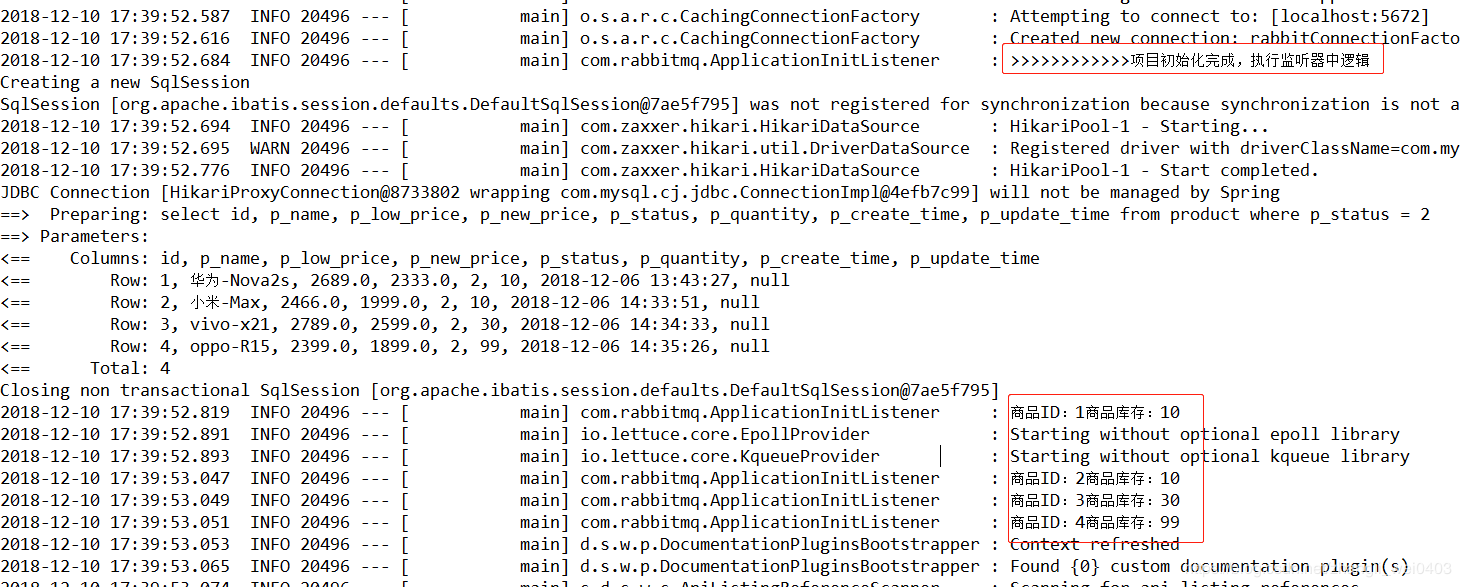
可以看到,相关的信息已经输出的控制台了。
三、项目资料等
本人由于能力有限,为了不误人子弟,在此提供源码和教学视频来帮助大家学习
1、项目代码
链接:https://pan.baidu.com/s/1qZjAuce1gRRXHHDHZgDLmw
提取码:iroz
2、该秒杀项目的视频,来源慕课网 https://www.imooc.com
链接:https://pan.baidu.com/s/1vjBlJ82iiIjBSkEN9hbEsA
提取码:33qx
