在实际业务中,经常碰见数据库和缓存中数据不一致的问题,缓存作为抵挡前端访问洪峰的工具,用的好的话可以大大减轻服务端压力,但是在一些场景下,如果没有控制好很容易造成数据库和缓存的数据不一致性,尤其是在并发环境下,这种情况出现的概率会大大的增加,为什么会出现这个问题呢?我们来简单分析一下。
1、页面发起一个请求,请求更新某个商品的库存,正常的流程是,如果没有缓存,直接更新数据库即可,如果有缓存,先删除该商品在redis中的缓存,然后再去更新数据库,同时可能还把更新后的库存数据同步到缓存中,这是正常的流程,也是基本上保证数据库和缓存数据一致性最基本的方式;
2、假如还是第一个场景的描述,这时候因为某种原因,比如网络中断一会儿,或者数据库连接异常导致在删除缓存的那一瞬间,正好有一个读取商品库存的请求发过来,而且正好这时候环境恢复正常,由于这两次操作可能是在分布式的环境下进行的,各自归属不同的事物互不影响,那么这时候问题就来了,读请求读到的数据还是老数据,而实际上应该是读到上一个请求更新后的库存数据,这样就造成了数据的不一致性,这样的场景在高并发环境下应该很容易模拟出来;
常见的解决思路在上面的描述中已经提到过一种,即先删除缓存在更新数据库,但这是在普通的环境下,但是在场景2中该如何解决呢?
我们可以设想,假如说有这样一种方式,对相同的数据进行操作,比如某商品的productId,或者订单orderId,我们是否可以让前一个写请求没有完成的情况下,后面的读请求被阻塞住那么一段时间,等待前面的写操作执行完毕后再进行读操作呢?
理论上来说是可行的,我们可以通过某种方式,比如阻塞队列,让相同的数据进入相同的队列,阻塞队列就有很好的顺序执行保障机制,保证入队的数据顺序执行,这样一来,是不是就可以达到目的呢?
说白了,就是前端发来一个的请求,若是写请求,将这个请求入队,然后从队列中取出请求执行写的业务逻辑操作,如果是读请求而且是相同的数据,我们通过自定义的想过路由算法路由到相同的队列中,通过设定一定的等待时间来达到让这两个请求由并行操作变成串行操作,这不就达到目的了吗?
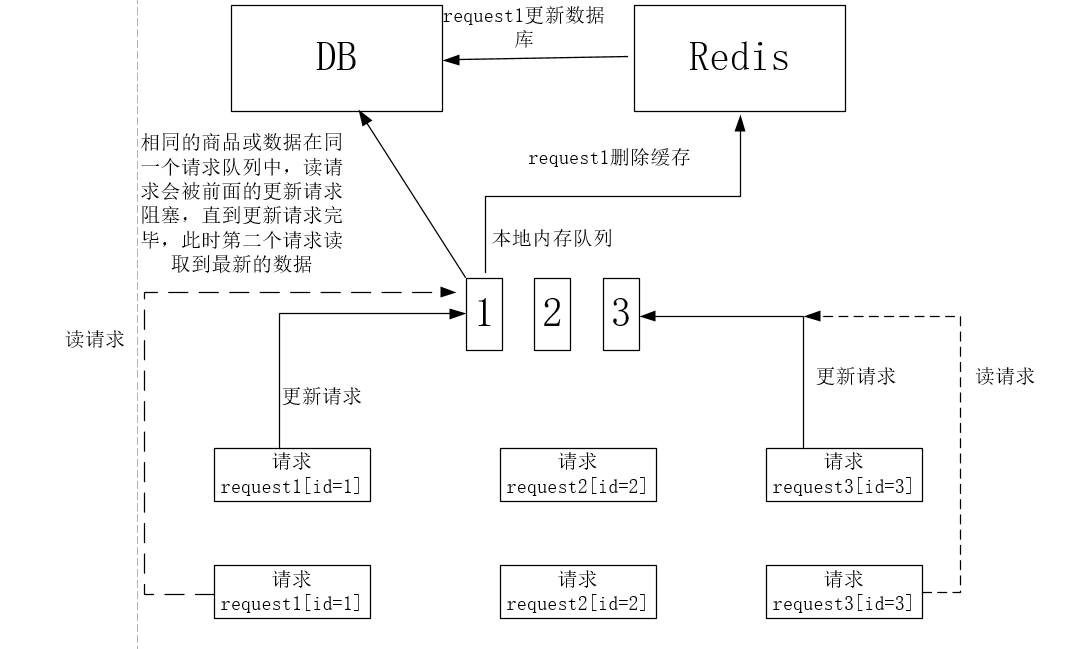
按照这个思路,我们来解决下面的业务需求。
第一个请求,更新数据库的商品缓存,这时候,又一个请求过来,要读取这个商品的库存
通过以上的分析思路,我们将解决的代码思路整理如下,
1、初始化一个监听器,在程序启动的时候将针对不同请求的队列全部创建出来;
2、封装两种不同的请求对象,一种是更新缓存,一种是读取数据并刷新到缓存;
3、处理两种不同请求的异步路由service;
4、两种请求的controller;
5、读请求去重优化;
6、空数据读请求过滤优化
根据以上思路,我们来整合一下这个过程,
1、项目结构,
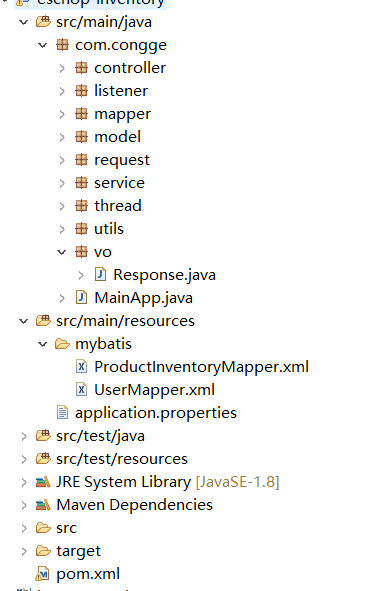
2、pom依赖文件,主要是springboot的相关依赖,
2
3
4
5
6
7
8
9
10
11
12
13
14
15
16
17
18
19
20
21
22
23
24
25
26
27
28
29
30
31
32
33
34
35
36
37
38
39
40
41
42
43
44
45
46
47
48
49
50
51
52
53
54
55
56
57
58
59
60
61
62
63
64
65
66
67
68
69
70
71
72
73
74
75
76
77
78
79
80
81
82
83
84
85
86
87
88
89
90
91
92
93
94
95
96
97
98
99
100
101
102
103
104
105
106
107
108
109
110
111
112
113
114
115
116
117
118
119
2 <groupId>org.springframework.boot</groupId>
3 <artifactId>spring-boot-starter-parent</artifactId>
4 <version>2.0.1.RELEASE</version>
5 <relativePath /> <!-- lookup parent from repository -->
6 </parent>
7
8 <properties>
9 <project.build.sourceEncoding>UTF-8</project.build.sourceEncoding>
10 <project.reporting.outputEncoding>UTF-8</project.reporting.outputEncoding>
11 <java.version>1.8</java.version>
12 </properties>
13
14 <dependencies>
15
16 <dependency>
17 <groupId>org.springframework.boot</groupId>
18 <artifactId>spring-boot-starter-freemarker</artifactId>
19 </dependency>
20
21 <dependency>
22 <groupId>org.springframework.boot</groupId>
23 <artifactId>spring-boot-starter-web</artifactId>
24 </dependency>
25
26 <dependency>
27 <groupId>org.springframework.boot</groupId>
28 <artifactId>spring-boot-starter-jdbc</artifactId>
29 </dependency>
30
31 <dependency>
32 <groupId>org.springframework.boot</groupId>
33 <artifactId>spring-boot-starter-test</artifactId>
34 <scope>test</scope>
35 </dependency>
36
37 <dependency>
38 <groupId>org.mybatis.spring.boot</groupId>
39 <artifactId>mybatis-spring-boot-starter</artifactId>
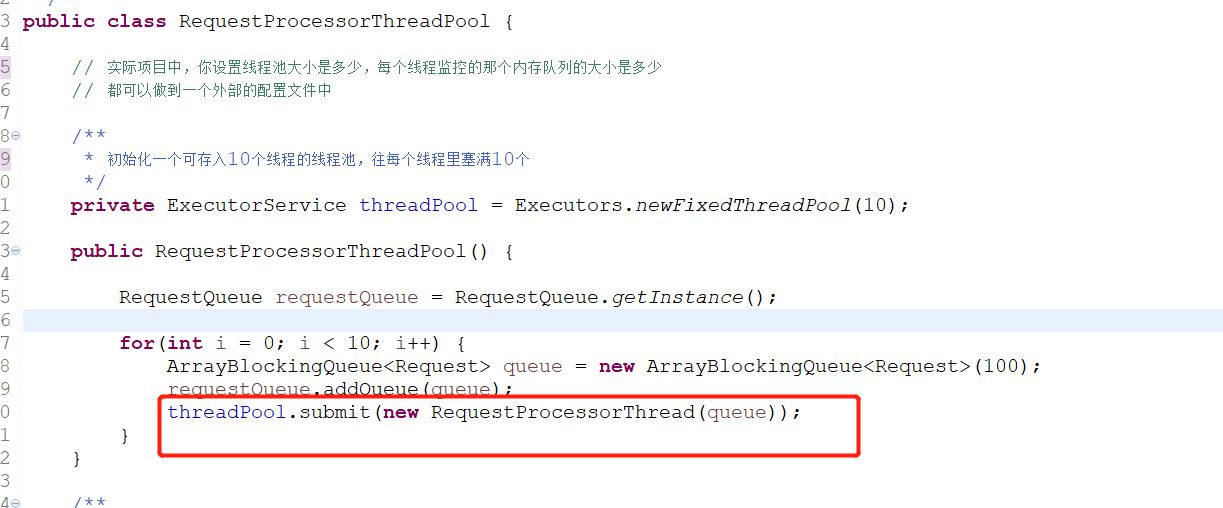
40 <version>1.3.2</version>
41 </dependency>
42
43 <dependency>
44 <groupId>org.springframework.boot</groupId>
45 <artifactId>spring-boot-starter-cache</artifactId>
46 </dependency>
47
48 <dependency>
49 <groupId>org.springframework.boot</groupId>
50 <artifactId>spring-boot-starter-data-redis</artifactId>
51 </dependency>
52
53 <!-- rabbitmq的依赖包 -->
54 <dependency>
55 <groupId>org.springframework.boot</groupId>
56 <artifactId>spring-boot-starter-amqp</artifactId>
57 </dependency>
58
59 <!-- 数据库连接池 -->
60 <!-- <dependency> <groupId>com.alibaba</groupId> <artifactId>druid</artifactId>
61 <version>1.1.9</version> </dependency> -->
62
63 <dependency>
64 <groupId>junit</groupId>
65 <artifactId>junit</artifactId>
66 <version>4.12</version>
67 </dependency>
68
69 <!-- http所需包 -->
70 <dependency>
71 <groupId>org.apache.httpcomponents</groupId>
72 <artifactId>httpclient</artifactId>
73 </dependency>
74 <dependency>
75 <groupId>org.apache.httpcomponents</groupId>
76 <artifactId>httpcore</artifactId>
77 </dependency>
78 <dependency>
79 <groupId>org.apache.httpcomponents</groupId>
80 <artifactId>httpmime</artifactId>
81 </dependency>
82 <!-- /http所需包 -->
83
84 <!--添加fastjson依赖 -->
85 <dependency>
86 <groupId>com.alibaba</groupId>
87 <artifactId>fastjson</artifactId>
88 <version>1.2.7</version>
89 </dependency>
90
91 <dependency>
92 <groupId>redis.clients</groupId>
93 <artifactId>jedis</artifactId>
94 <version>2.9.0</version><!--$NO-MVN-MAN-VER$ -->
95 </dependency>
96
97 <dependency>
98 <groupId>mysql</groupId>
99 <artifactId>mysql-connector-java</artifactId>
100 <scope>runtime</scope>
101 </dependency>
102
103 <dependency>
104 <groupId>org.apache.tomcat</groupId>
105 <artifactId>tomcat-jdbc</artifactId>
106 </dependency>
107
108 </dependencies>
109
110 <build>
111 <plugins>
112 <plugin>
113 <groupId>org.springframework.boot</groupId>
114 <artifactId>spring-boot-maven-plugin</artifactId>
115 </plugin>
116 </plugins>
117 </build>
118
119
3、整合mybatis以及数据库的连接,这里采用的是程序加载bean的方式配置,
2
3
4
5
6
7
8
9
10
11
12
13
14
15
16
17
18
19
20
21
22
23
24
25
26
27
28
29
30
31
2 * 整合mybatis以及数据库连接配置
3 * @author asus
4 *
5 */
6@Component
7public class DataSourceConfig {
8
9 @Bean
10 @ConfigurationProperties(prefix="spring.datasource")
11 public DataSource dataSource(){
12 return new DataSource();
13 }
14
15 @Bean
16 public SqlSessionFactory sqlSessionFactory() throws Exception{
17 SqlSessionFactoryBean sqlSessionFactoryBean = new SqlSessionFactoryBean();
18 sqlSessionFactoryBean.setDataSource(dataSource());
19 PathMatchingResourcePatternResolver resolver = new PathMatchingResourcePatternResolver();
20 sqlSessionFactoryBean.setMapperLocations(resolver.getResources("classpath:/mybatis/*.xml"));
21 return sqlSessionFactoryBean.getObject();
22 }
23
24 @Bean
25 public PlatformTransactionManager transactionManager(){
26 return new DataSourceTransactionManager(dataSource());
27 }
28
29}
30
31
数据库配置信息:application.properties
2
3
4
5
6
7
8
9
10
11
12
13
14
15
16
17
18
2
3spring.datasource.url=jdbc:mysql://localhost:3306/babaytun?useUnicode=true&characterEncoding=utf-8&useSSL=false
4spring.datasource.driver-class-name=com.mysql.jdbc.Driver
5spring.datasource.username=root
6spring.datasource.password=root
7
8spring.redis.database=3
9spring.redis.port=6379
10spring.redis.host=localhost
11spring.redis.database=0
12
13spring.redis.jedis.pool.max-active=100
14spring.redis.jedis.pool.max-idle=100
15spring.redis.jedis.pool.min-idle=10
16spring.redis.jedis.pool.max-wait=50000ms
17
18
4、初始化监听器,通过这个监听器,我们把要操作的内存队列全部创建出来,
2
3
4
5
6
7
8
9
10
11
12
13
14
15
16
17
18
19
20
21
22
23
24
2 * 系统初始化监听器
3 * @author asus
4 *
5 */
6public class InitListener implements ServletContextListener{
7
8
9 @Override
10 public void contextInitialized(ServletContextEvent sce) {
11 System.out.println("系统初始化 =============================");
12 RequestProcessorThreadPool.init();
13 }
14
15 @Override
16 public void contextDestroyed(ServletContextEvent sce) {
17
18
19 }
20
21}
22
23
24
可以看到,在监听器里面有一个RequestProcessorThreadPool.init(); 的方法,通过调用这个方法就可以实现创建内存队列的行为,我们就从这个类看起,
5、初始化一个可存入10个线程的线程池,往每个线程里塞满相应的阻塞队列,每个队列里最大可处理数量为100个,可以自定义,为了保证线程安全,这里采用静态内部类的方式,
2
3
4
5
6
7
8
9
10
11
12
13
14
15
16
17
18
19
20
21
22
23
24
25
26
27
28
29
30
31
32
33
34
35
36
37
38
39
40
41
42
43
44
45
46
47
48
49
50
51
52
53
54
55
56
57
58
59
60
61
62
63
64
2 * 请求处理线程池:单例
3 */
4public class RequestProcessorThreadPool {
5
6 // 实际项目中,你设置线程池大小是多少,每个线程监控的那个内存队列的大小是多少
7 // 都可以做到一个外部的配置文件中
8
9 /**
10 * 初始化一个可存入10个线程的线程池,往每个线程里塞满10个
11 */
12 private ExecutorService threadPool = Executors.newFixedThreadPool(10);
13
14 public RequestProcessorThreadPool() {
15
16 RequestQueue requestQueue = RequestQueue.getInstance();
17
18 for(int i = 0; i < 10; i++) {
19 ArrayBlockingQueue<Request> queue = new ArrayBlockingQueue<Request>(100);
20 requestQueue.addQueue(queue);
21 threadPool.submit(new RequestProcessorThread(queue));
22 }
23 }
24
25 /**
26 * 采取绝对线程安全的一种方式
27 * 静态内部类的方式,去初始化单例
28 *
29 */
30 private static class Singleton {
31
32 private static RequestProcessorThreadPool instance;
33
34 static {
35 instance = new RequestProcessorThreadPool();
36 }
37
38 public static RequestProcessorThreadPool getInstance() {
39 return instance;
40 }
41
42 }
43
44 /**
45 * jvm的机制去保证多线程并发安全
46 *
47 * 内部类的初始化,一定只会发生一次,不管多少个线程并发去初始化
48 *
49 * @return
50 */
51 public static RequestProcessorThreadPool getInstance() {
52 return Singleton.getInstance();
53 }
54
55 /**
56 * 初始化的便捷方法
57 */
58 public static void init() {
59 getInstance();
60 }
61
62}
63
64
2
3
4
5
6
7
8
9
10
11
12
13
14
15
16
17
18
19
20
21
22
23
24
25
26
27
28
29
30
31
32
33
34
35
36
37
38
39
40
41
42
43
44
45
46
47
48
49
50
51
52
53
54
55
56
57
58
59
60
61
62
63
64
65
66
67
68
69
70
71
72
73
74
75
76
77
78
79
80
81
2 * 请求内存队列
3 *
4 */
5public class RequestQueue {
6
7 /**
8 * 内存队列
9 */
10 private List<ArrayBlockingQueue<Request>> queues = new ArrayList<ArrayBlockingQueue<Request>>();
11
12 /**
13 * 标识位map
14 */
15 private Map<Integer, Boolean> flagMap = new ConcurrentHashMap<Integer, Boolean>();
16
17 /**
18 * 单例有很多种方式去实现:我采取绝对线程安全的一种方式
19 *
20 * 静态内部类的方式,去初始化单例
21 *
22 * @author Administrator
23 *
24 */
25 private static class Singleton {
26
27 private static RequestQueue instance;
28
29 static {
30 instance = new RequestQueue();
31 }
32
33 public static RequestQueue getInstance() {
34 return instance;
35 }
36
37 }
38
39 /**
40 * jvm的机制去保证多线程并发安全
41 *
42 * 内部类的初始化,一定只会发生一次,不管多少个线程并发去初始化
43 *
44 * @return
45 */
46 public static RequestQueue getInstance() {
47 return Singleton.getInstance();
48 }
49
50 /**
51 * 添加一个内存队列
52 * @param queue
53 */
54 public void addQueue(ArrayBlockingQueue<Request> queue) {
55 this.queues.add(queue);
56 }
57
58 /**
59 * 获取内存队列的数量
60 * @return
61 */
62 public int queueSize() {
63 return queues.size();
64 }
65
66 /**
67 * 获取内存队列
68 * @param index
69 * @return
70 */
71 public ArrayBlockingQueue<Request> getQueue(int index) {
72 return queues.get(index);
73 }
74
75 public Map<Integer, Boolean> getFlagMap() {
76 return flagMap;
77 }
78
79}
80
81
6、接下来,我们来封装具体的请求,一个是请求更新数据库的,一个是读取请求,
【1】更新数据库数据请求:
2
3
4
5
6
7
8
9
10
11
12
13
14
15
16
17
18
19
20
21
22
23
24
25
26
27
28
29
30
31
32
33
34
35
36
37
38
39
40
41
42
43
44
45
46
47
48
49
50
51
52
53
54
55
56
57
58
59
60
2 * 比如说一个商品发生了交易,那么就要修改这个商品对应的库存
3 * 此时就会发送请求过来,要求修改库存,那么这个可能就是所谓的data update request,数据更新请求
4 * (1)删除缓存
5 * (2)更新数据库
6 */
7public class ProductInventoryDBUpdateRequest implements Request {
8
9 private static final Logger logger = LoggerFactory.getLogger(RequestAsyncProcessServiceImpl.class);
10
11 /**
12 * 商品库存
13 */
14 private ProductInventory productInventory;
15 /**
16 * 商品库存Service
17 */
18 private ProductInventoryService productInventoryService;
19
20 public ProductInventoryDBUpdateRequest(ProductInventory productInventory,
21 ProductInventoryService productInventoryService) {
22 this.productInventory = productInventory;
23 this.productInventoryService = productInventoryService;
24 }
25
26 @Override
27 public void process() {
28 logger.info("===========日志===========: "
29 + "数据库更新请求开始执行,商品id=" + productInventory.getProductId() +
30 ", 商品库存数量=" + productInventory.getInventoryCnt());
31
32 // 删除redis中的缓存
33 productInventoryService.removeProductInventoryCache(productInventory);
34
35 // 为了能够看到效果,模拟先删除了redis中的缓存,然后还没更新数据库的时候,读请求过来了,这里可以人工sleep一下
36
37 try {
38 Thread.sleep(20000);
39 } catch (InterruptedException e) {
40 e.printStackTrace();
41 }
42 // 修改数据库中的库存
43 productInventoryService.updateProductInventory(productInventory);
44 }
45
46 /**
47 * 获取商品id
48 */
49 public Integer getProductId() {
50 return productInventory.getProductId();
51 }
52
53 @Override
54 public boolean isForceRefresh() {
55 return false;
56 }
57
58}
59
60
【2】读取最新数据请求:
2
3
4
5
6
7
8
9
10
11
12
13
14
15
16
17
18
19
20
21
22
23
24
25
26
27
28
29
30
31
32
33
34
35
36
37
38
39
40
41
42
43
44
45
46
47
48
49
50
51
52
2 * 重新加载商品库存的缓存
3 *
4 */
5public class ProductInventoryCacheRefreshRequest implements Request {
6
7 private static final Logger logger = LoggerFactory.getLogger(RequestAsyncProcessServiceImpl.class);
8
9 /**
10 * 商品id
11 */
12 private Integer productId;
13 /**
14 * 商品库存Service
15 */
16 private ProductInventoryService productInventoryService;
17 /**
18 * 是否强制刷新缓存
19 */
20 private boolean forceRefresh;
21
22 public ProductInventoryCacheRefreshRequest(Integer productId,
23 ProductInventoryService productInventoryService,
24 boolean forceRefresh) {
25 this.productId = productId;
26 this.productInventoryService = productInventoryService;
27 this.forceRefresh = forceRefresh;
28 }
29
30 @Override
31 public void process() {
32
33 // 从数据库中查询最新的商品库存数量
34 ProductInventory productInventory = productInventoryService.findProductInventory(productId);
35 logger.info("===========日志===========: 已查询到商品最新的库存数量,商品id=" + productId + ", 商品库存数量=" + productInventory.getInventoryCnt());
36
37 // 将最新的商品库存数量,刷新到redis缓存中去
38 productInventoryService.setProductInventoryCache(productInventory);
39 }
40
41 public Integer getProductId() {
42 return productId;
43 }
44
45 public boolean isForceRefresh() {
46 return forceRefresh;
47 }
48
49}
50
51
52
7、两种请求的具体业务逻辑实现类,
【1】更新商品数据,
2
3
4
5
6
7
8
9
10
11
12
13
14
15
16
17
18
19
20
21
22
23
24
25
26
27
28
29
30
31
32
33
34
35
36
37
38
39
40
41
42
43
44
45
46
47
48
49
50
51
52
53
54
55
56
57
58
59
60
61
62
63
64
65
66
67
68
69
70
71
72
73
74
75
76
77
78
79
80
81
2 * 修改商品库存Service实现类
3 *
4 */
5@Service("productInventoryService")
6public class ProductInventoryServiceImpl implements ProductInventoryService {
7
8 private static final Logger logger = LoggerFactory.getLogger(ProductInventoryController.class);
9
10 @Resource
11 private ProductInventoryMapper productInventoryMapper;
12
13 @Autowired
14 private RedisTemplate<String, String> redisTemplate;
15
16 /**
17 * 修改数据库商品库存数量
18 */
19 public void updateProductInventory(ProductInventory productInventory) {
20 productInventoryMapper.updateProductInventory(productInventory);
21 logger.info("===========日志===========: 已修改数据库中的库存,商品id=" + productInventory.getProductId() + ", 商品库存数量=" + productInventory.getInventoryCnt());
22 }
23
24 /**
25 * 根据商品的id删除redis中某商品
26 */
27 public void removeProductInventoryCache(ProductInventory productInventory) {
28 String key = "product:inventory:" + productInventory.getProductId();
29 //redisTemplate.delete(key);
30 redisTemplate.delete(key);
31 logger.info("===========日志===========: 已删除redis中的缓存,key=" + key);
32 }
33
34 /**
35 * 根据商品id查询商品库存
36 * @param productId 商品id
37 * @return 商品库存
38 */
39 public ProductInventory findProductInventory(Integer productId) {
40 return productInventoryMapper.findProductInventory(productId);
41 }
42
43 /**
44 * 设置商品库存的缓存
45 * @param productInventory 商品库存
46 */
47 public void setProductInventoryCache(ProductInventory productInventory) {
48 String key = "product:inventory:" + productInventory.getProductId();
49 //redisTemplate.opsForValue().set(key, String.valueOf(productInventory.getInventoryCnt()));
50 redisTemplate.opsForValue().set(key, String.valueOf(productInventory.getInventoryCnt()));
51 logger.info("===========日志===========: 已更新商品库存的缓存,商品id=" + productInventory.getProductId() + ", 商品库存数量=" + productInventory.getInventoryCnt() + ", key=" + key);
52 }
53
54 /**
55 * 获取商品库存的缓存
56 * @param productId
57 * @return
58 */
59 public ProductInventory getProductInventoryCache(Integer productId) {
60 Long inventoryCnt = 0L;
61
62 String key = "product:inventory:" + productId;
63 //String result = (String) redisTemplate.opsForValue().get(key);
64 String result = (String) redisTemplate.opsForValue().get(key);
65
66 if(result != null && !"".equals(result)) {
67 try {
68 inventoryCnt = Long.valueOf(result);
69 return new ProductInventory(productId, inventoryCnt);
70 } catch (Exception e) {
71 e.printStackTrace();
72 }
73 }
74
75 return null;
76 }
77
78}
79
80
81
【2】读取商品数据,
2
3
4
5
6
7
8
9
10
11
12
13
14
15
16
17
18
19
20
21
22
23
24
25
26
27
28
29
30
31
32
33
34
35
36
37
38
39
40
41
42
43
44
45
46
47
48
49
50
51
52
2 * 请求读取数据异步处理的service实现
3 *
4 */
5@Service("requestAsyncProcessService")
6public class RequestAsyncProcessServiceImpl implements RequestAsyncProcessService {
7
8
9 private static final Logger logger = LoggerFactory.getLogger(RequestAsyncProcessServiceImpl.class);
10
11 @Override
12 public void process(Request request) {
13 try {
14 // 做请求的路由,根据每个请求的商品id,路由到对应的内存队列中去
15
16 ArrayBlockingQueue<Request> queue = getRoutingQueue(request.getProductId());
17
18 // 将请求放入对应的队列中,完成路由操作
19 queue.put(request);
20
21 } catch (Exception e) {
22 e.printStackTrace();
23 }
24 }
25
26 /**
27 * 获取路由到的内存队列
28 * @param productId 商品id
29 * @return 内存队列
30 */
31 private ArrayBlockingQueue<Request> getRoutingQueue(Integer productId) {
32 RequestQueue requestQueue = RequestQueue.getInstance();
33
34 // 先获取productId的hash值
35 String key = String.valueOf(productId);
36
37 int h;
38 int hash = (key == null) ? 0 : (h = key.hashCode()) ^ (h >>> 16);
39
40 // 对hash值取模,将hash值路由到指定的内存队列中,比如内存队列大小8
41 // 用内存队列的数量对hash值取模之后,结果一定是在0~7之间
42 // 所以任何一个商品id都会被固定路由到同样的一个内存队列中去的
43 int index = (requestQueue.queueSize() - 1) & hash;
44
45 logger.info("===========日志===========: 路由内存队列,商品id=" + productId + ", 队列索引=" + index);
46
47 return requestQueue.getQueue(index);
48 }
49
50}
51
52
在请求读取最新的商品库存数据方法中,有个根据商品的id路由到对应的内存队列的方法,即相同的productId通过这个路由方法之后会进入某个线程下相同的arrayBlockingQueue中,这样就能保证读写的顺序性执行,
8、在初始化创建线程池的方法中,我们注意到有一个方法,即我们把整个queue提交到线程池里面了,其实在这个RequestProcessorThread 就是具体执行请求路由转发的,也就是说,一个前端请求打过来,只要是我们定义的请求类型,就会执行这个里面的转发逻辑,
9、以上就是主要的业务封装类,下面就来看看controller中两种请求的方法类,
2
3
4
5
6
7
8
9
10
11
12
13
14
15
16
17
18
19
20
21
22
23
24
25
26
27
28
29
30
31
32
33
34
35
36
37
38
39
40
41
42
43
44
45
46
47
48
49
50
51
52
53
54
55
56
57
58
59
60
61
62
63
64
65
66
67
68
69
70
71
72
73
74
75
76
77
78
79
80
81
82
83
84
85
86
87
88
89
90
91
92
93
94
95
96
97
98
99
100
101
102
103
104
105
106
107
108
109
110
111
112
113
114
115
116
117
118
119
120
121
122
123
124
125
126
127
128
129
130
2 * 商品库存Controller
3 * 要模拟的场景:
4 *
5 *(1)一个更新商品库存的请求过来,然后此时会先删除redis中的缓存,然后模拟卡顿5秒钟
6 *(2)在这个卡顿的5秒钟内,我们发送一个商品缓存的读请求,因为此时redis中没有缓存,就会来请求将数据库中最新的数据刷新到缓存中
7 *(3)此时读请求会路由到同一个内存队列中,阻塞住,不会执行
8 *(4)等5秒钟过后,写请求完成了数据库的更新之后,读请求才会执行
9 *(5)读请求执行的时候,会将最新的库存从数据库中查询出来,然后更新到缓存中
10 * 如果是不一致的情况,可能会出现说redis中还是库存为100,但是数据库中也许已经更新成了库存为99了
11 * 现在做了一致性保障的方案之后,就可以保证说,数据是一致的
12 *
13 *
14 */
15@Controller
16public class ProductInventoryController {
17
18 private static final Logger logger = LoggerFactory.getLogger(ProductInventoryController.class);
19
20 @Resource
21 private RequestAsyncProcessService requestAsyncProcessService;
22
23 @Resource
24 private ProductInventoryService productInventoryService;
25
26 /**
27 * 更新商品库存
28 */
29 @RequestMapping("/updateProductInventory")
30 @ResponseBody
31 public Response updateProductInventory(ProductInventory productInventory) {
32 // 为了简单起见,我们就不用log4j那种日志框架去打印日志了
33 // 其实log4j也很简单,实际企业中都是用log4j去打印日志的,自己百度一下
34 logger.info("===========日志===========: 接收到更新商品库存的请求,商品id=" + productInventory.getProductId() + ", 商品库存数量=" + productInventory.getInventoryCnt());
35
36 Response response = null;
37
38 try {
39 Request request = new ProductInventoryDBUpdateRequest(productInventory, productInventoryService);
40
41 requestAsyncProcessService.process(request);
42
43 response = new Response(Response.SUCCESS);
44
45 } catch (Exception e) {
46 e.printStackTrace();
47 response = new Response(Response.FAILURE);
48 }
49
50 return response;
51 }
52
53 /**
54 * 获取商品库存
55 */
56 @RequestMapping("/getProductInventory")
57 @ResponseBody
58 public ProductInventory getProductInventory(Integer productId) {
59
60 logger.info("===========日志===========: 接收到一个商品库存的读请求,商品id=" + productId);
61
62 ProductInventory productInventory = null;
63
64 try {
65 Request request = new ProductInventoryCacheRefreshRequest(productId, productInventoryService, false);
66
67 requestAsyncProcessService.process(request);
68
69 // 将请求扔给service异步去处理以后,就需要while(true)一会儿,在这里hang住
70 // 去尝试等待前面有商品库存更新的操作,同时缓存刷新的操作,将最新的数据刷新到缓存中
71 long startTime = System.currentTimeMillis();
72 long endTime = 0L;
73 long waitTime = 0L;
74
75 // 等待超过200ms没有从缓存中获取到结果
76 while(true) {
77 if(waitTime > 25000) {
78 break;
79 }
80
81 // 一般公司里面,面向用户的读请求控制在200ms就可以了
82 /*if(waitTime > 200) {
83 break;
84 }*/
85
86 // 尝试去redis中读取一次商品库存的缓存数据
87 productInventory = productInventoryService.getProductInventoryCache(productId);
88
89 // 如果读取到了结果,那么就返回
90 if(productInventory != null) {
91 logger.info("===========日志===========: 在200ms内读取到了redis中的库存缓存,商品id=" + productInventory.getProductId() + ", 商品库存数量=" + productInventory.getInventoryCnt());
92 return productInventory;
93 }
94
95 // 如果没有读取到结果,那么等待一段时间
96 else {
97 Thread.sleep(20);
98 endTime = System.currentTimeMillis();
99 waitTime = endTime - startTime;
100 }
101 }
102
103 // 直接尝试从数据库中读取数据
104 productInventory = productInventoryService.findProductInventory(productId);
105 if(productInventory != null) {
106 // 将缓存刷新一下
107 // 这个过程,实际上是一个读操作的过程,但是没有放在队列中串行去处理,还是有数据不一致的问题
108 request = new ProductInventoryCacheRefreshRequest(
109 productId, productInventoryService, true);
110 requestAsyncProcessService.process(request);
111
112 // 代码会运行到这里,只有三种情况:
113 // 1、就是说,上一次也是读请求,数据刷入了redis,但是redis LRU算法给清理掉了,标志位还是false
114 // 所以此时下一个读请求是从缓存中拿不到数据的,再放一个读Request进队列,让数据去刷新一下
115 // 2、可能在200ms内,就是读请求在队列中一直积压着,没有等待到它执行(在实际生产环境中,基本是比较坑了)
116 // 所以就直接查一次库,然后给队列里塞进去一个刷新缓存的请求
117 // 3、数据库里本身就没有,缓存穿透,穿透redis,请求到达mysql库
118
119 return productInventory;
120 }
121 } catch (Exception e) {
122 e.printStackTrace();
123 }
124
125 return new ProductInventory(productId, -1L);
126 }
127
128}
129
130
为了模拟出鲜果,我在读取数据的方法里面加了个wait的操作,这里wait的时间要大于请求更新数据库的时间长,因为要确保写请求执行完毕才执行读请求,这样读取到的数据才是最新的数据,就达到了阻塞队列的实际作用,
9、其他的类这里略过了,比较简单,主要是接口、实体类和一个更新数据库数据和查询的,注意,我们配置了监听器,在springboot里面一定要将监听器作为bean配置到启动类里面,否则不生效,
2
3
4
5
6
7
8
9
10
11
12
13
14
15
16
17
18
19
20
21
22
23
24
25
26
2@SpringBootApplication
3@Component
4@MapperScan("com.congge.mapper")
5public class MainApp {
6
7 /**
8 * 注册web应用启动监听器bean
9 * @return
10 */
11 @SuppressWarnings("rawtypes")
12 @Bean
13 public ServletListenerRegistrationBean servletListenerRegistrationBean(){
14 ServletListenerRegistrationBean<InitListener> listenerRegistrationBean =
15 new ServletListenerRegistrationBean<InitListener>();
16 listenerRegistrationBean.setListener(new InitListener());
17 return listenerRegistrationBean;
18 }
19
20 public static void main(String[] args) {
21 SpringApplication.run(MainApp.class, args);
22 }
23
24}
25
26
,
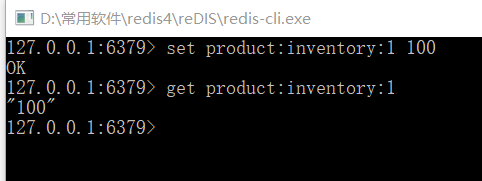
9、数据库中我提前创建好了一张表,并在redis中初始化了一条和数据库相同的数据,
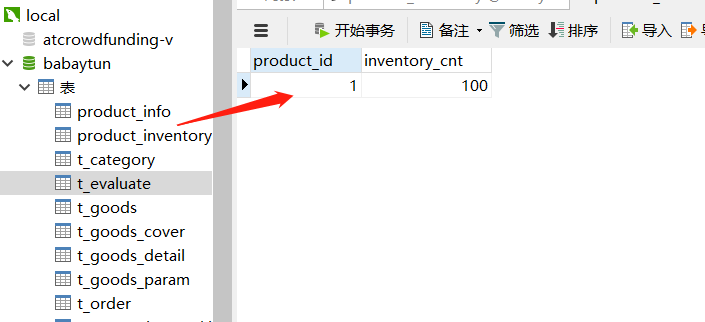
启动项目,首先我们访问,即发起请求,将这条数据的库存变为99,
http://localhost:8085/updateProductInventory?productId=1&inventoryCnt=99
同时立即发起请求,即读取这条数据的库存,即模拟一个并发操作,
http://localhost:8085/getProductInventory?productId=1
总体的效果是,第一个更新请求立即访问,由于后台有wait,所以相应的是null,当过了20秒后,我们继续刷新,更新成功,再发起读取数据请求,第二个请求相应到的数据就是更新完毕的数据99,中间第二个请求会一直卡顿在那儿,


同时可以看到后台的打印日志,也是按照我们的执行顺序进行的,

这样就达到了我们的目的,通过上述整合,我们实现了模拟在并发环境下实现mysql和redis中数据读写的一致性,本篇到此结束,感谢观看!
