集群简介
简单地说,集群就是指一组(若干个)相互独立的计算机,利用高速通信网络组成的一个较大的计算机服务系统,每个集群节点(即集群中的每台计算机)都是运行各自服务的独立服务器。这些服务器之间可以彼此通信,协同向用户提供应用程序,系统资源和数据,并以单一系统的模式加以管理。当用户客户机请求集群系统时,集群给用户的感觉就是一个单一独立的服务器,而实际上用户请求的是一组集群服务器。
打开谷歌,百度的页面,看起来好简单,也许你觉得用几分钟就可以制作出相似的网页,而实际上,这个页面的背后是由成千上万台服务器集群协同工作的结果。而这么多的服务器维护和管理,以及相互协调工作也许就是同学们未来的工作职责了。
若要用一句话描述集群,即一堆服务器合作做同一件事,这些机器可能需要整个技术团队架构,设计和统一协调管理,这些机器可以分布在一个机房,也可以分布在全国全球各个地区的多个机房。
集群的常见分类
1.2.1 集群的常见分类
计算机集群架构按功能和结构可以分成以下几类:
负载均衡集群,简称LBC或者LB
高可用性集群,简称HAC
高性能计算集群,简称HPC
网格计算集群
提示:
负载均衡集群和高可用性集群是互联网行业常用的集群架构模式,也是我们要学习的重点。
1.2.2 不同种类的集群介绍
(1)负载均衡集群
-负载均衡集群为企业提供了更为实用,性价比更高的系统架构解决方案。负载均衡集群可以把很多客户集中的访问请求负载压力尽可能平均地分摊在计算机集群中处理。客户访问请求负载通常包括应用程序处理负载和网络流量负载。这样的系统非常适合使用同一组应用程序为大量用户提供服务的模式,每个节点都可以承担一定的访问请求负载压力,并且可以实现访问请求在各节点之间动态分配,以实现负载均衡。
-负载均衡集群运行时,一般是通过一个或多个前端负载均衡器将客户访问请求分发到后端的一组服务器上,从而达到整个系统的高性能和高可用性。一般高可用性集群和负载均衡集群会使用类似的技术,或同时具有高可用性与负载均衡的特点。
负载均衡集群的作用为:
- 分摊用户访问请求及数据流量(负载均衡)
- 保持业务连续性,即7*24小时服务(高可用性)。
- 应用于Web业务及数据库从库等服务器的业务
负载均衡集群典型的开源软件包括LVS,Nginx,Haproxy等。如下图所示:

(2)高可用性集群
一般是指在集群中任意一个节点失效的情况下,该节点上的所有任务会自动转移到其他正常的节点上。此过程并不影响整个集群的运行。
当集群中的一个节点系统发生故障时,运行着的集群服务会迅速作出反应,将该系统的服务分配到集群中其他正在工作的系统上运行。考虑到计算机硬件和软件的容错性,高可用性集群的主要目的是使集群的整体服务尽可能可用。如果高可用性集群中的主节点发生了故障,那么这段时间内将由备节点代替它。备节点通常是主节点的镜像。当它代替主节点时,它可以完全接管主节点(包括IP地址及其他资源)提供服务,因此,使集群系统环境对于用户来说是一致的,既不会影响用户的访问。
高可用性集群使服务器系统的运行速度和响应速度会尽可能的快。他们经常利用在多台机器上运行的冗余节点和服务来相互跟踪。如果某个节点失败,它的替补者将在几秒钟或更短时间内接管它的职责。因此,对于用户而言,集群里的任意一台机器宕机,业务都不会受影响(理论情况下)。
高可用性集群的作用为:
当一台机器宕机时,另外一台机器接管宕机的机器的IP资源和服务资源,提供服务。
常用于不易实现负载均衡的应用,比如负载均衡器,主数据库,主存储对之间。
高可用性集群常用的开源软件包括Keepalived,Heartbeat等,其架构图如下图所示:

1.3 Nginx负载均衡集群介绍
1.3.1 搭建负载均衡服务的需求
负载均衡集群提供了一种廉价,有效,透明的方法,来扩展网络设备和服务器的负载,带宽和吞吐量,同时加强了网络数据处理能力,提高了网络的灵活性和可用性。
搭建负载均衡服务的需求如下:
2
3
4
5
2(2)单个重负载的运算分担到多台节点设备上做并行处理,每个节点设备处理结束后,将结果汇总,返回给用户,系统处理能力得到大幅度提高。
3(3)7*24小时的服务保证,任意一个或多个有限后面节点设备宕机,不能影响业务。
4
5
在负载均衡集群中,同组集群的所有计算机节点都应该提供相同的服务。集群负载均衡器会截获所有对该服务的入站请求。然后将这些请求尽可能地平均地分配在所有集群节点上。
1.3.2 Nginx负载均衡集群介绍
(1)反向代理与负载均衡概念简介
严格地说,Nginx仅仅是作为Nginx
Proxy反向代理使用的,因为这个反向代理功能表现的效果是负载均衡集群的效果,所以本文称之为Nginx负载均衡。那么,反向代理和负载均衡有什么区别呢?
普通负载均衡软件,例如大名鼎鼎的LVS,其实功能只是对请求数据包的转发(也可能会改写数据包),传递,其中DR模式明显的特征是从负载均衡下面的节点服务器来看,接收到的请求还是来自访问负载均衡器的客户端的真实用户,而反向代理就不一样了,反向代理接收访问用户的请求后,会代理用户重新发起请求代理下的节点服务器,最后把数据返回给客户端用户,在节点服务器看来,访问的节点服务器的客户端用户就是反向代理服务器了,而非真实的网站访问用户。
一句话,LVS等的负载均衡是转发用户请求的数据包,而Nginx反向代理是接收用户的请求然后重新发起请求去请求其后面的节点。
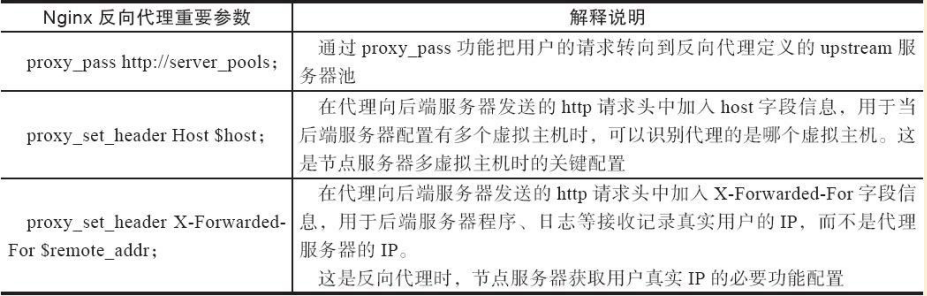
(2)实现Nginx负载均衡的组件说明
实现Nginx负载均衡的组件主要有两个,如下表:

1.4实践Nginx负载均衡环境准备
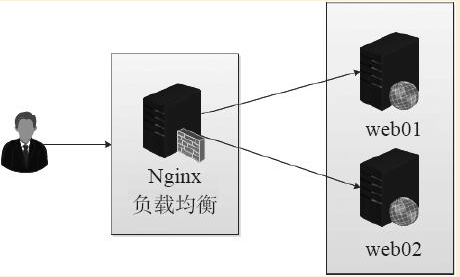
在上图中,所有用户的请求统一发送到Nginx负载均衡器,然后由负载均衡器根据调度算法来请求Web01和Web02
1.5.1 软硬件准备
(1)硬件准备
准备4台VM虚拟机(有物理服务器更佳),两台做负载均衡,两台做RS,如下表:
HOSTNAME IP 说明
2
3
4
5
6
2lb02 192.168.0.222 Nginx副负载均衡器
3web01 192.168.0.223 Web01服务器
4web02 192.168.0.224 Web02服务器
5
6
安装Nginx软件
(1)安装依赖软件包命令集合。
2
3
4
2[root@localhost ~]# rpm -qa openssl openssl-devel pcre pcre-devel
3
4
(2)安装Nginx软件包命令集合
源码包获取:http://nginx.org/download/
2
3
4
5
6
7
2 [root@localhost ~]# cd /usr/src/nginx-1.10.2/
3 [root@localhost nginx-1.10.2]# useradd -M -s /sbin/nologin nginx
4 [root@localhost nginx-1.10.2]# ./configure --user=nginx --group=nginx --prefix=/usr/local/nginx --with-http_stub_status_module --with-http_ssl_module && make && make install
5 [root@localhost nginx]# ln -s /usr/local/nginx/sbin/* /usr/local/sbin/
6
7
1.5.3 配置用于测试的Web服务
本小节将在两台NginxWeb服务器的节点上操作:配置并查看Web服务器的配置结果。
2
3
4
5
6
7
8
9
10
11
12
13
14
15
16
17
18
19
20
21
22
23
24
25
26
27
28
29
30
31
32
33
34
2worker_processes 1;
3events {
4 worker_connections 1024;
5}
6http {
7 include mime.types;
8 default_type application/octet-stream;
9 sendfile on;
10 keepalive_timeout 65;
11 log_format main '$remote_addr-$remote_user[$time_local]"$request"'
12 '$status $body_bytes_sent "$http_referer"'
13 '"$http_user_agent""$http_x_forwarded_for"';
14 server {
15 listen 80;
16 server_name bbs.yunjisuan.com;
17 location / {
18 root html/bbs;
19 index index.html index.htm;
20 }
21 access_log logs/access_bbs.log main;
22 }
23 server {
24 listen 80;
25 server_name www.yunjisuan.com;
26 location / {
27 root html/www;
28 index index.html index.htm;
29 }
30 access_log logs/access_www.log main;
31 }
32}
33
34
配置完成后检查语法,并启动Nginx服务
2
3
4
5
2[root@localhost nginx]# netstat -antup | grep nginx
3tcp 0 0 0.0.0.0:80 0.0.0.0:* LISTEN 4100/nginx
4
5
然后填充测试文件数据,如下:
2
3
4
5
6
7
8
9
10
11
2[root@localhost nginx]# echo "`hostname -I `www" >> /usr/local/nginx/html/www/index.html
3[root@localhost nginx]# cat /usr/local/nginx/html/www/index.html
4192.168.0.223 www
5[root@localhost nginx]# echo "`hostname -I `bbs" >> /usr/local/nginx/html/bbs/index.html
6[root@localhost nginx]# cat /usr/local/nginx/html/bbs/index.html
7192.168.0.223 bbs
8#提示:
9以上操作命令,在Web01上和Web02上是一样的
10
11
配置解析Web01的IP和主机名后,用curl测试一下
2
3
4
5
6
7
8
9
2192.168.0.223 www.yunjisuan.com
3192.168.0.223 bbs.yunjisuan.com
4[root@localhost nginx]# curl www.yunjisuan.com
5192.168.0.223 www
6[root@localhost nginx]# curl bbs.yunjisuan.com
7192.168.0.223 bbs
8
9
配置解析Web02的IP和主机名后,用curl测试一下
2
3
4
5
6
7
8
9
10
2[root@localhost nginx]# tail -2 /etc/hosts
3192.168.0.224 www.yunjisuan.com
4192.168.0.224 bbs.yunjisuan.com
5[root@localhost nginx]# curl www.yunjisuan.com
6192.168.0.224 www
7[root@localhost nginx]# curl bbs.yunjisuan.com
8192.168.0.224 bbs
9
10
提示: (1)不同Web测试节点,返回的结果是不同的,这是为了方便测试演示!
(2)通过上面配置就实现了两台Web服务器基于域名的虚拟主机配置。
1.5.4实现一个简单的负载均衡
HOSTNAME IP 说明
lb01 192.168.0.221 Nginx主负载均衡器
下面进行一个简单的Nginx负载均衡配置,代理www.yunjisuan.com服务,节点为Web01和Web02.nginx.conf配置文件内容如下:
2
3
4
5
6
7
8
9
10
11
12
13
14
15
16
17
18
19
20
21
22
23
24
25
26
27
2worker_processes 1;
3events {
4 worker_connections 1024;
5}
6http {
7 include mime.types;
8 default_type application/octet-stream;
9 sendfile on;
10 keepalive_timeout 65;
11 upstream www_server_pools { #这里定义Web服务器池,包含了223,224两个Web节点
12
13 server 192.168.0.223:80 weight=1;
14
15 server 192.168.0.224:80 weight=1;
16
17}
18server { #这里定义代理的负载均衡域名虚拟主机
19 listen 80;
20 server_name www.yunjisuan.com;
21 location / {
22 proxy_pass http://www_server_pools; #访问www.yunjisuan.com,请求发送给www_server_pools里面的节点
23 }
24}
25}
26
27
现在检查语法并启动。命令如下:
2
3
4
5
6
7
8
2nginx: the configuration file /usr/local/nginx/conf/nginx.conf syntax is ok
3nginx: configuration file /usr/local/nginx/conf/nginx.conf test is successful
4[root@lb01 nginx]# /usr/local/nginx/sbin/nginx
5[root@lb01 nginx]# netstat -antup | grep nginx
6tcp 0 0 0.0.0.0:80 0.0.0.0:* LISTEN 4105/nginx
7
8
然后,检查负载均衡测试结果。Linux作为客户端的测试结果如下:
2
3
4
5
6
7
8
9
10
11
12
13
14
15
16
17
18
19
20
21
22
2192.168.0.221
3[root@lb01 nginx]# tail -1 /etc/hosts
4192.168.0.221 www.yunjisuan.com #这里是lb1负载均衡器IP
5[root@lb01 nginx]# curl www.yunjisuan.com
6192.168.0.223 bbs
7[root@lb01 nginx]# curl www.yunjisuan.com
8192.168.0.224 bbs
9[root@lb01 nginx]# curl www.yunjisuan.com
10192.168.0.223 bbs
11[root@lb01 nginx]# curl www.yunjisuan.com
12192.168.0.224 bbs
13[root@lb01 nginx]# curl www.yunjisuan.com
14192.168.0.223 bbs
15[root@lb01 nginx]# curl www.yunjisuan.com
16192.168.0.224 bbs
17[root@lb01 nginx]# curl www.yunjisuan.com
18192.168.0.223 bbs
19[root@lb01 nginx]# curl www.yunjisuan.com
20192.168.0.224 bbs
21
22
从上面的测试结果可以看出来。两个Web节点按照1:1的比例被访问。
下面宕掉任意一个Web节点,看看测试结果如何,测试如下:
2
3
4
5
6
7
8
9
10
11
12
2192.168.0.223 bbs
3[root@lb01 nginx]# curl www.yunjisuan.com
4192.168.0.223 bbs
5[root@lb01 nginx]# curl www.yunjisuan.com
6192.168.0.223 bbs
7[root@lb01 nginx]# curl www.yunjisuan.com
8192.168.0.223 bbs
9[root@lb01 nginx]# curl www.yunjisuan.com
10192.168.0.223 bbs
11
12
从测试结果可以看出,已经实现了反向代理,负载均衡功能,但是有一个特殊问题,出来的结果并不是带有www的字符串,而是bbs的字符串,根据访问结果,我们推测是访问了Web节点下bbs的虚拟主机,明明代理的是www虚拟主机,为什么结果是访问了后端的bbs虚拟主机了呢?问题又该如何解决?
在配置文件加上proxy_set_header host $host
如下:
2
3
4
5
6
7
8
9
10
11
12
13
14
15
16
17
18
19
20
21
22
23
24
25
26
27
28
2worker_processes 1;
3events {
4 worker_connections 1024;
5}
6http {
7 include mime.types;
8 default_type application/octet-stream;
9 sendfile on;
10 keepalive_timeout 65;
11 upstream www_server_pools {
12
13 server 192.168.0.223:80 weight=1;
14
15 server 192.168.0.224:80 weight=1;
16
17 }
18 server {
19 listen 80;
20 server_name www.yunjisuan.com;
21 location / {
22 proxy_pass http://www_server_pools;
23 proxy_set_header host $host; #在代理向后端服务器发送的http请求头中加入host字段信息,用于当后端服务器配置有多个虚拟主机时,可以识别代理的是哪个虚拟主机。这是节点服务器多虚拟主机时的关键配置。
24 }
25 }
26}
27
28
1.6 准备:案例配置实战
先进行企业案例需求梳理:
当用户请求www.yunjisuan.com/upload/xx地址时,实现由upload上传服务器池处理请求。
当用户请求www.yunjisuan.com/static/xx地址时,实现由静态服务器池处理请求。
除此以外,对于其他访问请求,全都由默认的动态服务器池处理请求。
了解了需求后,就可以进行upstream模块服务器池的配置了。
#static_pools为静态服务器池,有一个服务器,地址为192.168.0.223,端口为80.
upstream static_pools {
server 192.168.0.223:80 weght=1;
}
#upload_pools为上传服务器池,有一个服务器地址为192.168.0.224,端口为80.
upstream upload_pools {
server 192.168.0.224:80 weight=1;
}
#default_pools为默认的服务器池,即动态服务器池,有一个服务器,地址为192.168.0.225,端口为80.
upstream default_pools {
server 192.168.0.225:80 weight=1;
}
#提示:需要增加一台测试Web节点Web03(ip:192.168.0.225),配置与Web01,Web02一样。
下面利用location或if语句把不同的URI(路径)请求,分给不同的服务器池处理,具体配置如下。
2
3
4
5
6
7
8
9
10
11
12
13
14
15
16
17
18
19
20
21
22
23
24
25
26
27
2
3#将符合static的请求交给静态服务器池static_pools,配置如下:
4location /static/ {
5
6proxy_pass http://static_pools;
7include proxy.conf;
8
9}
10
11#将符合upload的请求交给上传服务器池upload_pools,配置如下:
12location /upload/ {
13
14proxy_pass http://upload_pools;
15include proxy.conf;
16
17}
18
19#不符合上述规则的请求,默认全部交给动态服务器池default_pools,配置如下:
20location / {
21
22proxy_pass http://default_pools;
23include proxy.conf;
24
25}
26
27
方案2:以if语句实现。
2
3
4
5
6
7
8
9
10
11
12
13
14
15
16
17
18
2{
3proxy_pass http://static_pools/$1;
4}
5
6if ($request_uri ~* "^/upload/(.*)$")
7{
8proxy_pass http://upload_pools/$1;
9}
10
11location / {
12
13proxy_pass http://default_pools;
14include proxy.conf;
15
16}
17
18
以方案1为例进行讲解,Nginx反向代理的实际配置如下:
2
3
4
5
6
7
8
9
10
11
12
13
14
15
16
17
18
19
20
21
22
23
24
25
26
27
28
29
30
31
32
33
34
35
36
37
38
39
40
41
42
43
44
2worker_processes 1;
3events {
4 worker_connections 1024;
5}
6http {
7 include mime.types;
8 default_type application/octet-stream;
9 sendfile on;
10 keepalive_timeout 65;
11 upstream static_pools {
12server 192.168.0.223:80 weight=1;
13
14}
15upstream upload_pools {
16
17server 192.168.0.224:80 weight=1;
18
19}
20upstream default_pools {
21
22server 192.168.0.225:80 weight=1;
23
24}
25server {
26 listen 80;
27 server_name www.yunjisuan.com;
28 location / {
29 proxy_pass http://default_pools;
30 include proxy.conf;
31 }
32location /static/ {
33 proxy_pass http://static_pools;
34 include proxy.conf;
35}
36location /upload/ {
37 proxy_pass http://upload_pools;
38 include proxy.conf;
39}
40
41}
42}
43
44
重新加载配置生效,如下:
2
3
4
5
6
2nginx: the configuration file /usr/local/nginx/conf/nginx.conf syntax is ok
3nginx: configuration file /usr/local/nginx/conf/nginx.conf test is successful
4[root@lb01 ~]# /usr/local/nginx/sbin/nginx -s reload
5
6
暂时不要立刻测试成果,为了实现上述代理的测试,还需要在Web01和Web02上做节点的测试配置,才能更好地展示测试效果。
以Web01作为static静态服务,地址端口为:192.168.0.223:80,需要事先配置一个用于测试静态的地址页面,并测试访问,确定它会返回正确结果。操作步骤如下:
2
3
4
5
6
7
2[root@web01 www]# mkdir static
3[root@web01 www]# echo "static_pools" >> static/index.html
4[root@web01 www]# curl http://www.yunjisuan.com/static/index.html #这里的www.yunjisuan.com是解析过的Web01的本地IP
5static_pools
6
7
#提示:测试的静态地址为http://www.yunjisuan.com/static/index.html,注意,是带static路径的地址。
以Web02作为upload上传服务,地址端口为:192.168.0.224:80,需要事先配置一个用于测试上传服务的地址页面,并测试访问,确定它会返回正确结果。操作步骤如下:
2
3
4
5
6
7
2[root@web02 www]# mkdir upload
3[root@web02 www]# echo "upload_pools" >> upload/index.html
4[root@web02 www]# curl http://www.yunjisuan.com/upload/index.html #这里的www.yunjisuan.com是解析过的Web02的本地IP
5upload_pools
6
7
#提示:测试的上传地址为http://www.yunjisuan.com/upload/index.html,注意,是带upload路径的地址。
在Web03作为动态服务节点,地址端口为192.168.0.225:80,同样需要事先配置一个默认的地址页面,并测试访问,确定它会返回正确结果。操作步骤如下:
2
3
4
5
6
2[root@web03 www]# echo "default_pools" >> index.html
3[root@web03 www]# curl http://www.yunjisuan.com
4default_pools
5
6
