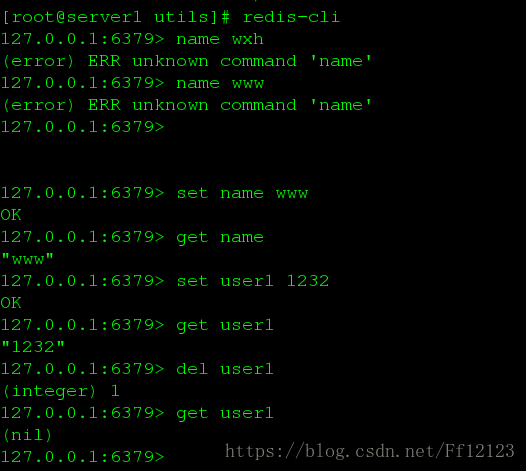
安装
下载redis-4.0.8.tar.gz
我这里使用4.0.8的
解压 下载gcc
进入解压目录 make && make installl
2
3
4
5
6
7
8
9
10
11
12
13
2# IF YOU ARE SURE YOU WANT YOUR INSTANCE TO LISTEN TO ALL THE INTERFACES
3# JUST COMMENT THE FOLLOWING LINE.
4# ~~~~~~~~~~~~~~~~~~~~~~~~~~~~~~~~~~~~~~~~~~~~~~~~~~~~~~~~~~~~~~~~~~~~~~~~
5bind 0.0.0.0 #更改为0.0.0.0 监听本机所有端口
6
7# Protected mode is a layer of security protection, in order to avoid that
8# Redis instances left open on the internet are accessed and exploited.
9#
10# When protected mode is on and if:
11#
12# 1) The server is not binding explicitly to a set of
13
同步 在server2 上面 进行同步
redis 集群搭建
2
3
4
5
6
7
8
9
10
2cluster-enabled yes
3cluster-config-file nodes.conf
4cluster-node-timeout 5000
5appendonly yes
6daemonize yes
7pidfile /usr/local/cluster/7001/redis.pid
8logfile /usr/local/cluster/7001/redis.log
9~
10
文件中的 cluster-enabled 选项用于开实例的集群模式, 而 cluster-conf-file 选项则设定了保存节点配置文件的路径, 默认值为 nodes.conf.节点配置文件无须人为修改, 它由 Redis 集群在启动时创建, 并在有需要时自动进行更新。
要让集群正常运作至少需要三个主节点,不过在刚开始试用集群功能时, 强烈建议使用六个节点: 其中三个为主节点, 而其余三个则是各个主节点的从节点。
首先, 让我们进入一个新目录, 并创建六个以端口号为名字的子目录, 稍后我们在将每个目录中运行一个 Redis 实例: 命令如下:
2
3
4
5
6
7
8
9
10
11
12
13
14
15
16
2[root@server1 local]# mkdir cluster
3[root@server1 local]# cd cluster/
4[root@server1 cluster]# mkdir 7001
5[root@server1 cluster]# mkdir 7002
6[root@server1 cluster]# mkdir 7003
7[root@server1 cluster]# mkdir 7004
8[root@server1 cluster]# mkdir 7005
9[root@server1 cluster]# mkdir 7006
10[root@server1 cluster]# cd 7001
11[root@server1 7001]# vim redis.conf
12[root@server1 7001]# cd ..
13[root@server1 cluster]# ls
147001 7002 7003 7004 7005 7006
15
16
在文件夹 7000 至 7005 中, 各创建一个 redis.conf 文件, 文件的内容可以使用上面的示例配置文件, 但记得将配置中的端口号从 7000 改为与文件夹名字相同的号码。
从 Redis Github 页面 的 unstable 分支中取出最新的 Redis 源码, 编译出可执行文件 redis-server , 并将文件复制到 cluster 文件夹
在集群中保持一个独一无二(unique)的名字
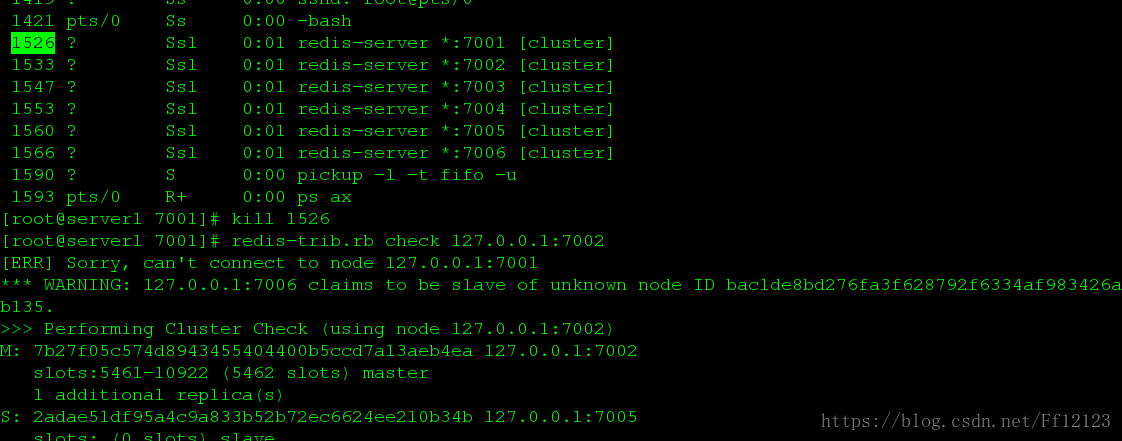
每个节点都要启动
查看日志
可能会有以下的警告,按照所给的提示进行修改即可
2
3
4
5
6
7
8
9
10
11
12
13
14
15
16
17
18
19
20
21
2appendonly.aof nodes.conf redis.conf redis.log redis.pid
3[root@server1 7001]# cat redis.log
41525:C 11 Aug 10:04:10.273 # oO0OoO0OoO0Oo Redis is starting oO0OoO0OoO0Oo
51525:C 11 Aug 10:04:10.273 # Redis version=4.0.8, bits=64, commit=00000000, modified=0, pid=1525, just started
61525:C 11 Aug 10:04:10.274 # Configuration loaded
71526:M 11 Aug 10:04:10.276 * Increased maximum number of open files to 10032 (it was originally set to 1024).
81526:M 11 Aug 10:04:10.276 * No cluster configuration found, I'm bac1de8bd276fa3f628792f6334af983426ab135
91526:M 11 Aug 10:04:10.982 * Running mode=cluster, port=7001.
101526:M 11 Aug 10:04:10.982 # WARNING: The TCP backlog setting of 511 cannot be enforced because /proc/sys/net/core/somaxconn is set to the lower value of 128.
111526:M 11 Aug 10:04:10.982 # Server initialized
121526:M 11 Aug 10:04:10.982 # WARNING overcommit_memory is set to 0! Background save may fail under low memory condition. To fix this issue add 'vm.overcommit_memory = 1' to /etc/sysctl.conf and then reboot or run the command 'sysctl vm.overcommit_memory=1' for this to take effect.
131526:M 11 Aug 10:04:10.982 # WARNING you have Transparent Huge Pages (THP) support enabled in your kernel. This will create latency and memory usage issues with Redis. To fix this issue run the command 'echo never > /sys/kernel/mm/transparent_hugepage/enabled' as root, and add it to your /etc/rc.local in order to retain the setting after a reboot. Redis must be restarted after THP is disabled.
141526:M 11 Aug 10:04:10.982 * Ready to accept connections
15[root@server1 7001]# echo 511 > /proc/sys/net/core/somaxconn
16[root@server1 7001]# sysctl -w vm.overcommit_memory=1
17vm.overcommit_memory = 1
18[root@server1 7001]# vim /etc/sysctl.conf
19[root@server1 7001]# echo never > /sys/kernel/mm/transparent_hugepage/enabled
20
21
现在我们已经有了六个正在运行中的 Redis 实例, 接下来我们需要使用这些实例来创建集群, 并为每个节点编写配置文件。
通过使用 Redis 集群命令行工具 redis-trib , 编写节点配置文件的工作可以非常容易地完成: redis-trib 位于 Redis 源码的 src 文件夹中, 它是一个 Ruby 程序, 这个程序通过向实例发送特殊命令来完成创建新集群, 检查集群, 或者对集群进行重新分片(reshared)等工作。
这个命令在这里用于创建一个新的集群, 选项–replicas 1 表示我们希望为集群中的每个主节点创建一个从节点。
之后跟着的其他参数则是这个集群实例的地址列表,3个master3个slave redis-trib 会打印出一份预想中的配置给你看, 如果你觉得没问题的话, 就可以输入 yes , redis-trib 就会将这份配置应用到集群当中,让各个节点开始互相通讯,最后可以得到如下信息:
2
3
4
5
6
7
8
9
10
11
12
13
14
15
16
17
18
19
20
21
22
23
24
25
26
27
28
29
30
31
32
33
34
35
36
37
38
39
40
41
42
43
44
45
46
47
48
49
50
51
52
53
54
55
2>>> Creating cluster
3>>> Performing hash slots allocation on 6 nodes...
4Using 3 masters:
5127.0.0.1:7001
6127.0.0.1:7002
7127.0.0.1:7003
8Adding replica 127.0.0.1:7005 to 127.0.0.1:7001
9Adding replica 127.0.0.1:7006 to 127.0.0.1:7002
10Adding replica 127.0.0.1:7004 to 127.0.0.1:7003
11>>> Trying to optimize slaves allocation for anti-affinity
12[WARNING] Some slaves are in the same host as their master
13M: bac1de8bd276fa3f628792f6334af983426ab135 127.0.0.1:7001
14 slots:0-5460 (5461 slots) master
15M: 7b27f05c574d8943455404400b5ccd7a13aeb4ea 127.0.0.1:7002
16 slots:5461-10922 (5462 slots) master
17M: df3a33ab5eebe048d6f28337071f849f2454d9c2 127.0.0.1:7003
18 slots:10923-16383 (5461 slots) master
19S: 4af16ec541d4bb88ac5e251c1a12544948681f57 127.0.0.1:7004
20 replicates 7b27f05c574d8943455404400b5ccd7a13aeb4ea
21S: 2adae51df95a4c9a833b52b72ec6624ee210b34b 127.0.0.1:7005
22 replicates df3a33ab5eebe048d6f28337071f849f2454d9c2
23S: cb6f64329d15a9af752f73f1c0efb62916969311 127.0.0.1:7006
24 replicates bac1de8bd276fa3f628792f6334af983426ab135
25Can I set the above configuration? (type 'yes' to accept): yes
26>>> Nodes configuration updated
27>>> Assign a different config epoch to each node
28>>> Sending CLUSTER MEET messages to join the cluster
29Waiting for the cluster to join..
30..
31>>> Performing Cluster Check (using node 127.0.0.1:7001)
32M: bac1de8bd276fa3f628792f6334af983426ab135 127.0.0.1:7001
33 slots:0-5460 (5461 slots) master
34 1 additional replica(s)
35S: 4af16ec541d4bb88ac5e251c1a12544948681f57 127.0.0.1:7004
36 slots: (0 slots) slave
37 replicates 7b27f05c574d8943455404400b5ccd7a13aeb4ea
38S: 2adae51df95a4c9a833b52b72ec6624ee210b34b 127.0.0.1:7005
39 slots: (0 slots) slave
40 replicates df3a33ab5eebe048d6f28337071f849f2454d9c2
41M: 7b27f05c574d8943455404400b5ccd7a13aeb4ea 127.0.0.1:7002
42 slots:5461-10922 (5462 slots) master
43 1 additional replica(s)
44M: df3a33ab5eebe048d6f28337071f849f2454d9c2 127.0.0.1:7003
45 slots:10923-16383 (5461 slots) master
46 1 additional replica(s)
47S: cb6f64329d15a9af752f73f1c0efb62916969311 127.0.0.1:7006
48 slots: (0 slots) slave
49 replicates bac1de8bd276fa3f628792f6334af983426ab135
50[OK] All nodes agree about slots configuration.
51>>> Check for open slots...
52>>> Check slots coverage...
53[OK] All 16384 slots covered.
54##这表示集群中的 16384 个槽都有至少一个主节点在处理, 集群运作正常。
55
下面做个测试
将1 杀掉 可以看到2 已经为master 且依旧可以获取到数据
lnmp 里用redis作mysql的缓存
首先 配置一下环境
我这里使用三台机器
1:nginx。php
2:redis缓存
3:mysql数据库
1:
下载nginx以及php的相关组件
2
2
在这里把时区一改
在nginx里面
2
3
2
3
2
3
4
2[root@server1 html]# ls
350x.html index.html index.php
4
在这里面
下一个页面测试一下
接下来可以使用php语言编写的调用数据库
2
3
4
5
6
7
8
9
10
11
12
13
14
15
16
17
18
19
20
21
22
23
24
25
26
27
28
29
30
31
32
33
34
35
36
37
38
39
40
41
42
2 $redis = new Redis();
3 $redis->connect('172.25.19.2',6379) or die ("could net connect redis server");
4 # $query = "select * from test limit 9";
5 $query = "select * from test";
6 for ($key = 1; $key < 10; $key++)
7 {
8 if (!$redis->get($key))
9 {
10 $connect = mysql_connect('172.25.19.3','redis','westos');
11 mysql_select_db(test);
12 $result = mysql_query($query);
13 //如果没有找到$key,就将该查询sql的结果缓存到redis
14 while ($row = mysql_fetch_assoc($result))
15 {
16 $redis->set($row['id'],$row['name']);
17 }
18 $myserver = 'mysql';
19 break;
20 }
21 else
22 {
23 $myserver = "redis";
24 $data[$key] = $redis->get($key);
25 }
26 }
27
28 echo $myserver;
29 echo "<br>";
30 for ($key = 1; $key < 10; $key++)
31 {
32 echo "number is <b><font color=#FF0000>$key</font></b>";
33
34 echo "<br>";
35
36 echo "name is <b><font color=#FF0000>$data[$key]</font></b>";
37
38 echo "<br>";
39 }
40?>
41
42
写到index.html
这里面写道先去看redis缓存
然后曲调用数据库
但是这里面并没有redis这个模块
所以我们要加入
2
3
4
5
6
7
8
9
10
11
12
13
14
15
16
17
18
19
20
21
22
23
24
25
26
27
28
29
30
31
32
33
34
35
36
37
38
39
40
41
42
43
44
45
2[PHP Modules]
3bz2
4calendar
5Core
6ctype
7curl
8date
9ereg
10exif
11fileinfo
12filter
13ftp
14gd
15gettext
16gmp
17hash
18iconv
19json
20libxml
21mbstring
22mysql
23mysqli
24openssl
25pcntl
26pcre
27PDO
28pdo_mysql
29pdo_sqlite
30Phar
31readline
32Reflection
33session
34shmop
35SimpleXML
36sockets
37SPL
38sqlite3
39standard
40tokenizer
41xml
42zip
43zlib
44
45
2
3
4
5
6
7
8
9
10
11
12
13
14
15
16
17
18
19
20
21
22
23
24
25
26
27
28
29
30
31
32
33
34
35
36
37
38
39
40
41
42
43
44
45
46
47
48
49
50
51
52
53
54
55
56
57
58
59
60
61
62
63
64
65
66
67
68
69
70
71
72
73
74
75
76
77
78
79
80
81
82
83
84
85
86
87
88
89
90
91
92
93
94
95
96
97
98
99
100
101
102
103
104
105
106
107
108
109
110
111
112
113
114
115
116
117
118
2[root@server1 redis]# cd phpredis-master
3[root@server1 phpredis-master]#
4[root@server1 phpredis-master]# ls
5common.h debian.control mkdeb-apache2.sh redis_session.c
6config.m4 igbinary php_redis.h redis_session.h
7CREDITS library.c README.markdown serialize.list
8debian library.h redis.c tests
9[root@server1 phpredis-master]# php
10php php-cgi php-config php-fpm phpize
11[root@server1 phpredis-master]# phpize
12Configuring for:
13PHP Api Version: 20090626
14Zend Module Api No: 20090626
15Zend Extension Api No: 220090626
16[root@server1 phpredis-master]# LS
17-bash: LS: command not found
18[root@server1 phpredis-master]# ls
19acinclude.m4 config.sub library.c README.markdown
20aclocal.m4 configure library.h redis.c
21autom4te.cache configure.in ltmain.sh redis_session.c
22build CREDITS Makefile.global redis_session.h
23common.h debian missing run-tests.php
24config.guess debian.control mkdeb-apache2.sh serialize.list
25config.h.in igbinary mkinstalldirs tests
26config.m4 install-sh php_redis.h
27[root@server1 phpredis-master]# ./configure
28checking for grep that handles long lines and -e... /bin/grep
29checking for egrep... /bin/grep -E
30checking for a sed that does not truncate output... /bin/sed
31checking for cc... cc
32checking for C compiler default output file name... a.out
33checking whether the C compiler works... yes
34checking whether we are cross compiling... no
35checking for suffix of executables...
36checking for suffix of object files... o
37checking whether we are using the GNU C compiler... yes
38checking whether cc accepts -g... yes
39checking for cc option to accept ISO C89... none needed
40checking how to run the C preprocessor... cc -E
41checking for icc... no
42checking for suncc... no
43checking whether cc understands -c and -o together... yes
44checking for system library directory... lib
45checking if compiler supports -R... no
46checking if compiler supports -Wl,-rpath,... yes
47checking build system type... x86_64-unknown-linux-gnu
48checking host system type... x86_64-unknown-linux-gnu
49checking target system type... x86_64-unknown-linux-gnu
50checking for PHP prefix... /usr
51checking for PHP includes... -I/usr/include/php -I/usr/include/php/main -I/usr/include/php/TSRM -I/usr/include/php/Zend -I/usr/include/php/ext -I/usr/include/php/ext/date/lib
52checking for PHP extension directory... /usr/lib64/php/modules
53checking for PHP installed headers prefix... /usr/include/php
54checking if debug is enabled... no
55checking if zts is enabled... no
56checking for re2c... no
57configure: WARNING: You will need re2c 0.13.4 or later if you want to regenerate PHP parsers.
58checking for gawk... gawk
59checking whether to enable redis support... yes, shared
60checking for a sed that does not truncate output... (cached) /bin/sed
61checking for fgrep... /bin/grep -F
62checking for ld used by cc... /usr/bin/ld
63checking if the linker (/usr/bin/ld) is GNU ld... yes
64checking for BSD- or MS-compatible name lister (nm)... /usr/bin/nm -B
65checking the name lister (/usr/bin/nm -B) interface... BSD nm
66checking whether ln -s works... yes
67checking the maximum length of command line arguments... 1966080
68checking whether the shell understands some XSI constructs... yes
69checking whether the shell understands "+="... yes
70checking for /usr/bin/ld option to reload object files... -r
71checking for objdump... objdump
72checking how to recognize dependent libraries... pass_all
73checking for ar... ar
74checking for strip... strip
75checking for ranlib... ranlib
76checking command to parse /usr/bin/nm -B output from cc object... ok
77checking for ANSI C header files... yes
78checking for sys/types.h... yes
79checking for sys/stat.h... yes
80checking for stdlib.h... yes
81checking for string.h... yes
82checking for memory.h... yes
83checking for strings.h... yes
84checking for inttypes.h... yes
85checking for stdint.h... yes
86checking for unistd.h... yes
87checking for dlfcn.h... yes
88checking for objdir... .libs
89checking if cc supports -fno-rtti -fno-exceptions... no
90checking for cc option to produce PIC... -fPIC -DPIC
91checking if cc PIC flag -fPIC -DPIC works... yes
92checking if cc static flag -static works... no
93checking if cc supports -c -o file.o... yes
94checking if cc supports -c -o file.o... (cached) yes
95checking whether the cc linker (/usr/bin/ld -m elf_x86_64) supports shared libraries... yes
96checking whether -lc should be explicitly linked in... no
97checking dynamic linker characteristics... GNU/Linux ld.so
98checking how to hardcode library paths into programs... immediate
99checking whether stripping libraries is possible... yes
100checking if libtool supports shared libraries... yes
101checking whether to build shared libraries... yes
102checking whether to build static libraries... no
103configure: creating ./config.status
104config.status: creating config.h
105config.status: executing libtool commands
106[root@server1 phpredis-master]# make && make install
107完成之后
108[root@server1 modules]# cd /etc/php.d/
109[root@server1 php.d]# ls
110curl.ini json.ini mysql.ini pdo_sqlite.ini zip.ini
111fileinfo.ini mbstring.ini pdo.ini phar.ini
112gd.ini mysqli.ini pdo_mysql.ini sqlite3.ini
113[root@server1 php.d]# cp mysql.ini redis.ini
114[root@server1 php.d]# vim redis.ini
115[root@server1 php.d]#
116[root@server1 php.d]# vim redis.ini
117>extension=redis.so
118
当然redis端必须时master的状态
再次查看
2
3
4
2redis
3
4
在数据库端写入一些数据
通过网页访问
到这里,我们已经实现了 redis 作为 mysql 的缓存服务器,但是如果更新了 mysql,redis
中仍然会有对应的 KEY,数据就不会更新,此时就会出现 mysql 和 redis 数据不一致的情
况。所以接下来就要通过 mysql 触发器将改变的数据同步到 redis 中。
配置 gearman 实现数据同步
Gearman 是一个支持分布式的任务分发框架:
Gearman Job Server: Gearman 核心程序,需要编译安装并以守护进程形式运行在后台。
Gearman Client:可以理解为任务的请求者。
Gearman Worker:任务的真正执行者,一般需要自己编写具体逻辑并通过守护进程方式
运行,Gearman Worker 接收到 Gearman Client 传递的任务内容后,会按顺序处理。
大致流程:下面要编写的 mysql 触发器,就相当于 Gearman 的客户端。修改表,插入表就相当于直接
下发任务。然后通过 lib_mysqludf_json UDF 库函数将关系数据映射为 JSON 格式,然后
在通过 gearman-mysql-udf 插件将任务加入到 Gearman 的任务队列中,最后通过
redis_worker.php,也就是 Gearman 的 worker 端来完成 redis 数据库的更新。
2
3
4
5
6
7
8
9
10
11
12
13
14
15
16
17
18
19
20
21
22
23
24
25
26
27
28
29
30
31
2gearmand libgearman-devel libgearman libevent libevent-devel
3libevent-doc libevent-headers tokyocabinet
4# service gearmand start
5#启动服务
6# netstat -antlp |grep gearmand
7tcp
80
90 0.0.0.0:4730
107304/gearmand
110.0.0.0:*
12LISTEN
132. 安装 php 的 gearman 扩展
14https://pecl.php.net
15yum install -y db*-devel
16tar zxf gearman-1.1.2.tgz
17cd gearman-1.1.2
18./configure --with-php-config=/usr/bin/php-config
19make && make install
20# vim /etc/php.ini
21extension=gearman.so
22# service php-fpm reload
233. 安装 lib_mysqludf_json
24lib_mysqludf_json UDF 库函数将关系数据映射为 JSON 格式。通常,数据库中的数据映
25射为 JSON 格式,是通过程序来转换的。
26https://github.com/mysqludf/lib_mysqludf_json
27# yum install -y mysql-devel# unzip lib_mysqludf_json-master.zip
28# cd lib_mysqludf_json-master
29# gcc $(mysql_config --cflags) -shared -fPIC -o lib_mysqludf_json.so
30lib_mysqludf_json.c
31
在server3中:
2
3
4
5
6
7
8
9
10
11
12
13
14
15
16
17
18
19
20
21
22
23
24
25
26
27
28
29
30
31
32
33
34
35
36
37
38
39
40
41
42
43
44
45
46
47
48
49
50
51
52
53
54
55
56
57
58
59
60
61
62
63
64
65
66
67
68
69
70
71
72
73
74
75
76
77
78
79
80
81
82
83
84
85
86
87
88
89
2mysql> show global variables like 'plugin_dir';
3+---------------+-------------------------+
4| Variable_name | Value
5|
6+---------------+-------------------------+
7| plugin_dir
8| /usr/lib64/mysql/plugin |
9+---------------+-------------------------+
10拷贝 lib_mysqludf_json.so 模块:
11# cp lib_mysqludf_json.so /usr/lib64/mysql/plugin/
12注册 UDF 函数
13mysql> CREATE FUNCTION json_object RETURNS STRING SONAME
14'lib_mysqludf_json.so';
15查看函数
16mysql> select * from mysql.func;
17+--------------------+-----+-------------------------+----------+
18| name
19| ret | dl
20| type
21|
22+--------------------+-----+-------------------------+----------+
23| json_object
24| 0 | lib_mysqludf_json.so | function |
25+--------------------+-----+-------------------------+----------+
264. 安装 gearman-mysql-udf
27这个插件是用来管理调用 Gearman 的分布式的队列。
28https://launchpad.net/gearman-mysql-udf
29# tar zxf gearman-mysql-udf-0.6.tar.gz
30# cd gearman-mysql-udf-0.6
31# ./configure --with-mysql=/usr/bin/mysql_config
32--libdir=/usr/lib64/mysql/plugin/
33# make# make install
34注册 UDF 函数
35mysql> CREATE FUNCTION gman_do_background RETURNS STRING SONAME
36'libgearman_mysql_udf.so';
37mysql> CREATE FUNCTION gman_servers_set RETURNS STRING SONAME
38'libgearman_mysql_udf.so';
39查看函数
40mysql> select * from mysql.func;
41+--------------------+-----+-------------------------+----------+
42| name
43| ret | dl
44| type
45|
46+--------------------+-----+-------------------------+----------+
47| json_object
48|
490 | lib_mysqludf_json.so
50| function |
51| gman_do_background |
520 | libgearman_mysql_udf.so | function |
53| gman_servers_set
54|
550 | libgearman_mysql_udf.so | function |
56+--------------------+-----+-------------------------+----------+
57指定 gearman 的服务信息
58mysql> SELECT gman_servers_set('127.0.0.1:4730');
59+------------------------------------+
60| gman_servers_set('127.0.0.1:4730') |
61+------------------------------------+
62| 127.0.0.1:4730
63|
64+------------------------------------+
655. 编写 mysql 触发器(根据实际情况编写)
66# vim test.sql
67use test;
68DELIMITER $$
69CREATE TRIGGER datatoredis AFTER UPDATE ON test FOR EACH ROW BEGIN
70SET @RECV=gman_do_background('syncToRedis', json_object(NEW.id as
71`id`, NEW.name as `name`));
72END$$
73DELIMITER ;
74# mysql < test.sql
75查看触发器
76mysql> SHOW TRIGGERS FROM test;+-------------+--------+-------+------------------------------------------------------------------------
77-------+----------------------+--------------------+
78| datatoredis | UPDATE | test | BEGIN
79SET @RECV=gman_do_background('syncToRedis', json_object(NEW.id as
80`id`, NEW.name as `name`));
81END | AFTER | NULL
82|
83| root@localhost | latin1
84|
85latin1_swedish_ci
86| latin1_swedish_ci |
87+-------------+--------+-------+------------------------------------------------------------------------
88-------+----------------------+--------------------+
89
server1:
2
3
4
5
6
7
8
9
10
11
12
13
14
15
16
17
18
19
20
21
22
23
24
2# vim worker.php
3<?php
4$worker = new GearmanWorker();
5$worker->addServer();
6$worker->addFunction('syncToRedis', 'syncToRedis');
7$redis = new Redis();
8$redis->connect('172.25.19.2', 6379); 指向你的
9while($worker->work());
10function syncToRedis($job)
11{
12global $redis;
13$workString = $job->workload();
14$work = json_decode($workString);
15if(!isset($work->id)){
16return false;
17}
18$redis->set($work->id, $work->name); #这条语句就是将 id 作 KEY 和
19name 作 VALUE 分开存储,需要和前面写的 php 测试代码的存取一致。
20}
21?>
22后台运行 worker
23# nohup php worker.php &
24
然后更新数据
查看
