mongodb集群有三种方式
1,主从模式,类似mysql master slave方式。
2,副本集模式,其实是一主多从,如果主节点挂掉,会重新在从节点选取一台为主节点。
3,分片模式,针对大数据量,高负载情况。
从图中可以看到有四个组件:mongos、config server、shard、replica set。
mongos,数据库集群请求的入口,所有的请求都通过mongos进行协调,不需要在应用程序添加一个路由选择器,mongos自己就是一个请求分发中心,它负责把对应的数据请求请求转发到对应的shard服务器上。在生产环境通常有多mongos作为请求的入口,防止其中一个挂掉所有的mongodb请求都没有办法操作。
config server,顾名思义为配置服务器,存储所有数据库元信息(路由、分片)的配置。mongos本身没有物理存储分片服务器和数据路由信息,只是缓存在内存里,配置服务器则实际存储这些数据。mongos第一次启动或者关掉重启就会从 config server 加载配置信息,以后如果配置服务器信息变化会通知到所有的 mongos 更新自己的状态,这样 mongos 就能继续准确路由。在生产环境通常有多个 config server 配置服务器,因为它存储了分片路由的元数据,这个可不能丢失!就算挂掉其中一台,只要还有存货, mongodb集群就不会挂掉。
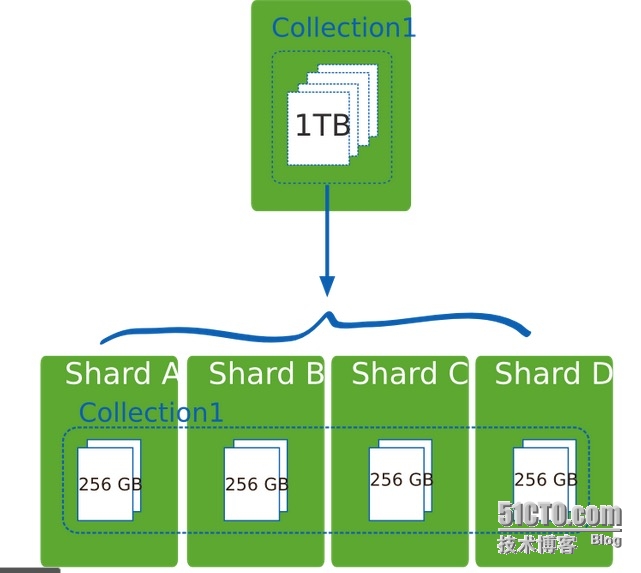
shard,这就是传说中的分片了。上面提到一个机器就算能力再大也有天花板,就像军队打仗一样,一个人再厉害喝血瓶也拼不过对方的一个师。俗话说三个臭皮匠顶个诸葛亮,这个时候团队的力量就凸显出来了。在互联网也是这样,一台普通的机器做不了的多台机器来做,如下图:

一台机器的一个数据表 Collection1 存储了 1T 数据,压力太大了!在分给4个机器后,每个机器都是256G,则分摊了集中在一台机器的压力。也许有人问一台机器硬盘加大一点不就可以了,为什么要分给四台机器呢?不要光想到存储空间,实际运行的数据库还有硬盘的读写、网络的IO、CPU和内存的瓶颈。在mongodb集群只要设置好了分片规则,通过mongos操作数据库就能自动把对应的数据操作请求转发到对应的分片机器上。在生产环境中分片的片键可要好好设置,这个影响到了怎么把数据均匀分到多个分片机器上,不要出现其中一台机器分了1T,其他机器没有分到的情况,这样还不如不分片!
replica set,上两节已经详细讲过了这个东东,怎么这里又来凑热闹!其实上图4个分片如果没有 replica set 是个不完整架构,假设其中的一个分片挂掉那四分之一的数据就丢失了,所以在高可用性的分片架构还需要对于每一个分片构建 replica set 副本集保证分片的可靠性。生产环境通常是 2个副本 + 1个仲裁。
说了这么多,还是来实战一下如何搭建高可用的mongodb集群:
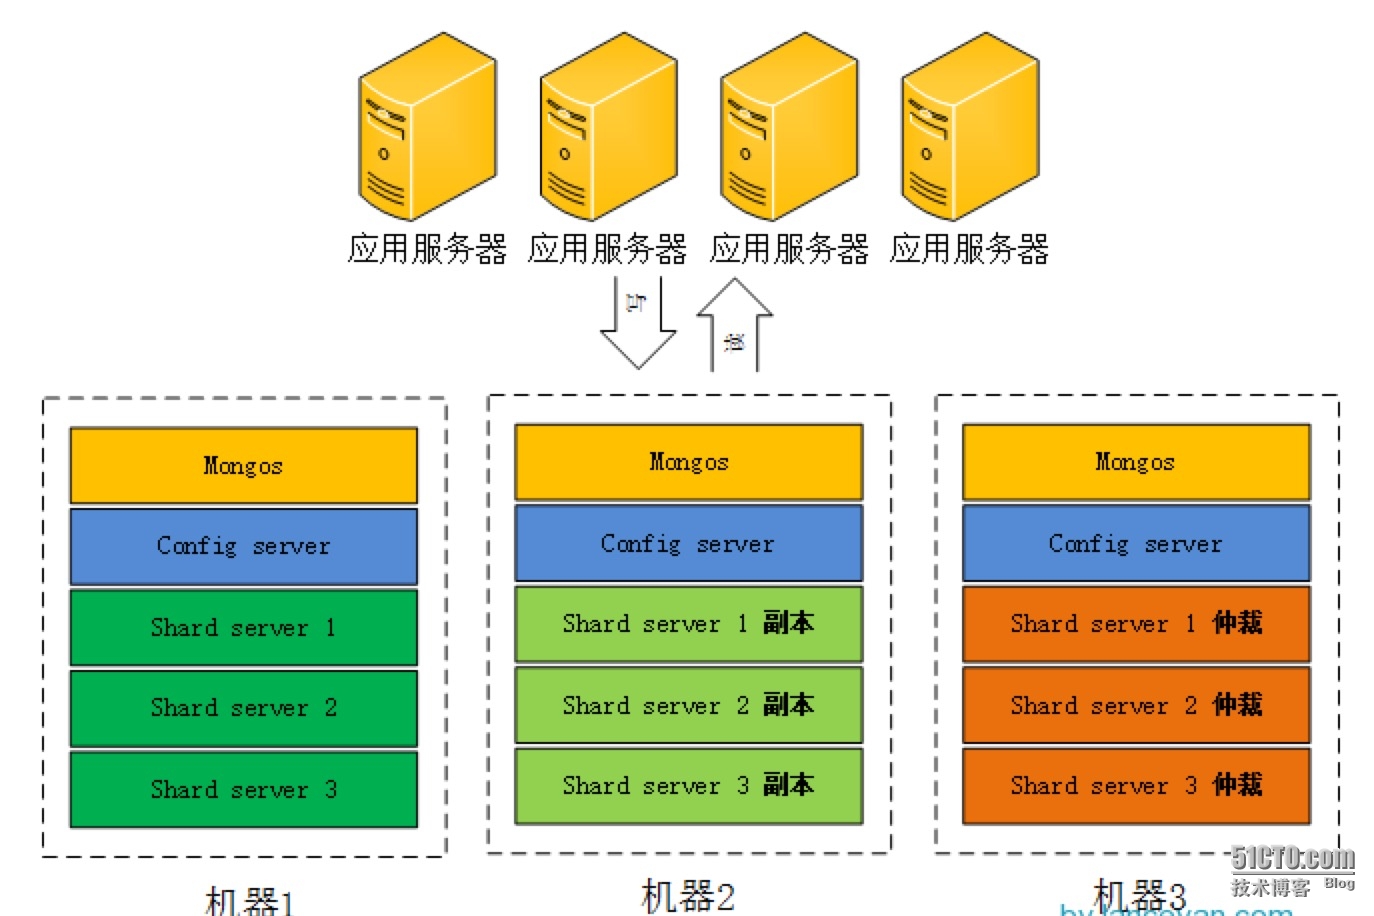
首先确定各个组件的数量,mongos 3个, config server 3个,数据分3片 shard server 3个,每个shard 有一个副本一个仲裁也就是 3 * 2 = 6 个,总共需要部署15个实例。这些实例可以部署在独立机器也可以部署在一台机器,我们这里测试资源有限,只准备了 3台机器,在同一台机器只要端口不同就可以,看一下物理部署图:

下面是安装配置
1,准备三台机器
ip:10.19.21.241
10.19.21.242
10.19.21.243
2,分别在每台机器上建立mongodb数据目录
我使用ansible工具来创建目录
创建存放mongodb数据文件
2
2
3,安装mongodb,这里使用yum来安装
配置yum repo
2
3
4
5
6
7
2[mongodb-org-2.6]
3name=MongoDB 2.6 Repository
4baseurl=http://downloads-distro.mongodb.org/repo/redhat/os/x86_64/
5gpgcheck=0
6enabled=1
7
拷贝过去
ansible mongodb -m copy -a "src=mongodb/mongodb-org.repo dest=/etc/yum.repos.d/"
2
3
4
5
6
7
8
9
10
2错误如下:
310.19.21.243 | FAILED >> {
4"checksum": "d79d6075271e933b3811455e74eaa9ef47f593e6",
5"failed": true,
6"msg": "Aborting, target uses selinux but python bindings (libselinux-python) aren't installed!"
7}
8解决方法:
9ansible mongodb -m yum -a "name=libselinux-python state=latest"
10
安装mongodb
2
2
4,每台上创建mongos config shard1 shard2 shard3五个目录,因为mongos不存储数据,只需建立日志文件目录
建立mongos目录和日志目录
2
2
建立config server数据目录
2
2
建立config server日志目录
2
2
建立shard1数据目录和日志目录
2
2
建立shard2数据目录和日志目录
2
3
2ansible mongodb -m shell -a "mkdir -p /data/mongodb/shard2/data /data/mongodb/shard2/log"
3
建立shard3数据目录和日志目录
2
2
5,规划5个组件对应的端口号,由于一个机器需要同时部署mongos, config server, shard1, shard2, shard3,所以需要用端口号进行区分
这个端口号可以自己定义,mongos:20000,config server:21000, shard1:22001, shard2:22002, shard3:22003
6,配置每台服务器的配置文件
由于我们的mongodb是yum安装,会有一个默认的配置文件,需要先备份
2
2
配置每台服配置服务器
2
3
4
5
6
7
8
2dbpath=/data/mongodb/config/data
3port=21000
4logpath=/data/mongodb/config/log/config.log
5fork=true
6configsvr=true
7logappend=true
8
配置每台mongos服务器
2
3
4
5
6
7
2configdb=10.19.21.241:21000,10.19.21.242:21000,10.19.21.243:21000
3port=20000
4logpath=/data/mongodb/mongos/log/mongos.log
5logappend=true
6fork=true
7
配置各个分片的副本集
2
3
4
5
6
7
8
9
10
11
12
13
14
15
16
17
18
19
20
21
22
23
24
25
26
27
2shardsvr=true
3replSet=shard1
4port=22001
5dbpath=/data/mongodb/shard1/data
6logpath=/data/mongodb/shard1/log/shard1.log
7fork=true
8logappend=true
9
10cat mongod-shardsvr2.conf
11shardsvr=true
12replSet=shard2
13port=22002
14dbpath=/data/mongodb/shard2/data
15logpath=/data/mongodb/shard2/log/shard2.log
16fork=true
17logappend=true
18
19cat mongod-shardsvr3.conf
20shardsvr=true
21replSet=shard3
22port=22003
23dbpath=/data/mongodb/shard3/data
24logpath=/data/mongodb/shard3/log/shard3.log
25fork=true
26logappend=true
27
创建配置文件目录
2
2
拷贝配置文件到目录
ansible mongodb -m copy -a "src=mongodb/mongod-configsvr.conf dest=/etc/mongodb/"
2
3
4
5
2ansible mongodb -m copy -a "src=mongodb/mongod-shardsvr1.conf dest=/etc/mongodb/"
3ansible mongodb -m copy -a "src=mongodb/mongod-shardsvr2.conf dest=/etc/mongodb/"
4ansible mongodb -m copy -a "src=mongodb/mongod-shardsvr3.conf dest=/etc/mongodb/"
5
启动服务
ansible mongodb -m shell -a "mongod -f /etc/mongodb/mongod-configsvr.conf"
2
3
4
5
6
7
8
9
10
11
12
13
14
15
16
17
2
3启动这个报错了
42015-04-10T20:42:37.340+0800 [mongosMain] MongoS version 2.6.9 starting: pid=19701 port=20000 64-bit host=VM-241 (--help for usage)
52015-04-10T20:42:37.340+0800 [mongosMain] db version v2.6.9
62015-04-10T20:42:37.340+0800 [mongosMain] git version: df313bc75aa94d192330cb92756fc486ea604e64
72015-04-10T20:42:37.340+0800 [mongosMain] build info: Linux build20.nj1.10gen.cc 2.6.32-431.3.1.el6.x86_64 #1 SMP Fri Jan 3 21:39:27 UTC 2014 x86_64 BOOST_LIB_VERSION=1_49
82015-04-10T20:42:37.340+0800 [mongosMain] allocator: tcmalloc
92015-04-10T20:42:37.341+0800 [mongosMain] options: { config: "/etc/mongodb/mongod-mongos.conf", net: { port: 20000 }, processManagement: { fork: true }, sharding: { configDB: "10.19.21.241:21000,10.19.21.242:21000,10.19.21.243:21000" }, systemLog: { destination: "file", path: "/data/mongodb/mongos/log/mongos.log" } }
102015-04-10T20:42:37.345+0800 [mongosMain] SyncClusterConnection connecting to [10.19.21.241:21000]
112015-04-10T20:42:37.346+0800 [mongosMain] SyncClusterConnection connecting to [10.19.21.242:21000]
122015-04-10T20:42:37.349+0800 [mongosMain] SyncClusterConnection connecting to [10.19.21.243:21000]
132015-04-10T20:42:37.414+0800 [mongosMain] scoped connection to 10.19.21.241:21000,10.19.21.242:21000,10.19.21.243:21000 not being returned to the pool
142015-04-10T20:42:48.522+0800 [mongosMain] waited 11s for distributed lock configUpgrade for upgrading config database to new format v5
152015-04-10T20:42:59.622+0800 [mongosMain] waited 22s for distributed lock configUpgrade for upgrading config database to new format v5
162015-04-10T20:43:10.720+0800 [mongosMain] waited 33s for distributed lock configUpgrade for upgrading config database to new format v5
17
然后网上找了下原因,由于每台服务器时间不同步导致
这个坑爹问题都出现,看来是不够仔细
2
3
4
5
6
7
8
9
210.19.21.243 | success | rc=0 >>
3Thu Apr 9 22:11:05 CST 2015
410.19.21.241 | success | rc=0 >>
5Fri Apr 10 20:45:27 CST 2015
610.19.21.242 | success | rc=0 >>
7Thu Apr 9 22:09:13 CST 2015
8一看果然有问题
9
执行命令同步时间服务器
2
3
4
5
6
7
8
210.19.21.242 | FAILED | rc=127 >>
3/bin/sh: /usr/sbin/ntpdate: No such file or directory
410.19.21.243 | FAILED | rc=127 >>
5/bin/sh: /usr/sbin/ntpdate: No such file or directory
610.19.21.241 | success | rc=0 >>
713 Apr 17:11:59 ntpdate[19842]: adjust time server 202.112.29.82 offset 0.000138 sec
8
尼玛只有一台能正常同步,估计没有安装ntpdate命令
ansible mongodb -m shell -a "yum install ntpdate -y"
2
3
4
5
6
7
8
9
10
11
12
13
14
15
210.19.21.243 | success | rc=0 >>
313 Apr 17:14:03 ntpdate[2661]: step time server 202.112.31.197 offset 327602.420329 sec
410.19.21.241 | success | rc=0 >>
513 Apr 17:14:03 ntpdate[19888]: adjust time server 202.112.29.82 offset 0.004004 sec
610.19.21.242 | success | rc=0 >>
713 Apr 17:14:03 ntpdate[2681]: step time server 202.112.31.197 offset 327714.079649 sec
8ansible mongodb -m shell -a "date"
910.19.21.242 | success | rc=0 >>
10Mon Apr 13 17:14:08 CST 2015
1110.19.21.243 | success | rc=0 >>
12Mon Apr 13 17:14:08 CST 2015
1310.19.21.241 | success | rc=0 >>
14Mon Apr 13 17:14:08 CST 2015
15
顺便把硬件时间也同步下
2
3
4
5
210.19.21.241 | success | rc=0 >>
310.19.21.243 | success | rc=0 >>
410.19.21.242 | success | rc=0 >>
5
继续启动mongos
2
3
4
5
6
7
8
9
10
11
12
13
14
210.19.21.243 | success | rc=0 >>
3about to fork child process, waiting until server is ready for connections.
4forked process: 2708
5child process started successfully, parent exiting
610.19.21.241 | success | rc=0 >>
7about to fork child process, waiting until server is ready for connections.
8forked process: 19968
9child process started successfully, parent exiting
1010.19.21.242 | success | rc=0 >>
11about to fork child process, waiting until server is ready for connections.
12forked process: 2728
13child process started successfully, parent exiting
14
启动各个分片的副本集
2
3
4
2ansible mongodb -m shell -a "mongod -f /etc/mongodb/mongod-shardsvr2.conf"
3ansible mongodb -m shell -a "mongod -f /etc/mongodb/mongod-shardsvr3.conf"
4
顺便关闭开机自动启动mongod
2
3
4
5
210.19.21.243 | success | rc=0 >>
310.19.21.242 | success | rc=0 >>
410.19.21.241 | success | rc=0 >>
5
6,登陆任意一台,连接mongodb
设置第一个分片副本集
2
3
4
2MongoDB shell version: 2.6.9
3connecting to: 127.0.0.1:22001/test
4
使用admin数据库
mongos> use admin
switched to db admin
定义副本集配置
2
3
4
5
6
7
8
9
10
11
12
13
14
15
16
17
18
19
20
2{
3"_id" : "shard1",
4"members" : [
5{
6"_id" : 0,
7"host" : "10.19.21.241:22001"
8},
9{
10"_id" : 1,
11"host" : "10.19.21.242:22001"
12},
13{
14"_id" : 2,
15"host" : "10.19.21.243:22001",
16"arbiterOnly" : true
17}
18]
19}
20
初始化副本集配置
> rs.initiate(config);
2
3
4
5
2"info" : "Config now saved locally. Should come online in about a minute.",
3"ok" : 1
4}
5
设置第二个分片副本集
2
3
4
5
6
7
8
9
10
11
12
13
14
15
16
17
18
19
20
21
22
23
24
25
26
27
28
29
30
2MongoDB shell version: 2.6.9
3connecting to: 127.0.0.1:22002/test
4> use admin
5switched to db admin
6> config={_id:"shard2",members:[{_id:0,host:"10.19.21.241:22002"},{_id:1,host:"10.19.21.242:22002"},{_id:2,host:"10.19.21.243:22002",arbiterOnly:true}]}
7{
8"_id" : "shard2",
9"members" : [
10{
11"_id" : 0,
12"host" : "10.19.21.241:22002"
13},
14{
15"_id" : 1,
16"host" : "10.19.21.242:22002"
17},
18{
19"_id" : 2,
20"host" : "10.19.21.243:22002",
21"arbiterOnly" : true
22}
23]
24}
25> rs.initiate(config);
26{
27"info" : "Config now saved locally. Should come online in about a minute.",
28"ok" : 1
29}
30
设置第三个分片副本集
2
3
4
5
6
7
8
9
10
11
12
13
14
15
16
17
18
19
20
21
22
23
24
25
26
27
28
29
30
2MongoDB shell version: 2.6.9
3connecting to: 127.0.0.1:22003/test
4> use admin
5switched to db admin
6> config={_id:"shard3",members:[{_id:0,host:"10.19.21.241:22003"},{_id:1,host:"10.19.21.242:22003"},{_id:2,host:"10.19.21.243:22003",arbiterOnly:true}]}
7{
8"_id" : "shard3",
9"members" : [
10{
11"_id" : 0,
12"host" : "10.19.21.241:22003"
13},
14{
15"_id" : 1,
16"host" : "10.19.21.242:22003"
17},
18{
19"_id" : 2,
20"host" : "10.19.21.243:22003",
21"arbiterOnly" : true
22}
23]
24}
25> rs.initiate(config);
26{
27"info" : "Config now saved locally. Should come online in about a minute.",
28"ok" : 1
29}
30
7,配置分片
目前搭建的mongodb配置服务器,路由服务器,各个分片服务器,不过应用程序连接到mongs路由服务器并不能使用分片机制,还需要在程序里设置分片配置,让分片生效。
连接mongos
2
3
4
2MongoDB shell version: 2.6.9
3connecting to: 127.0.0.1:20000/test
4
使用admin数据库
2
3
2switched to db admin
3
串联路由服务器与分配副本集1
2
3
2{ "shardAdded" : "shard1", "ok" : 1 }
3
串联路由服务器与分配副本集2
2
3
2{ "shardAdded" : "shard2", "ok" : 1 }
3
串联路由服务器与分配副本集3
2
3
2{ "shardAdded" : "shard3", "ok" : 1 }
3
查看分片服务器配置
2
3
4
5
6
7
8
9
10
11
12
13
14
15
16
17
18
19
2{
3"shards" : [
4{
5"_id" : "shard1",
6"host" : "shard1/10.19.21.241:22001,10.19.21.242:22001"
7},
8{
9"_id" : "shard2",
10"host" : "shard2/10.19.21.241:22002,10.19.21.242:22002"
11},
12{
13"_id" : "shard3",
14"host" : "shard3/10.19.21.241:22003,10.19.21.242:22003"
15}
16],
17"ok" : 1
18}
19
由于10.19.21.243是每个分片副本集的仲裁节点,所以上面没有列出
8,目前配置服务、路由服务、分片服务、副本集服务都已经串联起来了,但我们的目的是希望插入数据,数据能够自动分片,连接在mongos上,准备让指定的数据库、指定的集合分片生效
指定数据库里面的索引
使用table1中的id字段的hash作为索引来分片,需要进入数据库中去建立
2
3
2db.table1.ensureIndex({id:1},{unique:true});
3
指定数据库testdb使分片生效,在admin库中执行以下命令
2
3
4
5
2{ "ok" : 1 }
3或是
4mongos> sh.enableSharding('testdb');
5
指定数据库里需要分片的集合和片键
2
3
4
5
2{ "collectionsharded" : "testdb.table1", "ok" : 1 }
3或是
4mongos> sh.shardCollection('testdb.table1',{id:'hashed'})
5
我们设置testdb的 table1 表需要分片,根据 id 自动分片到 shard1 ,shard2,shard3 上面去。要这样设置是因为不是所有mongodb 的数据库和表 都需要分片!
mongos> use testdb
switched to db testdb
插入测试数据
2
3
2WriteResult({ "nInserted" : 1 })
3
查看分片情况如下:
2
3
4
5
6
7
8
9
10
11
12
13
14
15
16
17
18
19
20
21
22
23
24
25
26
27
28
29
30
31
32
33
34
35
36
37
38
39
40
41
42
43
44
45
46
47
48
49
50
51
52
53
54
55
56
57
58
59
60
61
62
63
64
65
66
67
68
69
70
71
72
73
74
75
76
77
78
79
2{
3"sharded" : true,
4"systemFlags" : 1,
5"userFlags" : 1,
6"ns" : "testdb.table1",
7"count" : 100000,
8"numExtents" : 12,
9"size" : 11200000,
10"storageSize" : 23212032,
11"totalIndexSize" : 6091120,
12"indexSizes" : {
13"_id_" : 3278576,
14"id_1" : 2812544
15},
16"avgObjSize" : 112,
17"nindexes" : 2,
18"nchunks" : 3,
19"shards" : {
20"shard1" : {
21"ns" : "testdb.table1",
22"count" : 5097,
23"size" : 570864,
24"avgObjSize" : 112,
25"storageSize" : 696320,
26"numExtents" : 4,
27"nindexes" : 2,
28"lastExtentSize" : 524288,
29"paddingFactor" : 1,
30"systemFlags" : 1,
31"userFlags" : 1,
32"totalIndexSize" : 335216,
33"indexSizes" : {
34"_id_" : 179872,
35"id_1" : 155344
36},
37"ok" : 1
38},
39"shard2" : {
40"ns" : "testdb.table1",
41"count" : 0,
42"size" : 0,
43"storageSize" : 8192,
44"numExtents" : 1,
45"nindexes" : 2,
46"lastExtentSize" : 8192,
47"paddingFactor" : 1,
48"systemFlags" : 0,
49"userFlags" : 1,
50"totalIndexSize" : 16352,
51"indexSizes" : {
52"_id_" : 8176,
53"id_1" : 8176
54},
55"ok" : 1
56},
57"shard3" : {
58"ns" : "testdb.table1",
59"count" : 94903,
60"size" : 10629136,
61"avgObjSize" : 112,
62"storageSize" : 22507520,
63"numExtents" : 7,
64"nindexes" : 2,
65"lastExtentSize" : 11325440,
66"paddingFactor" : 1,
67"systemFlags" : 0,
68"userFlags" : 1,
69"totalIndexSize" : 5739552,
70"indexSizes" : {
71"_id_" : 3090528,
72"id_1" : 2649024
73},
74"ok" : 1
75}
76},
77"ok" : 1
78}
79
可以看到数据分到3个分片,shard1:5097 shard2:0 shard3:94903
从结果看出,效果不是很理想,因为shard2里没有分配到。还要调试。
-
java程序调用分片集群,因为我们配置了三个mongos作为入口,就算其中哪个入口挂掉了都没关系,使用集群客户端程序如下:
2
3
4
5
6
7
8
9
10
11
12
13
14
15
16
17
18
19
20
21
22
23
24
25
26
27
28
29
30
2
3 public static void main(String[] args) {
4
5 try {
6 List<ServerAddress> addresses = new ArrayList<ServerAddress>();
7 ServerAddress address1 = new ServerAddress("192.168.0.136" , 20000);
8 ServerAddress address2 = new ServerAddress("192.168.0.137" , 20000);
9 ServerAddress address3 = new ServerAddress("192.168.0.138" , 20000);
10 addresses.add(address1);
11 addresses.add(address2);
12 addresses.add(address3);
13
14 MongoClient client = new MongoClient(addresses);
15 DB db = client.getDB( "testdb" );
16 DBCollection coll = db.getCollection( "table1" );
17
18 BasicDBObject object = new BasicDBObject();
19 object.append( "id" , 1);
20
21 DBObject dbObject = coll.findOne(object);
22
23 System. out .println(dbObject);
24
25 } catch (Exception e) {
26 e.printStackTrace();
27 }
28 }
29}
30
整个分片集群搭建完了,思考一下我们这个架构是不是足够好呢?其实还有很多地方需要优化,比如我们把所有的仲裁节点放在一台机器,其余两台机器承担了全部读写操作,但是作为仲裁的192.168.0.138相当空闲。让机器3 192.168.0.138多分担点责任吧!架构可以这样调整,把机器的负载分的更加均衡一点,每个机器既可以作为主节点、副本节点、仲裁节点,这样压力就会均衡很多了,如图:
当然生产环境的数据远远大于当前的测试数据,大规模数据应用情况下我们不可能把全部的节点像这样部署,硬件瓶颈是硬伤,只能扩展机器。要用好mongodb还有很多机制需要调整,不过通过这个东东我们可以快速实现高可用性、高扩展性,所以它还是一个非常不错的Nosql组件。
再看看我们使用的mongodb java 驱动客户端 MongoClient(addresses),这个可以传入多个mongos 的地址作为mongodb集群的入口,并且可以实现自动故障转移,但是负载均衡做的好不好呢?打开源代码查看:
它的机制是选择一个ping 最快的机器来作为所有请求的入口,如果这台机器挂掉会使用下一台机器。那这样。。。。肯定是不行的!万一出现双十一这样的情况所有请求集中发送到这一台机器,这台机器很有可能挂掉。一但挂掉了,按照它的机制会转移请求到下台机器,但是这个压力总量还是没有减少啊!下一台还是可能崩溃,所以这个架构还有漏洞!不过这个文章已经太长了,后续解决吧。
