elasticsearch集群
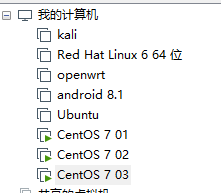
本文准备搭建三节点 elasticsearch集群,elasticsearch版本:6.5.4,因此这里准备了三台 Linux CentOS 7机器,只需要简单通过Vmware克隆两台CentOS 7机器,并分别设置静态ip即可。
三台 CentOS 7分别启动elasticsearch

node-1
192.168.92.90:9200
node-2
192.168.92.91:9200
node-3
192.168.92.93:9200
并将三台Centos7主机名分别设置nodenode01,node02和node03,区别三台centos7机器
2
3
4
5
6
7
8
9
10
11
12
13
14
15
16
17
18
19
20
21
22
23
24
25
26
27
28
29
30
31
32
33
34
35
36
37
38
39
40
41
42
43
2[elsearch@localhost ~]$ hostnamectl set-hostname node01
3node01
4[elsearch@node01 ~]$ ifconfig
5ens33: flags=4163<UP,BROADCAST,RUNNING,MULTICAST> mtu 1500
6 inet 192.168.92.90 netmask 255.255.255.0 broadcast 192.168.92.255
7 inet6 fe80::b889:1772:c306:ef8f prefixlen 64 scopeid 0x20<link>
8 inet6 fe80::72e0:4da:118d:13d9 prefixlen 64 scopeid 0x20<link>
9 ether 00:0c:29:07:43:5a txqueuelen 1000 (Ethernet)
10 RX packets 829 bytes 158380 (154.6 KiB)
11 RX errors 0 dropped 0 overruns 0 frame 0
12 TX packets 634 bytes 116833 (114.0 KiB)
13 TX errors 0 dropped 0 overruns 0 carrier 0 collisions 0
14
15#node02主机名设置:
16[elsearch@localhost ~]$ hostnamectl set-hostname node02
17node02
18[elsearch@node02 ~]$ ifconfig
19ens33: flags=4163<UP,BROADCAST,RUNNING,MULTICAST> mtu 1500
20 inet 192.168.92.91 netmask 255.255.255.0 broadcast 192.168.92.255
21 inet6 fe80::b889:1772:c306:ef8f prefixlen 64 scopeid 0x20<link>
22 ether 00:0c:29:84:99:62 txqueuelen 1000 (Ethernet)
23 RX packets 2195 bytes 323930 (316.3 KiB)
24 RX errors 0 dropped 0 overruns 0 frame 0
25 TX packets 466 bytes 52037 (50.8 KiB)
26 TX errors 0 dropped 0 overruns 0 carrier 0 collisions 0
27
28#node03主机名设置:
29[elsearch@localhost ~]$ hostnamectl set-hostname node03
30node03
31[elsearch@node03 ~]$ ifconfig
32ens33: flags=4163<UP,BROADCAST,RUNNING,MULTICAST> mtu 1500
33 inet 192.168.92.92 netmask 255.255.255.0 broadcast 192.168.92.255
34 inet6 fe80::22a3:7ced:1761:de8e prefixlen 64 scopeid 0x20<link>
35 inet6 fe80::b889:1772:c306:ef8f prefixlen 64 scopeid 0x20<link>
36 inet6 fe80::72e0:4da:118d:13d9 prefixlen 64 scopeid 0x20<link>
37 ether 00:0c:29:c9:f0:22 txqueuelen 1000 (Ethernet)
38 RX packets 859 bytes 141277 (137.9 KiB)
39 RX errors 0 dropped 0 overruns 0 frame 0
40 TX packets 619 bytes 147363 (143.9 KiB)
41 TX errors 0 dropped 0 overruns 0 carrier 0 collisions 0
42
43
下面在三台Centos7机器上对应的elasticsearch.yml配置集群
2
3
4
5
6
7
8
9
10
11
12
13
14
15
16
17
18
19
20
21
22
23
24
25
26
27
28
29
30
31
32
33
34
35
36
37
38
39
40
41
42
43
44
45
46
47
48
49
50
51
52
53
54
55
56
57
58
59
60
61
62
63
64
65
66
67
68
69
70
71
72
73
74
75
76
77
78
79
80
81
82
83
84
85
86
87
88
89
90
91
92
93
94
95
96
2#node01的配置:
3cluster.name: es-itcast-cluster
4node.name: node01
5#设置node01为主节点
6node.master: true
7node.data: true
8network.host: 0.0.0.0
9http.port: 9200
10discovery.zen.ping.unicast.hosts: ["192.168.92.90","192.168.92.91","192.168.92.92"] discovery.zen.minimum_master_nodes: 2
11http.cors.enabled: true
12http.cors.allow-origin: "*"
13
14[elsearch@node02 elasticsearch-6.5.4]$ vim config/elasticsearch.yml
15#node02的配置:
16cluster.name: es-itcast-cluster
17node.name: node02
18node.master: true
19node.data: true
20network.host: 0.0.0.0
21http.port: 9200
22discovery.zen.ping.unicast.hosts: ["192.168.92.90","192.168.92.91","192.168.92.92"] discovery.zen.minimum_master_nodes: 2
23http.cors.enabled: true
24http.cors.allow-origin: "*"
25
26[elsearch@node03 elasticsearch-6.5.4]$ vim config/elasticsearch.yml
27#node03的配置:
28cluster.name: es-itcast-cluster
29node.name: node03
30node.master: false
31node.data: true
32network.host: 0.0.0.0
33http.port: 9200
34discovery.zen.ping.unicast.hosts: ["192.168.92.90","192.168.92.91","192.168.92.92"]
35discovery.zen.minimum_master_nodes: 2
36http.cors.enabled: true
37http.cors.allow-origin: "*"
38
39#分别启动3个节点 bin/elasticsearch
40
41[elsearch@node01 ~]# curl 127.0.0.1:9200
42{
43 "name": "node01",
44 "cluster_name": "es-itcast-cluster",
45 "cluster_uuid": "_na_",
46 "version": {
47 "number": "6.5.4",
48 "build_flavor": "default",
49 "build_type": "tar",
50 "build_hash": "d2ef93d",
51 "build_date": "2018-12-17T21:17:40.758843Z",
52 "build_snapshot": false,
53 "lucene_version": "7.5.0",
54 "minimum_wire_compatibility_version": "5.6.0",
55 "minimum_index_compatibility_version": "5.0.0"
56 },
57 "tagline": "You Know, for Search"
58}
59[elsearch@node02 ~]# curl 127.0.0.1:9200
60{
61 "name": "node02",
62 "cluster_name": "es-itcast-cluster",
63 "cluster_uuid": "_na_",
64 "version": {
65 "number": "6.5.4",
66 "build_flavor": "default",
67 "build_type": "tar",
68 "build_hash": "d2ef93d",
69 "build_date": "2018-12-17T21:17:40.758843Z",
70 "build_snapshot": false,
71 "lucene_version": "7.5.0",
72 "minimum_wire_compatibility_version": "5.6.0",
73 "minimum_index_compatibility_version": "5.0.0"
74 },
75 "tagline": "You Know, for Search"
76}
77[elsearch@node03 ~]# curl 127.0.0.1:9200
78{
79 "name" : "node03",
80 "cluster_name" : "es-itcast-cluster",
81 "cluster_uuid" : "_na_",
82 "version" : {
83 "number" : "6.5.4",
84 "build_flavor" : "default",
85 "build_type" : "tar",
86 "build_hash" : "d2ef93d",
87 "build_date" : "2018-12-17T21:17:40.758843Z",
88 "build_snapshot" : false,
89 "lucene_version" : "7.5.0",
90 "minimum_wire_compatibility_version" : "5.6.0",
91 "minimum_index_compatibility_version" : "5.0.0"
92 },
93 "tagline" : "You Know, for Search"
94}
95
96
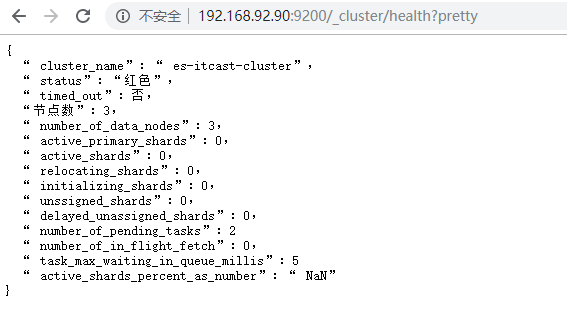
访问任何一个节点,判断是否健康:http://192.168.92.90:9200/_cluster/health?pretty

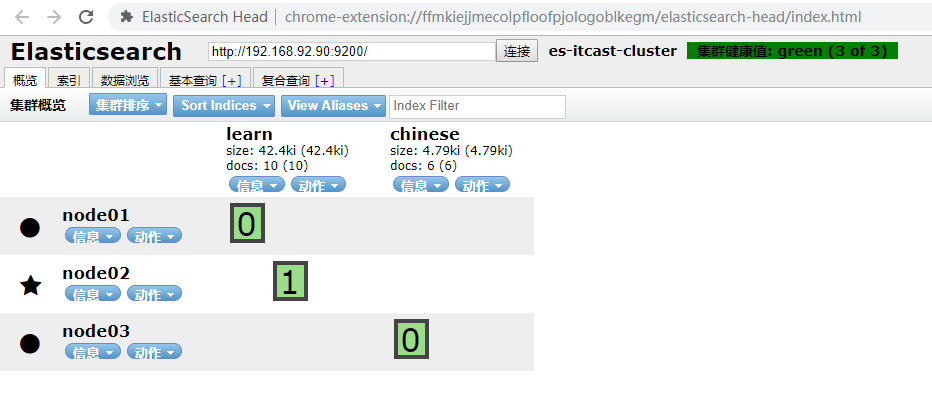
在elasticsearch-head界面管理工具,我们可以看见创建了三节点集群配置成功,

遇到的报错
org.elasticsearch.cluster.block.ClusterBlockException: blocked by: [SERVICE]
解决方法:查看9300端口是否开放
停止firewall
2
3
2
3
org.elasticsearch.discovery.MasterNotDiscoveredException
解决方法:将在三节点中node.master:true设置2个,设置一个无法体现选举的设置思想。
[node01] not enough master nodes discovered during pinging
google 超级久,两个节点的 日志和data 目录没在一个地方
可我没有指定 日志和data 目录,在浪费1个小时多,找到解决方法:
删除elasticsearch安装目录的data文件夹
