Node.js
2. 数据上传
在实际的业务中,我们往往需要接收一些数据,比如表单数据、文件提交、Json上传、XML上传等等。
Node的http模块只对HTTP报文头部进行了解析,然后触发request事件。如果请求中还带有内容部分(比如POST报文,它具有请求头以及请求体),内容部分需要用户自行接收和解析。通过请求头的
Transfer-Encoding和
Content-Length可以判断请求中是否存在内容。
实践:
2
3
4
5
6
7
8
9
10
11
12
13
14
15
16
17
18
19
20
21
22
23
2var hasBody = function (req) {
3 return 'transfer-encoding' in req.headers || 'content-length' in req.headers;
4};
5var server = http.createServer();
6server.on('request', (req, res) => {
7 if (hasBody(req)) {
8 var buffers = [];
9 req.on('data', function (chunk) {
10 buffers.push(chunk);
11 // res.end(Buffer.from(chunk)) //=> name=Errrl&age=20
12 });
13 req.on('end', function () {
14 req.rawBody = Buffer.concat(buffers).toString();
15 res.end(req.rawBody); //=> name=Errrl&age=20
16 });
17 } else {
18 res.end()
19 }
20}).listen(8000, () => {
21 console.log('server is create')
22})
23
(1)表单数据
最常见的数据提交就是通过网页的表单提交数据到服务端或者说是控制端(C层):
2
3
4
5
6
2 <label for="username">Username:</label> <input type="text" name="username" id="username" />
3 <br />
4 <input type="submit" name="submit" value="Submit" />
5</form>
6
默认提交表单,请求头中的Content-Type字段值为
application/x-www-form-urlencoded:

由于它的报文体内容与查询字符串相同:
name=Errrl&age=20
所以解析起来也非常容易:
2
3
4
5
6
7
8
9
10
11
12
13
14
15
16
17
18
19
20
21
22
23
24
25
26
27
28
29
2var querystring = require('querystring')
3var hasBody = function (req) {
4 return 'transfer-encoding' in req.headers || 'content-length' in req.headers;
5};
6
7
8var server = http.createServer();
9server.on('request', (req, res) => {
10 if (hasBody(req)) {
11 var buffers = [];
12 req.on('data', function (chunk) {
13 buffers.push(chunk);
14 });
15 req.on('end', function () {
16 req.rawBody = Buffer.concat(buffers).toString();
17 if (req.headers['content-type'] === 'application/x-www-form-urlencoded') {
18 req.body = querystring.parse(req.rawBody);
19 }
20 res.end();
21 console.log(req.body);
22 });
23 } else {
24 res.end()
25 }
26}).listen(8000, () => {
27 console.log('server is create')
28})
29
结果:

在后续的业务中可以直接访问req.body获取提交表单的数据。
(2)其他格式
除了提交表单数据外,常见的提交还有JSON文件和XML文件等,判断和解析它们的原理比较相似,都是依据Content-Type中的值决定,其中JSON类型的值为application/json,XML的为application/xml。
需要注意的是,在Content-Type中可能还要附带如下的编码信息:
2
2
因此在做判断时,需要注意区分:
2
3
4
5
6
2 var str = req.headers['content-type']||'';
3 return str.split(';')[0];
4}
5
6
1. JSON 文件
如果从客户端提交JSON文件内容,对于Node来说,要处理它是不需要额外的库的,操作如下:
2
3
4
5
6
7
8
9
10
11
12
13
14
15
16
17
18
19
20
21
22
23
24
25
26
27
28
29
30
31
32
33
34
35
36
37
38
39
2var http = require('http');
3var hasBody = function (req) {
4 return 'transfer-encoding' in req.headers || 'content-length' in req.headers;
5};
6var mime = function(req){
7 var str = req.headers['content-type']||'';
8 return str.split(';')[0];
9}
10
11var server = http.createServer();
12server.on('request', (req, res) => {
13 if (hasBody(req)) {
14 var buffers = [];
15 req.on('data', function (chunk) {
16 buffers.push(chunk);
17 });
18 req.on('end', function () {
19 req.rawBody = Buffer.concat(buffers).toString();
20 if (mime(req) === 'application/json') {
21 try {
22 req.body = JSON.parse(req.rawBody);
23 } catch (e) {
24 // 异常内容Lj响应Bad request
25 res.writeHead(400);
26 res.end('Invalid JSON');
27 return;
28 }
29 console.log(req.body)
30 res.end()
31 }
32 });
33 } else {
34 res.end()
35 }
36}).listen(8000, () => {
37 console.log('server is create')
38})
39
2. XML 文件
解析XML文件就稍微复杂一点,需要引入第三方插件
xml2js :
2
3
4
5
6
7
8
9
10
11
12
13
14
15
16
17
18
19
20
21
22
23
24
25
26
27
28
29
30
31
32
33
34
35
36
37
38
39
40
41
2var http = require('http');
3var xml = require('xml2js');
4var hasBody = function (req) {
5 return 'transfer-encoding' in req.headers || 'content-length' in req.headers;
6};
7var mime = function (req) {
8 var str = req.headers['content-type'] || '';
9 return str.split(';')[0];
10}
11
12var server = http.createServer();
13server.on('request', (req, res) => {
14 if (hasBody(req)) {
15 var buffers = [];
16 req.on('data', function (chunk) {
17 buffers.push(chunk);
18 });
19 req.on('end', function () {
20 req.rawBody = Buffer.concat(buffers).toString();
21 if (mime(req) === 'application/xml') {
22 xml.parseString(req.rawBody, function (err, xml) {
23 if (err) {
24 // 异常内容Lj响应Bad request
25 res.writeHead(400);
26 res.end('Invalid XML');
27 return;
28 }
29 req.body = xml;
30 console.log(req.body);
31 res.end();
32 });
33 }
34 });
35 } else {
36 res.end()
37 }
38}).listen(8000, () => {
39 console.log('server is create')
40})
41
XML文件:
2
3
4
5
6
7
8
9
10
11
12
13
14
2<root>
3 <part id = "01" name="选项一">
4 <name>Errrl</name>
5 <age>20</age>
6 <sex>男</sex>
7 </part>
8 <part id="02" name="选项二">
9 <name>Errl</name>
10 <age>22</age>
11 <sex>男</sex>
12 </part>
13</root>
14
结果:

总结:
采用这种类似的方式,无论客户端提交的是什么格式的数据,我们都可以通过这种方式来判断该数据是何种类型,然后采取对应的解析方式进行解析。
(3)附件上传
除了常见的表单和特殊格式的内容提交外,还有一种比较特殊的表单,通常的表单,其内容可以通过urlencode的方式编码内容形成报文体,在发送给服务器,但是业务场景往往需要用户直接提交文件,在前端HTML代码中,特殊表单与普通表单的差异在于该表单中可以含有file类型的控件,以及需要指定表单属性enctype为multipart/form-data,如下所示:
2
3
4
5
6
7
2 <label for="username">Username:</label> <input type="text" name="username" id="username" />
3 <label for="file">Filename:</label> <input type="file" name="file" id="file" />
4 <br />
5 <input type="submit" name="submit" value="Submit" />
6</form>
7
浏览器遇到multipart/form-data表单提交时,构造的请求报文与普通表单的报文完全不同,首先请求头很特殊:
2
3
2Content-Length: 18231
3
它代表本次提交的内容由多部分构成,其中boundary=AaB03x 指的是每每部分内容的分界符,AaB03x是随机生成的一段字符串,报文体的内容通过在它前面添加的–进行分界,报文结束时在它的前后都加上–表示结束。另外Content-Type的值必须确保报文体的长度。
接下来就看看特殊表单提交与普通表单提交的报文区别:
假设上传一个js文件,并进行文件上传,生成的报文如下:
2
3
4
5
6
7
8
9
10
11
2Content-Disposition: form-data; name="username"\r\n
3\r\n
4Jackson Tian\r\n
5--AaB03x\r\n
6Content-Disposition: form-data; name="file"; filename="diveintonode.js"\r\n
7Content-Type: application/javascript\r\n
8\r\n
9 ... contents of diveintonode.js ...
10--AaB03x--
11
提交普通表单,生成的报文如下:
2
3
4
2Content-Disposition: form-data; name="username"\r\n \r\n
3Jackson Tian\r\n
4
文件控件提交时,生成的报文如下:
2
3
4
5
6
2Content-Disposition: form-data; name="file"; filename="diveintonode.js"\r\n
3Content-Type: application/javascript\r\n
4\r\n
5 ... contents of diveintonode.js ...
6
一旦我们知晓报文如何构成,那么解析起来就方便很多。**值得注意的是:**由于是文件上传,那么像普通表单、json或者xml那样先接收内容在进行解析的方式将变得不可接受。所以接收大小、格式未知的数据量时,我们要注意谨慎操作:
2
3
4
5
6
7
8
9
10
11
12
13
14
15
16
17
18
19
20
21
22
23
24
25
26
27
28
29
30
31
32
33
34
35
36
37
38
39
40
41
42
43
44
45
46
47
48
49
50
51
52
53
54
55
56
57
58
59
60
61
62
2var http = require('http');
3var xml = require('xml2js');
4var formidable = require('formidable')
5var hasBody = function (req) {
6 return 'transfer-encoding' in req.headers || 'content-length' in req.headers;
7};
8var mime = function (req) {
9 var str = req.headers['content-type'] || '';
10 return str.split(';')[0];
11}
12
13var server = http.createServer();
14server.on('request', (req, res) => {
15 if (hasBody(req)) {
16 var buffers = [];
17 req.on('data', function (chunk) {
18 buffers.push(chunk);
19 });
20 req.on('end', function () {
21 req.rawBody = Buffer.concat(buffers).toString();
22 if (mime(req) === 'application/json') {
23 try {
24 req.body = JSON.parse(req.rawBody);
25 } catch (e) {
26 // 异常内容Lj响应Bad request
27 res.writeHead(400);
28 res.end('Invalid JSON');
29 return;
30 }
31 console.log(req.body)
32 res.end()
33 } else if (mime(req) === 'application/xml') {
34 xml.parseString(req.rawBody, function (err, xml) {
35 if (err) {
36 // 异常内容Lj响应Bad request
37 res.writeHead(400);
38 res.end('Invalid XML');
39 return;
40 }
41 req.body = xml;
42 console.log(req.body);
43 res.end();
44 });
45 } else if (mime(req) === 'multipart/form-data') {
46 var form = new formidable.IncomingForm();
47 form.parse(req, function (err, fields, files) {
48 req.body = fields;
49 req.files = files;
50 console.log(req.body);
51 console.log(req.files)
52 res.end();
53 });
54 }
55 });
56 } else {
57 res.end()
58 }
59}).listen(8000, () => {
60 console.log('server is create')
61})
62
在此重点介绍的模块是
formidable。首先话不多说 npm install formidable。它是基于流式处理解析报文,将接收到的文件写入系统的临时文件夹中,并返回对应的路径。在后期经常使用。
(4)数据库操作 —- 操作实例
1. 连接MySql数据库
(1)MySQL的基本操作CURD
- C:create 具体方法就是 INSERT INTO
11`
users
11`(
11`id
11`,
11`name
11`) VALUES ([value-1],[value-2])
- U:update 具体方法就是 UPDATE
11`
users
11`SET
11`name
11`='value' WHERE id=1
- R:read 具体方法就是 SELECT
11`
id
11`,
11`name
11`FROM
11`users
11`WHERE 1
- D:delete 具体方法就是 DELETE FROM
11`
users
11`WHERE id=value
注意:R中的where可以加也可以不加,加上就是有条件的阅读,不加就是整体阅读。U、D一定要加上where条件如果不加死定。
(2)安装与连接数据库示例
1. 将数据库表导入到本地数据库中,并命名新的数据库文件test2
链接: https://pan.baidu.com/s/19s13smuDcTeaDTAU0UqG7Q
提取码: 94md
复制这段内容后打开百度网盘手机App,操作更方便哦
npm install mysql
创建 js 文件连接数据库,进行操作:
2
3
4
5
6
7
8
9
10
11
12
13
14
15
16
17
18
19
20
21
2
3var mysql = require('mysql');
4// 连接数据库
5var connection = mysql.createConnection({
6 host:'localhost',
7 user:'root',
8 password:'***', // 填自己的
9 database:'test2'
10});
11// 开启链接
12connection.connect();
13// 简单测试
14var mysql = 'select * from users where id=1';
15connection.query(mysql,function(err,results,fields){
16 console.log(err);
17 console.log(results);
18 console.log(fields);
19})
20connection.end(); // 注意一定要断开资源
21
测试:
node mysql.js 启动
结果:
2
3
4
5
6
7
8
9
10
11
12
13
14
15
16
17
18
19
20
21
22
23
24
25
26
27
28
29
30
31
32
33
34
35
36
37
38
39
40
41
42
43
44
45
46
47
48
49
50
51
52
53
54
55
56
57
58
59
60
61
62
63
64
65
66
67
68
69
70
71
72
73
74
75
76
77
78
79
80
81
82
83
84
85
86
87
88
89
90
91
92
93
2[
3 RowDataPacket {
4 id: 1,
5 name: '路飞',
6 nengli: '超人系橡胶果实',
7 jituan: '草帽海贼团',
8 img: ''
9 }
10]
11[
12 FieldPacket {
13 catalog: 'def',
14 db: 'test2',
15 table: 'users',
16 orgTable: 'users',
17 name: 'id',
18 orgName: 'id',
19 charsetNr: 63,
20 length: 11,
21 type: 3,
22 flags: 20483,
23 decimals: 0,
24 default: undefined,
25 zeroFill: false,
26 protocol41: true
27 },
28 FieldPacket {
29 catalog: 'def',
30 db: 'test2',
31 table: 'users',
32 orgTable: 'users',
33 name: 'name',
34 orgName: 'name',
35 charsetNr: 33,
36 length: 765,
37 type: 253,
38 flags: 4097,
39 decimals: 0,
40 default: undefined,
41 zeroFill: false,
42 protocol41: true
43 },
44 FieldPacket {
45 catalog: 'def',
46 db: 'test2',
47 table: 'users',
48 orgTable: 'users',
49 name: 'nengli',
50 orgName: 'nengli',
51 charsetNr: 33,
52 length: 765,
53 type: 253,
54 flags: 4097,
55 decimals: 0,
56 default: undefined,
57 zeroFill: false,
58 protocol41: true
59 },
60 FieldPacket {
61 catalog: 'def',
62 db: 'test2',
63 table: 'users',
64 orgTable: 'users',
65 name: 'jituan',
66 orgName: 'jituan',
67 charsetNr: 33,
68 length: 765,
69 type: 253,
70 flags: 4097,
71 decimals: 0,
72 default: undefined,
73 zeroFill: false,
74 protocol41: true
75 },
76 FieldPacket {
77 catalog: 'def',
78 db: 'test2',
79 table: 'users',
80 orgTable: 'users',
81 name: 'img',
82 orgName: 'img',
83 charsetNr: 33,
84 length: 765,
85 type: 253,
86 flags: 4097,
87 decimals: 0,
88 default: undefined,
89 zeroFill: false,
90 protocol41: true
91 }
92]
93
2. 项目初始化、安装第三方模块、构建html模板
新建一个目录名称为:模块化-案例;
npm init 初始化
安装项目所需的模块:npm install art-template mysql bootstrap jquery
index.html:
2
3
4
5
6
7
8
9
10
11
12
13
14
15
16
17
18
19
20
21
22
23
24
25
26
27
28
29
30
31
32
33
34
35
36
37
38
39
40
41
42
43
44
45
46
47
48
49
50
51
2<html lang="en">
3
4<head>
5 <meta charset="UTF-8">
6 <title>Hero - Admin</title>
7 <link rel="stylesheet" href="/node_modules/bootstrap/dist/css/bootstrap.css">
8 <style>
9 .hero-list img {
10 width: 50px;
11 }
12 </style>
13</head>
14
15<body>
16 <header>
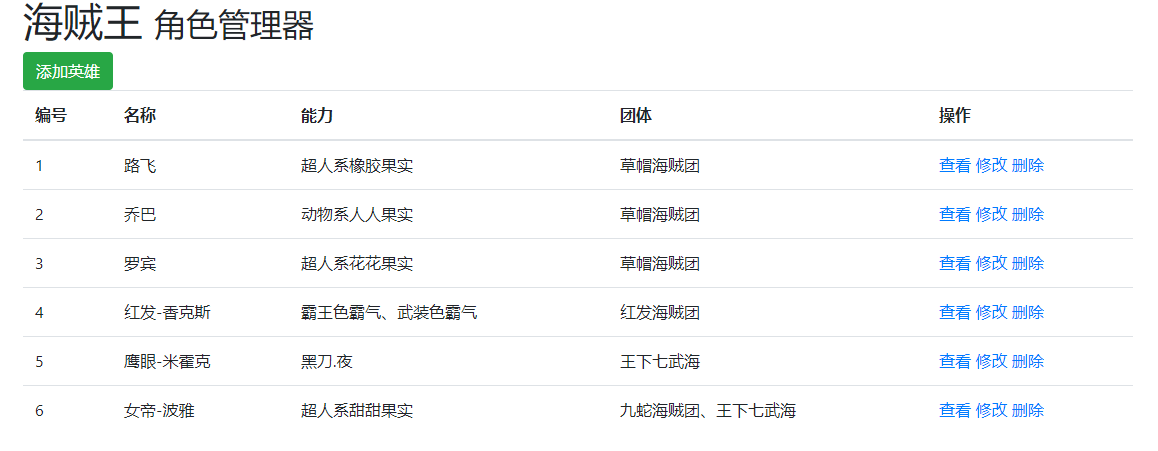
17 <div class="page-header container">
18 <h1>海贼王 <small>角色管理器</small></h1>
19 </div>
20 </header>
21 <div class="container hero-list">
22 <a class="btn btn-success pull-right" href="/add">添加英雄</a>
23 <table class="table table-hover">
24 <thead>
25 <th>编号</th>
26 <th>名称</th>
27 <th>能力</th>
28 <th>团体</th>
29 <th>操作</th>
30 </thead>
31 <tbody id="tbody">
32 {{each data}}
33 <tr>
34 <td>{{$value.id}}</td>
35 <td>{{$value.name}}</td>
36 <td>{{$value.nengli}}</td>
37 <td>{{$value.jituan}}</td>
38 <td>
39 <a href="#">查看</a>
40 <a href="#">修改</a>
41 <a href="#">删除</a>
42 </td>
43 </tr>
44 {{/each}}
45 </tbody>
46 </table>
47 </div>
48</body>
49
50</html>
51
3. 启动项目
(1)创建http服务器并加载静态页面
http.js:
2
3
4
5
6
7
8
9
10
11
2var http = require('http');
3// 获取请求
4var qingqiu = require('./http_请求处理');
5var server = http.createServer();
6server.listen(8080,function(err){
7 console.log('请在浏览器中打开127.0.0.1:8080');
8});
9
10qingqiu.server(server); // 将server对象传进http_请求处理.js中
11
http_请求处理.js:
2
3
4
5
6
7
8
9
10
11
12
13
14
15
16
17
18
19
20
21
2var chuli = require('./http_处理数据');
3// 导出数据(binds方法)
4// binds方法设置监听
5module.exports.server = function(server){
6 server.on('request',function(request,response){
7 var urls = request.url;
8 // 获取请求路径,判断路径请求,
9 if(urls == '/'){
10 // 调用yewu模块获取data
11 var res = chuli.data;
12 response.end(res);
13 }else{
14 // 接收静态资源请求并按照请求路径响应
15 fs.readFile('.'+urls,function(err,data){
16 response.end(data);
17 });
18 }
19 })
20}
21
http_处理数据.js:
2
3
4
5
2template.defaults.root = './';
3var data = template('./index.html',{data:123});
4module.exports.data = data;
5
效果:

(2)动态获取数据
修改 http_处理数据.js:
2
3
4
5
6
7
8
2var sql = require('./http_连接数据库');
3var template = require('art-template');
4template.defaults.root = './';
5var res = template('./index.html',{data:sql.data});
6module.exports.res = res;
7
8
http_连接数据库.js:
2
3
4
5
6
7
8
9
10
11
12
13
14
15
16
17
18
19
2var connection = mysql.createConnection({
3 host: 'localhost',
4 user: 'root',
5 password: '***',
6 database: 'test2'
7});
8
9connection.connect();
10
11var sql = "select * from users";
12
13connection.query(sql,function(error,res){
14 console.log(res);
15 exports.data = res;
16});
17
18connection.end();
19
结果:

存在问题:通过连接数据库查找到的数据,对外导出时,导不出去。这导致模板数据为空。
解决方法:利用回调函数,将数据导出。
(3)解决问题
修改 http_处理数据.js:
2
3
4
5
6
7
8
9
10
11
2var sql = require('./http_连接数据库');
3var template = require('art-template');
4template.defaults.root = './';
5// 利用回调函数 获取linkdb得到的数据
6sql.getdata(function(datas){
7 // 使用模板引擎遍历解析数据
8 // 将解析好的数据导出
9 module.exports.res = template('./index.html',{data:datas});
10});
11
修改 http_连接数据库.js:
2
3
4
5
6
7
8
9
10
11
12
13
14
15
16
17
18
19
20
21
22
23
24
2// 设置连接信息
3var connection = mysql.createConnection({
4 host: '127.0.0.1',
5 user: 'root',
6 password: '',
7 database: 'test2'
8});
9// 打开连接
10connection.connect();
11
12// 将整个查的方法导出
13// 因为我们需要接受一个回调函数
14module.exports.getdata = function (calls) {
15 var sql = 'select * from users';
16 connection.query(sql, function (err, sql_data) {
17 var da = sql_data;
18 // 调用回调函数,将数据当做实参进行函数的回调
19 calls(da);
20
21 })
22 connection.end();
23}
24
结果:
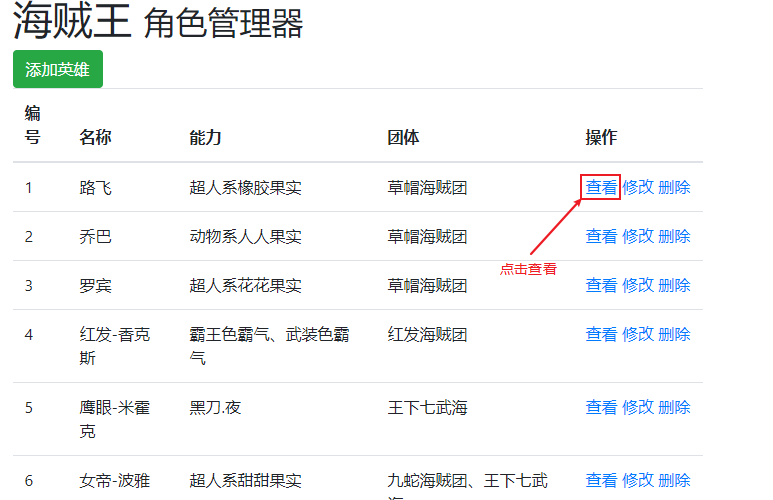
4. 获取单个用户的信息
前提:修改模板 index.html:
2
3
4
5
6
2 <a href="/getone?id={{$value.id}}">查看</a>
3 <a href="/setone?id={{$value.id}}">修改</a>
4 <a href="/delone?id={{$value.id}}">删除</a>
5</td>
6
(1)接受前台的请求
修改** http_请求处理.js:**
2
3
4
5
6
7
8
9
10
11
12
13
14
15
16
17
18
19
20
21
22
2var chuli = require('./http_处理数据');
3// 导出数据(server方法)
4// server方法设置监听
5module.exports.server = function(server){
6 server.on('request',function(request,response){
7 var urls = request.url;
8 if(urls == '/'){
9 // 调用chuli模块获取data
10 var res = chuli.data;
11 response.end(res);
12 }else if(urls == '/get_one'){
13 res.end(1);
14 }else{
15 // 接收静态资源请求并按照请求路径响应
16 fs.readFile('.'+urls,function(err,data){
17 response.end(data);
18 });
19 }
20 })
21}
22
但是,http_请求处理模块,无法处理前后不同类型的请求,需要我们在服务器端接收并处理客户端发送的get以及post请求;
(2)获取请求类型以及参数
GET 请求把所有的内容编码到访问路径中,POST 请求的内容全部都在请求体中。 http.ServerRequest 并没有一个属性内容为请求体,原因是等待请求体传输可能是一件 耗时的工作,譬如上传文件。而很多时候我们可能并不需要理会请求体的内容,恶意的 POST 请求会大大消耗服务器的资源。所以 Node.js 默认是不会解析请求体的,当我们需要的时候, 只能手动来做 。
获取请求类型
2
3
4
5
6
7
8
9
10
11
12
13
14
2var server = http.createServer();
3
4server.on('request', function(request, response) {
5 // 获取请求类型
6 var method = request.method;
7 console.log(method);
8 response.end();
9});
10
11server.listen(8000, function() {
12 console.log(' 请访问http://localhost:8000');
13});
14
获取GET请求参数
2
3
4
5
6
7
8
9
10
11
12
13
14
15
16
17
18
19
20
21
22
2var url = require('url');
3var server = http.createServer();
4
5server.on('request', function(request, response) {
6 // 获取请求类型
7 var method = request.method;
8 if(method=="GET"){
9 //解析请求地址
10 url_obj = url.parse(request.url,true);
11 console.log(url_obj.pathname);
12 console.log(url_obj.query);
13 response.end();
14 }else if(method=="POST"){
15
16 }
17});
18
19server.listen(8080, function() {
20 console.log(' 请访问http://localhost:8080');
21});
22
使用postman进行请求测试:

获取post请求参数
2
3
4
5
6
7
8
2 // url_obj = url.parse(request.url,true);
3 // console.log(url_obj.query);
4
5 //以上代码 无内容,失败
6 // POST请求的内容全部都在请求体中
7}
8
原因:手册中明确说明为了支持各种http应用,Node.js的HTTP API是非常底层的。它只涉及流处理与消息的解析。它把一个消息解析成消息头与消息主体,但不解析具体的消息头或者消息主体。因此我们需要查找更底层的网络实现,node中的基础网络模块net就派上用场了。
模仿上述各类上传代码:
2
3
4
5
6
7
8
9
10
11
12
13
14
15
16
17
18
19
20
21
2 // url_obj = url.parse(request.url,true);
3 // console.log(url_obj.query);
4
5 //以上代码 无内容,失败
6 // POST请求的内容全部都在请求体中
7
8 var data = '';
9 // net 模块中的 net.Socket 提供的data及end事件
10 // 绑定data事件获取数据
11 request.on('data', function (chunk) {
12 data += chunk;
13 })
14 // 绑定end事件,监听数据接受完成
15 request.on('end', function () {
16 // console.log(data);
17 console.log(require('querystring').parse(data));
18 response.end();
19 })
20}
21
5. 获取单个用户的信息
修改 http_请求处理.js 优先判断请求类型
2
3
4
5
6
7
8
9
10
11
12
13
14
15
16
17
18
19
20
21
22
23
24
25
26
27
28
29
30
31
2var url = require('url');
3var chuli = require('./http_处理数据');
4
5module.exports.server = function(server){
6 server.on('request',function(request,response){
7 var urls = url.parse(request.url,true);
8 var method = request.method;
9 // 获取请求路径,判断路径请求
10 if(method == "GET"){
11 if(urls.pathname == '/'){
12 // 调用yewu模块获取data
13 var res = chuli.res;
14 response.end(res);
15 }else if(urls.pathname == '/get_one'){
16 // 获取id值
17 var id = urls.query.id;
18 // 进行传参(关键)
19 // ...
20 }else{
21 // 接收静态资源请求并按照请求路径响应
22 fs.readFile('.'+urls.pathname,function(err,data){
23 response.end(data);
24 });
25 }
26 }else if(method == "POST"){
27
28 }
29 })
30}
31
传参怎么传,这是关键,为了方便操作封装每一个处理数据方法:
修改 http_处理数据.js:
2
3
4
5
6
7
8
9
10
11
12
13
14
15
16
17
18
19
20
21
22
23
24
25
26
27
28
29
2var url = require('url');
3var sql = require('./http_连接数据库');
4var template = require('art-template');
5template.defaults.root = './';
6
7module.exports = {
8 /* 在此模块中接受请求、解析请求、响应客户端 */
9 getAll:function(req,res){
10 sql.select(function(data){
11 var data = template('./index.html', { data: data });
12 /* 响应 */
13 res.end(data);
14 })
15 },
16
17 getOne:function(req,res){
18 /* 交给此模块处理解析请求 */
19 var id = url.parse(req.url,true).query.id;
20 /* 这里又要传递参数所以对 http_连接数据库.js 每个功能进行封装 */
21 sql.where("id="+id).select(function(data){
22 var data = template('./new.html', { data: data });
23 /* 响应 */
24 res.end(data);
25 })
26 }
27
28}
29
修改 http_连接数据库.js:
2
3
4
5
6
7
8
9
10
11
12
13
14
15
16
17
18
19
20
21
22
23
24
25
26
27
28
29
30
31
32
33
2var mysql = require('mysql');
3// 连接数据库
4var connection = mysql.createConnection({
5 host:'localhost',
6 user:'root',
7 password:'***',
8 database:'test2'
9})
10// 开启链接
11connection.connect();
12
13module.exports = {
14 where:function(wh){
15 this.wh = wh; // this表示整个对象
16 return this;
17 },
18 select:function(callback){
19 // 判断是否存在where条件,有就根据where条件查找,没有就整体查询
20 if(this.wh == undefined){
21 /* 写入sql语句 */
22 var sql = "select * from users";
23 }else{
24 var sql = "select * from users where "+this.wh;
25 }
26 /* 根据sql语句进行查询 */
27 connection.query(sql,function(err,sql_data){
28 callback(sql_data);
29 });
30 this.wh = undefined; // 重置where,避免this.wh会影响后面的调用
31 }
32}
33
修改http_请求处理.js:
2
3
4
5
6
7
8
9
10
11
12
13
14
15
16
17
18
19
20
21
22
23
24
25
26
27
2var url = require('url');
3var chuli = require('./http_处理数据');
4
5module.exports.server = function(server){
6 server.on('request',function(request,response){
7 var urls = url.parse(request.url,true);
8 var method = request.method;
9 // 获取请求路径,判断路径请求
10 if(method == "GET"){
11 if(urls.pathname == '/'){
12 /* 传入request,response */
13 chuli.getAll(request,response);
14 }else if(urls.pathname == '/getone'){
15 chuli.getOne(request,response);
16 }else{
17 // 接收静态资源请求并按照请求路径响应
18 fs.readFile('.'+urls.pathname,function(err,data){
19 response.end(data);
20 });
21 }
22 }else if(method == "POST"){
23
24 }
25 })
26}
27
./new.html模板:
2
3
4
5
6
7
8
9
10
11
12
13
14
15
16
17
18
19
20
21
22
23
24
25
26
27
28
29
30
31
32
33
34
35
36
37
38
39
2<html lang="en">
3
4<head>
5 <meta charset="UTF-8">
6 <meta name="viewport" content="width=device-width, initial-scale=1.0">
7 <meta http-equiv="X-UA-Compatible" content="ie=edge">
8 <title>Document</title>
9</head>
10
11<body>
12 <table border="1" cellspacing="0" style="width: 800px;margin: 10px auto;text-align: center">
13 <thead>
14 <th>编号</th>
15 <th>名称</th>
16 <th>能力</th>
17 <th>团体</th>
18 <th>操作</th>
19 </thead>
20 <tbody>
21 {{each data}}
22 <tr>
23 <td>{{$value.id}}</td>
24 <td>{{$value.name}}</td>
25 <td>{{$value.nengli}}</td>
26 <td>{{$value.jituan}}</td>
27 <td>
28 <a href="#">查看</a>
29 <a href="#">修改</a>
30 <a href="#">删除</a>
31 </td>
32 </tr>
33 {{/each}}
34 </tbody>
35 </table>
36</body>
37
38</html>
39
结果:

6. 链式操作原理解析
http_处理数据中链式操作数据库的原理其实就是http_连接数据库中where里的return this;既保存了数据也返回了对象本身。
7. 修改用户信息
怎么修改:
1)获取原数据(GET请求)
2)修改数据(POST请求)
前提
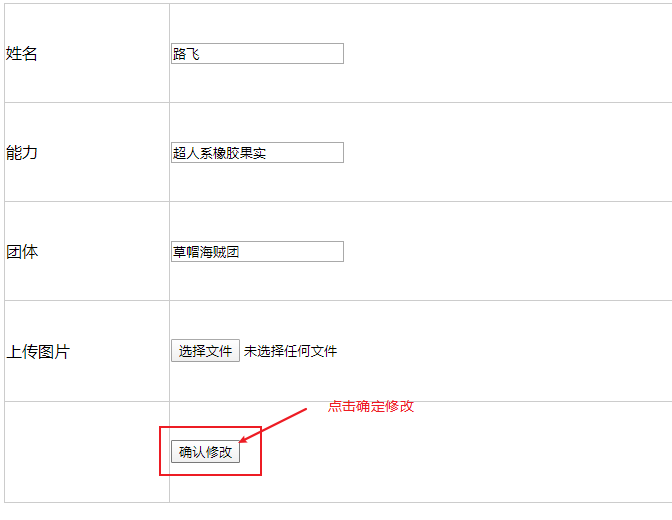
添加新的模板 upuser.html:
2
3
4
5
6
7
8
9
10
11
12
13
14
15
16
17
18
19
20
21
22
23
24
25
26
27
28
29
30
31
32
33
34
35
36
37
38
39
40
41
42
43
44
45
46
47
48
49
50
51
2<html lang="en">
3
4<head>
5 <meta charset="UTF-8">
6 <meta name="viewport" content="width=device-width, initial-scale=1.0">
7 <meta http-equiv="X-UA-Compatible" content="ie=edge">
8 <title>Document</title>
9 <style>
10 table {
11 margin: 0 auto;
12 border-collapse: collapse;
13 width: 800px;
14 height: 500px;
15 }
16
17 td {
18 border: 1px solid #ccc;
19 }
20 </style>
21</head>
22
23<body>
24 <form action="/setone?id={{data[0].id}}" method="post">
25 <table>
26 <tr>
27 <td>姓名</td>
28 <td><input name="name" type="text" value="{{data[0].name}}"></td>
29 </tr>
30 <tr>
31 <td>能力</td>
32 <td><input name="nengli" type="text" value="{{data[0].nengli}}"></td>
33 </tr>
34 <tr>
35 <td>团体</td>
36 <td><input name="jituan" type="text" value="{{data[0].jituan}}"></td>
37 </tr>
38 <tr>
39 <td>上传图片</td>
40 <td><input type="file"></td>
41 </tr>
42 <tr>
43 <td></td>
44 <td><input type="submit" value="确认修改"></td>
45 </tr>
46 </table>
47 </form>
48</body>
49
50</html>
51
(1)http_请求处理.js 中添加路径
2
3
4
5
2else if(urls.pathname == '/setone'){
3 chuli.setone_get(request,response);
4}
5
2
3
4
5
2if(urls.pathname == '/setone'){
3 chuli.setone_post(request,response);
4}
5
**(2)**http_处理数据.js 中封装数据处理方法
2
3
4
5
6
7
8
9
10
11
12
13
14
15
16
17
18
19
20
21
22
23
24
25
26
2 var id = url.parse(req.url, true).query.id;
3 sql.where('id='+id).select(function(datas){
4 var data = template('./upuser.html',{ data: datas });
5 res.end(data);
6 })
7},
8setone_post:function(req,res){
9 var id = url.parse(req.url, true).query.id;
10 /* 底层中获取请求体数据 */
11 var datas = '';
12 req.on('data',function(data){
13 datas+=data;
14 });
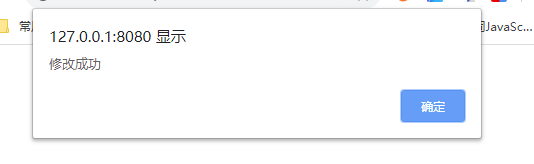
15 req.on('end',function(){
16 sql.where('id='+id).update(require('querystring').parse(datas),function(data){
17 // console.log(data); // 此处返回的是一个OkPacket对象
18 if(data.affectedRows>=1){ // 更新行为
19 var backstr = "<script>alert('修改成功');window.location.href='/'</script>" // 弹出窗口,并回到页面
20 res.setHeader('Content-type','text/html;charset=utf-8');
21 res.end(backstr);
22 }
23 });
24 })
25}
26
**(3)**http_连接数据库.js 中封装数据库方法
2
3
4
5
6
7
8
9
10
11
12
13
14
15
16
17
18
19
20
21
22
2 console.log(data); //=> {name:'路飞',nengli:'超人系橡胶果实',jituan:'草帽海贼团'}
3 var set = '';
4 for(i in data){ //将对象组装成string字符串
5 set+=i+"='"+data[i]+"',";
6 }
7 set = set.slice(0,set.length-1); //string的slice方法,剪切
8 // slice(初始位置,结束位置)
9
10 //=> 结果:name='路飞',nengli='超人系橡胶果实',jituan='草帽海贼团'
11 if(this.wh == undefined){
12 console.log('滚,一定要加where');
13 return;
14 }else{
15 var sql = "update users set "+set+" where "+this.wh
16 }
17 connection.query(sql,function(err,sql_data){
18 callback(sql_data);
19 })
20 this.wh = undefined;
21 },
22
8. 删除用户信息
(1)http_请求处理.js 中添加路径
2
3
4
5
2else if(re_url_pn == '/delone'){
3 chuli.delone(request,response);
4}
5
**(2)**http_处理数据.js 中封装数据处理方法
2
3
4
5
6
7
8
9
10
11
2 var id = url.parse(req.url, true).query.id;
3 sql.where('id='+id).delete(function(data){
4 if(data.affectedRows>=1){
5 var backstr = "<script>alert('删除成功');window.location.href='/'</script>" // 弹出窗口,并回到页面
6 res.setHeader('Content-type','text/html;charset=utf-8');
7 res.end(backstr);
8 }
9 })
10},
11
**(3)**http_连接数据库.js 中封装数据库方法
2
3
4
5
6
7
8
9
10
11
12
13
2 if(this.wh == undefined){
3 console.log('滚,一定要加where');
4 return;
5 }else{
6 var sql = "delete from users where "+this.wh;
7 }
8 connection.query(sql,function(err,sql_data){
9 callback(sql_data);
10 })
11 this.wh = undefined;
12}
13
9. 添加、上传用户信息
待后续,Express框架中提及…….。
